

Oh, there is just nothing quite like the taste of true Southern baking, is there? For me, that sensation immediately brings me back to my kitchen, even though my memories are filled with Italian sunshine, not humid Southern evenings! But when I found this buttermilk pie recipe, I knew I had stumbled upon something truly timeless. It’s the ultimate comfort dessert, blending the simplest ingredients into something magical. We are talking about that dreamy, creamy, slightly tangy custard nestled in a flaky blanket. My passion, as you know, is honoring time-honored recipes, and this one just sings of tradition and pure, unadulterated deliciousness. Trust me, this pie is practically baking magic!
Why This Classic Buttermilk Pie Recipe is Southern Comfort Food
When I look for a recipe that truly feels like a warm hug, I always turn to the classics. This buttermilk pie isn’t just a dessert; it’s an instant trip back to simpler times, the very definition of Best Southern Desserts. It carries that beautiful weight of history, feeling just as right today as it did when it was first concocted in a farmhouse kitchen—it’s truly a wonderful Grandma’s Pie Recipe!
What makes it so soulful? It’s the pure honesty in the ingredients. Unlike fussier desserts, this one relies on simple elegance. I see it as the perfect centerpiece for a big Dessert for Sunday Dinner, bringing everyone together just by smelling the oven.
Achieving the Perfect Tangy Sweet Pie Texture
This is where the *magic* really happens in a buttermilk pie. You need that beautiful edge where sweet meets tart. If it’s too sweet, it tastes like straightforward sugar; if it’s too tangy, well, it’s just sharp!
The secret lies in that cultured tang from the buttermilk. It cuts beautifully through the sugar and richness of the eggs and butter. This balance is what gives you that melt-in-your-mouth sensation, the signature characteristic of a truly great Tangy Sweet Pie. Too much of one, and you lose that perfect harmony we’re aiming for!
Simple Custard Pie Ingredients You Already Have
I adore recipes that don’t require a specialized trip to the store, and this is certainly one of them. When building a Simple Custard Pie, you often find items already waiting in your fridge or pantry. Sugar, flour, eggs, butter—you probably have those staples right now!
The star, of course, is the buttermilk, but even if you run out, I’ve got a little trick for you later on how to whip up a quick substitute! That’s the beauty of old-fashioned baking—being resourceful. If you enjoy pantry-staple recipes that shine, you might also love my creamy old-fashioned stovetop rice pudding, which relies on similar humble beginnings!
Ingredients for Your Homemade Buttermilk Pie
Listen, when you are dealing with such a simple, classic dessert like a buttermilk pie, the quality and clearness of your ingredients list absolutely matter. There are no complex spices or fancy extracts to hide behind here; we need precision!
This recipe is the gold standard for a Homemade Buttermilk Pie because these components come together so beautifully. Remember, clarity prevents heartache later, so pay attention to how I’ve listed these preparations!
- 1 (9-inch) unbaked pie crust – make sure it’s ready to go into the oven!
- 1 1/2 cups granulated sugar – measure this accurately, please!
- 3 tablespoons all-purpose flour – this is our secret to a stable, non-weeping filling.
- 1/4 teaspoon salt – never skip the salt, it balances that sweetness!
- 1 cup buttermilk – cold is fine for mixing, but make sure it’s quality buttermilk.
- 1/2 cup unsalted butter, melted – make sure it cools just slightly before adding it in!
- 2 large eggs, lightly beaten – don’t whisk them into a foam, just break the yolks!
- 1 teaspoon vanilla extract – give it a good sniff before adding it; it should smell strong!
See? Pure, straightforward goodness. Using an amazing flaky crust—whether purchased or made with love—is half the battle won for this kind of From Scratch Pie Filling.
Tips for a Flaky Crust Pie Success
You could have the best custard filling in the world, but if your crust ends up sad and soggy, well, that’s just heartbreaking, isn’t it? For a proper Southern experience, we absolutely must have that wonderful contrast: silky filling against a crisp, flaky crust pie!
Whether you are making your crust from scratch—and I applaud your ambition!—or using a good quality store-bought one, the handling matters immensely before that liquid filling goes in. My one big piece of advice here is to make sure that crust is well-chilled until the very last second. Cold butter or cold shortening creates those little pockets of steam that give you those beautiful flakes later on. Don’t coddle it, but respect the chill!
If you’re using a single, unbaked bottom crust, give it a quick blind bake if you feel nervous about a soggy bottom. I don’t always do it for this specific pie because the custard seals things up nicely, but for extra peace of mind, give it about 10 minutes at 375°F until it just begins to set. Pull it out, let it cool for five minutes, and then you are ready to pour in that beautiful filling.
Remember, even a slightly cracked crust baked nicely will taste amazing once smothered in that creamy filling. If you’re interested in mastering homemade pastry, I recently shared the secrets to my easy homemade breadsticks recipe, where I go into a lot more detail about handling dough!
How to Make the Best Southern Buttermilk Pie Filling
Alright, take a deep breath because this part is pure buttermilk pie joy. We are moving past the holding pattern of the crust and getting into the heart of the dessert—that silky, gorgeous filling. This is where we ensure we get the smoothest From Scratch Pie Filling possible, and that means no lumps allowed!
My first big secret, which I learned the hard way after scraping gritty sugar from the bottom of a bowl, is to always, *always* combine your dry ingredients first. Don’t just dump everything in. We need a thorough whisking of the sugar, the flour—yep, that’s the stabilizer—and the salt.
- Whisk those three dry items together until they look perfectly uniform. This distributes the flour evenly so it can properly thicken the custard without leaving you with little white pockets later.
- Next, we introduce the buttermilk. Add it slowly while whisking gently. You want it incorporated, but we aren’t trying to whip air in yet—this is a custard base, not a meringue!
- Once that’s smooth, drizzle in your slightly cooled melted butter. Butter adds richness and ensures that wonderful mouthfeel. Whisk until fully combined.
- Last, gently fold in your lightly beaten eggs and the vanilla extract. Remember, those eggs are just there to bind the custard structure. If you beat too hard here, you’ll get bubbles that might pop and cause cracks on top later. Go slow and steady!
The mixture should look thin, smooth, and almost liquidy. Don’t panic! That’s exactly right for a buttermilk pie. It sets magically in the oven.
Baking with Buttermilk: Why It Works
So, why buttermilk instead of just regular milk? That’s the genius of this Southern Custard Pie! The acidity in the buttermilk interacts with the eggs and the flour in such a delicate way. It helps tenderize the structure just a bit while giving us that signature, bright, slightly tart flavor. It cuts through all that sweetness, preventing the pie from tasting heavy or cloying.
If you skip the buttermilk, you just get a standard sweet custard pie, which is fine, but it isn’t *this* pie. That tanginess pushes the flavor profile right where it needs to be to complement a flaky crust. It’s what makes people ask for the recipe every single time!
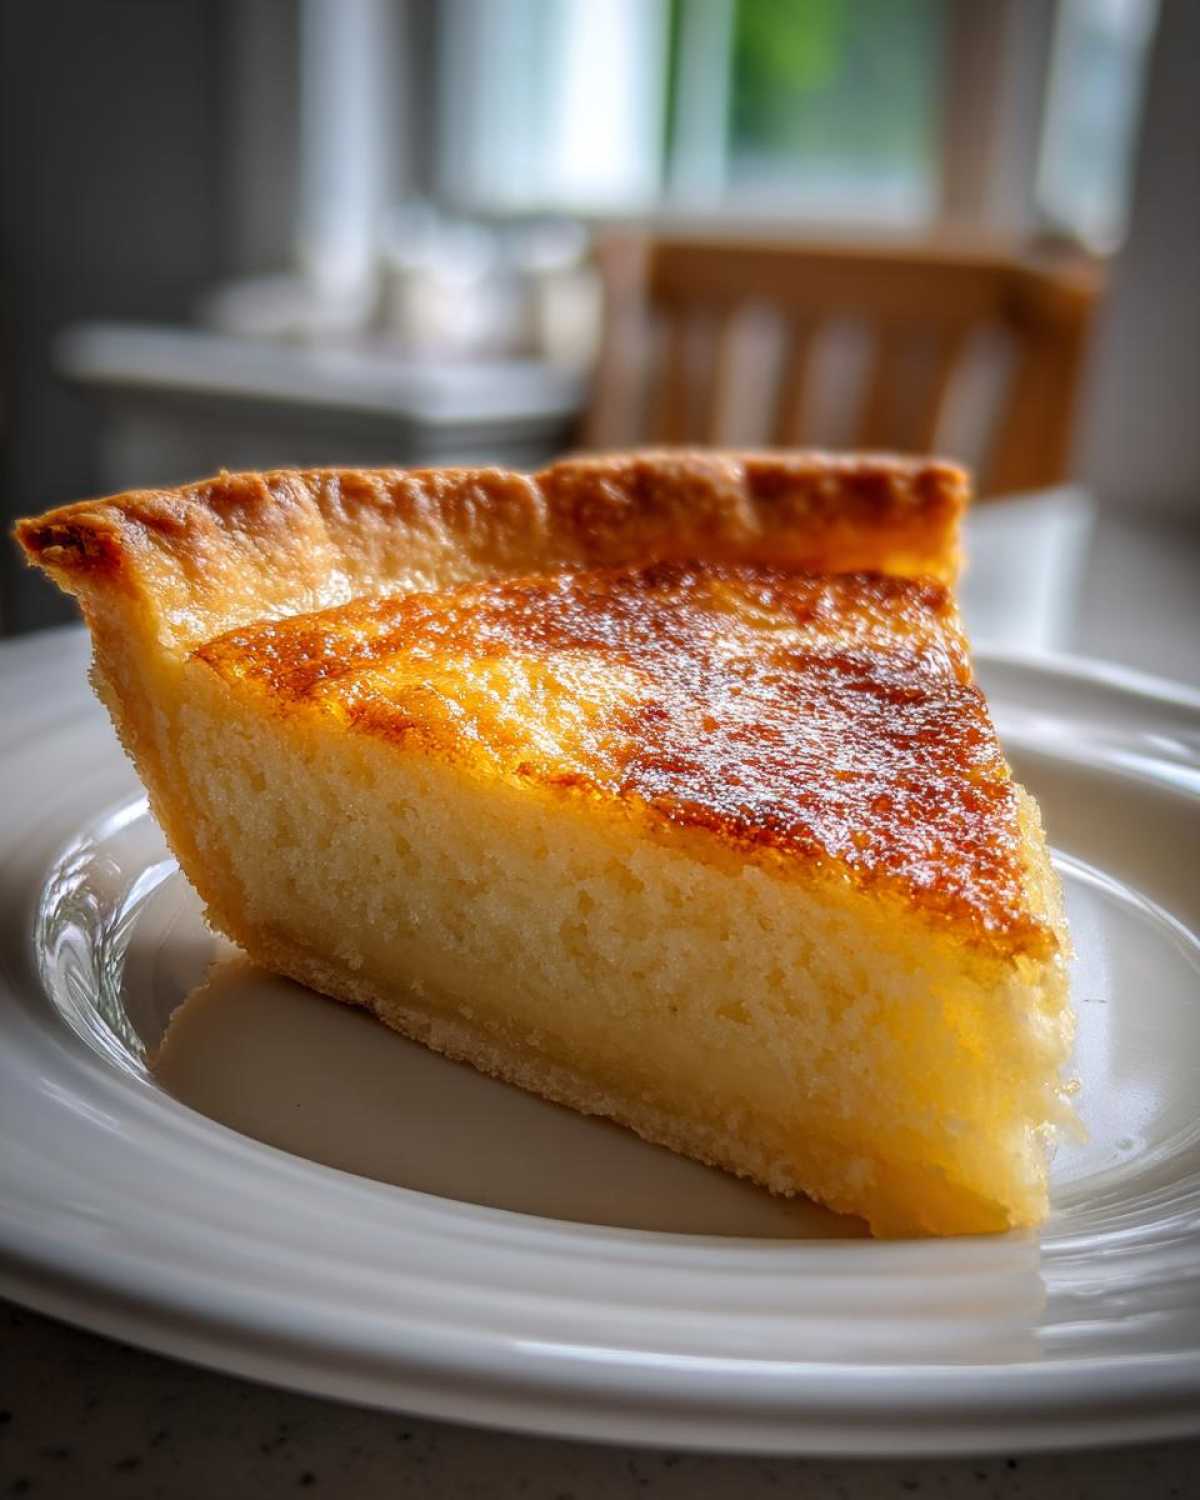
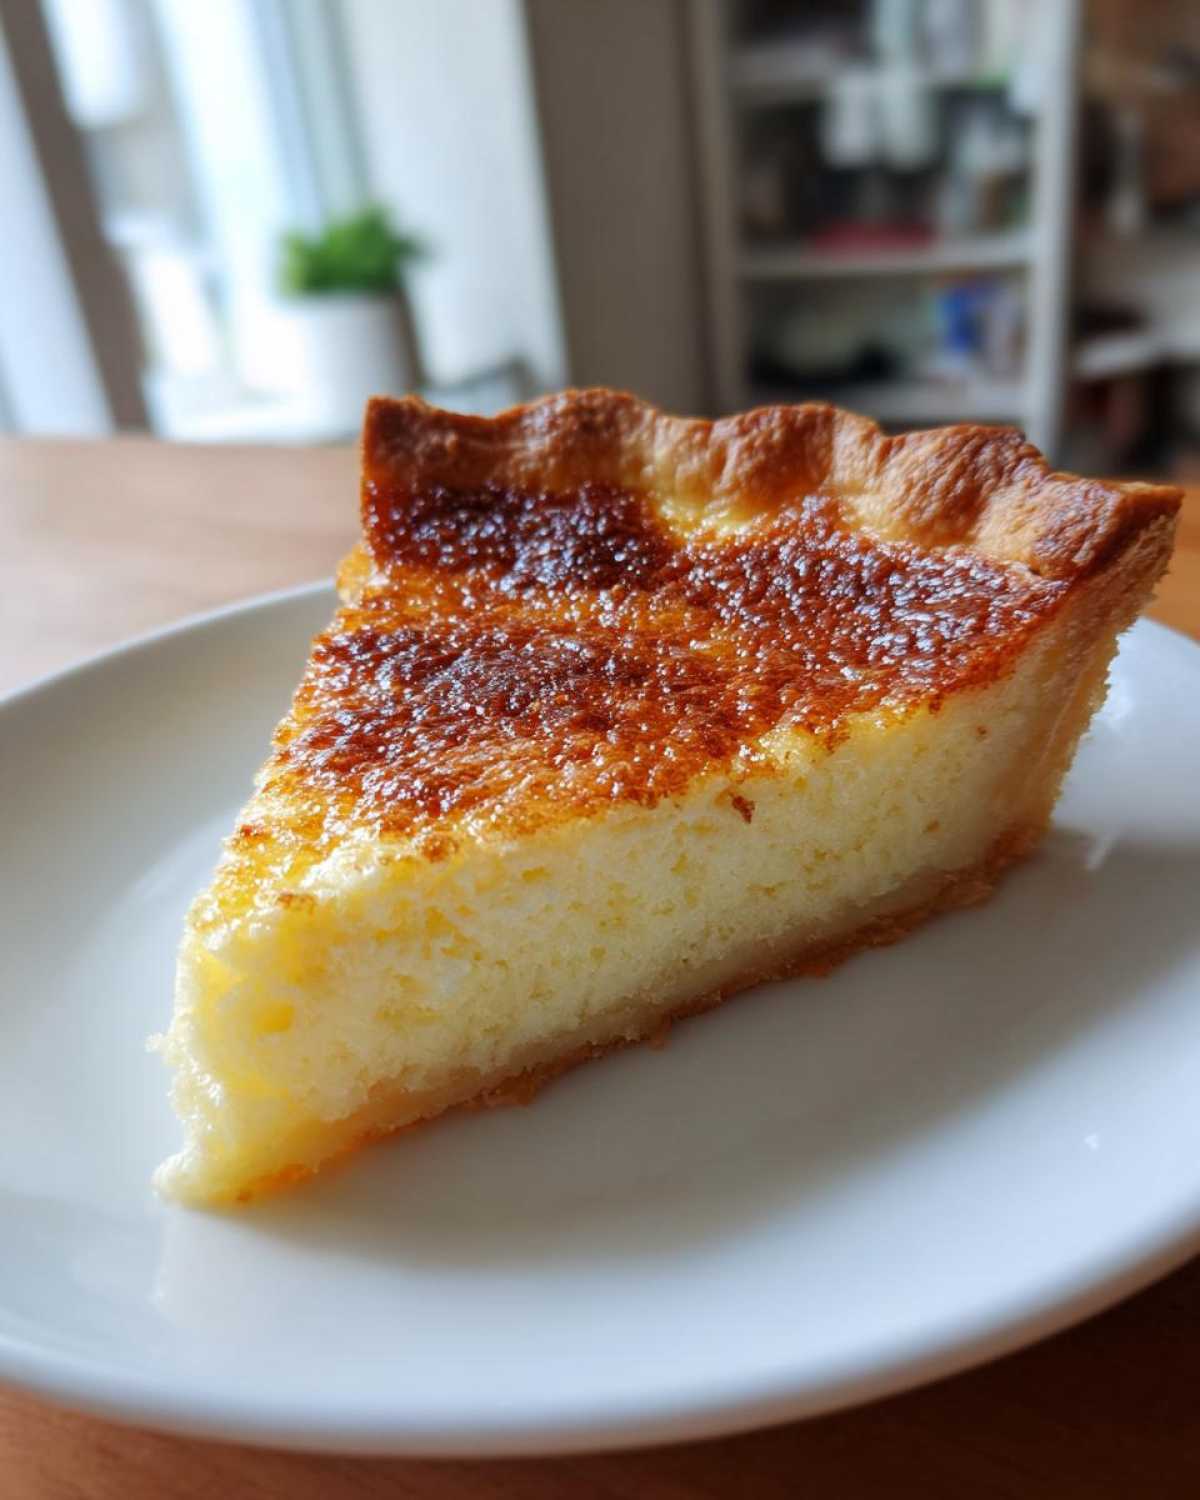
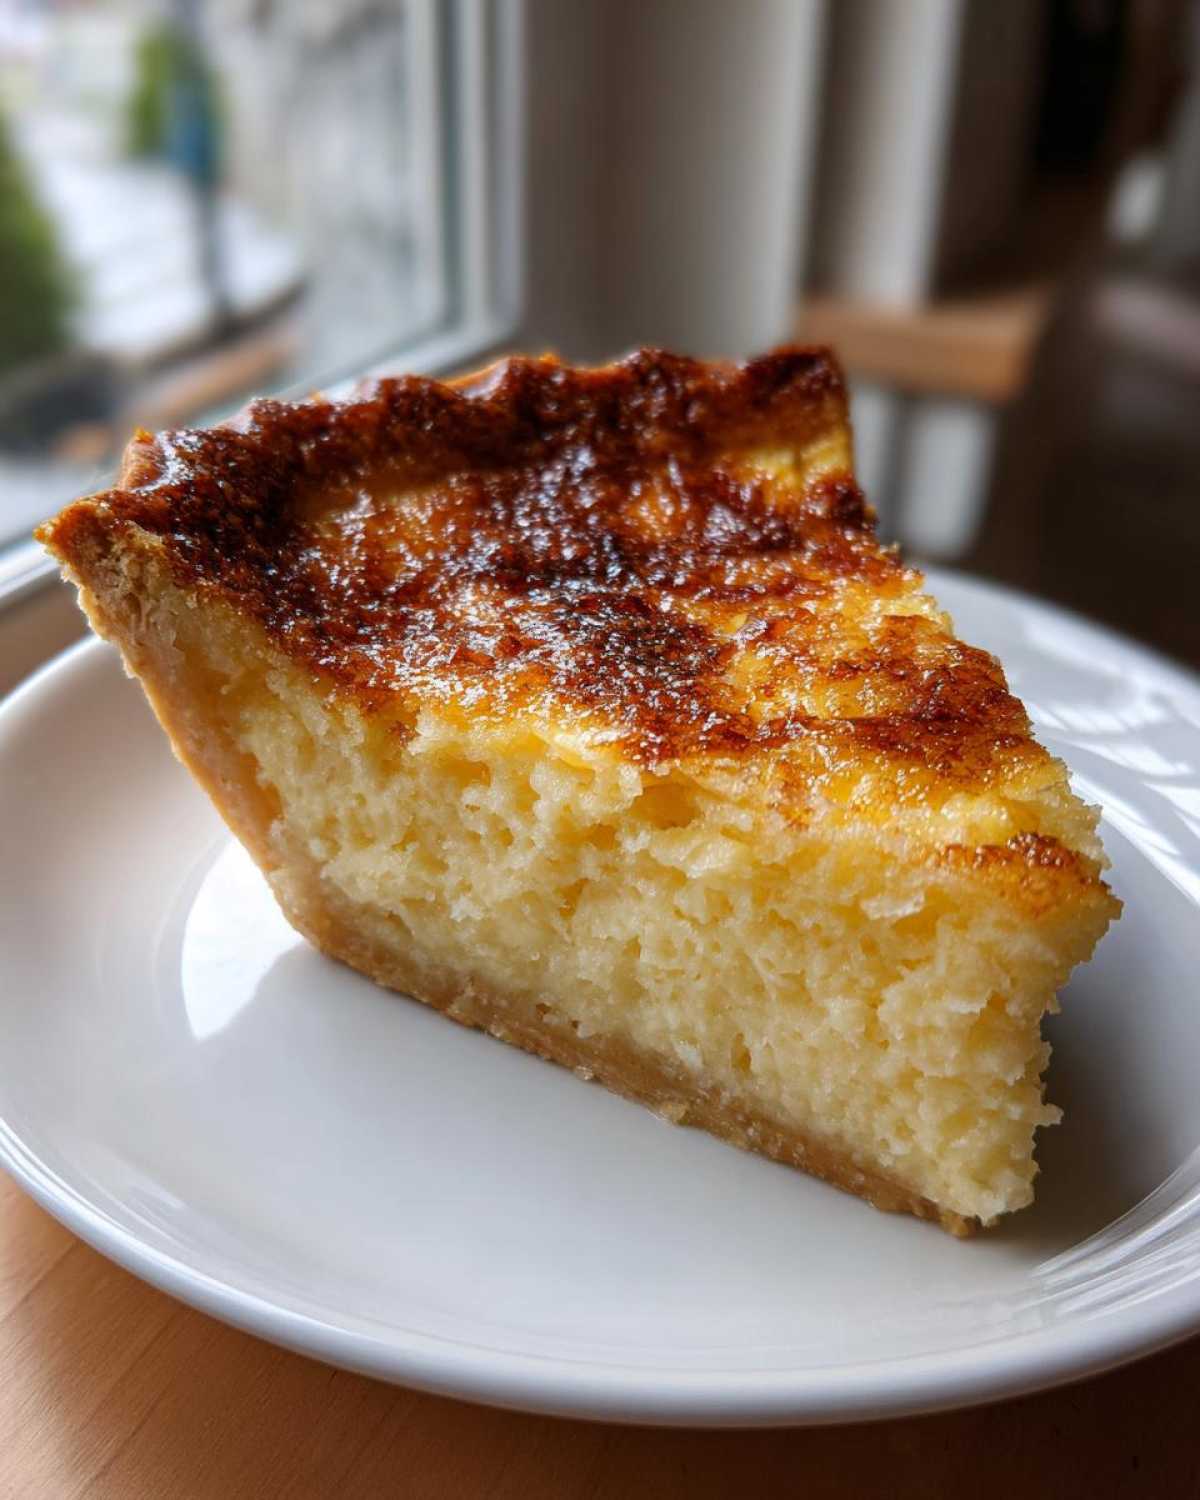
Baking Instructions for a Golden Brown Pie Top Dessert
This is the moment of truth, isn’t it? We’ve done all the careful mixing—remember, gentle folding is key for our **buttermilk pie** filling—and now we need to treat that delicate custard right in the oven. Baking this pie correctly is what guarantees that beautiful, slightly caramelized, Golden Brown Pie Top Dessert and guarantees the center sets just perfectly.
First things first: Make sure your oven is ready to go. It needs to be fully preheated to 350 degrees F (175 degrees C). An oven that isn’t hot enough will cause the filling to soak into that beautiful crust we worked so hard on, giving us a sad, soggy bottom. Preheating properly is step one for success!
- Gently place your pie—with the filling poured into that unbaked crust we prepared—onto the center rack of your preheated oven.
- Bake for about 40 to 50 minutes. Now, don’t just walk away! You need to watch it carefully, especially toward the end.
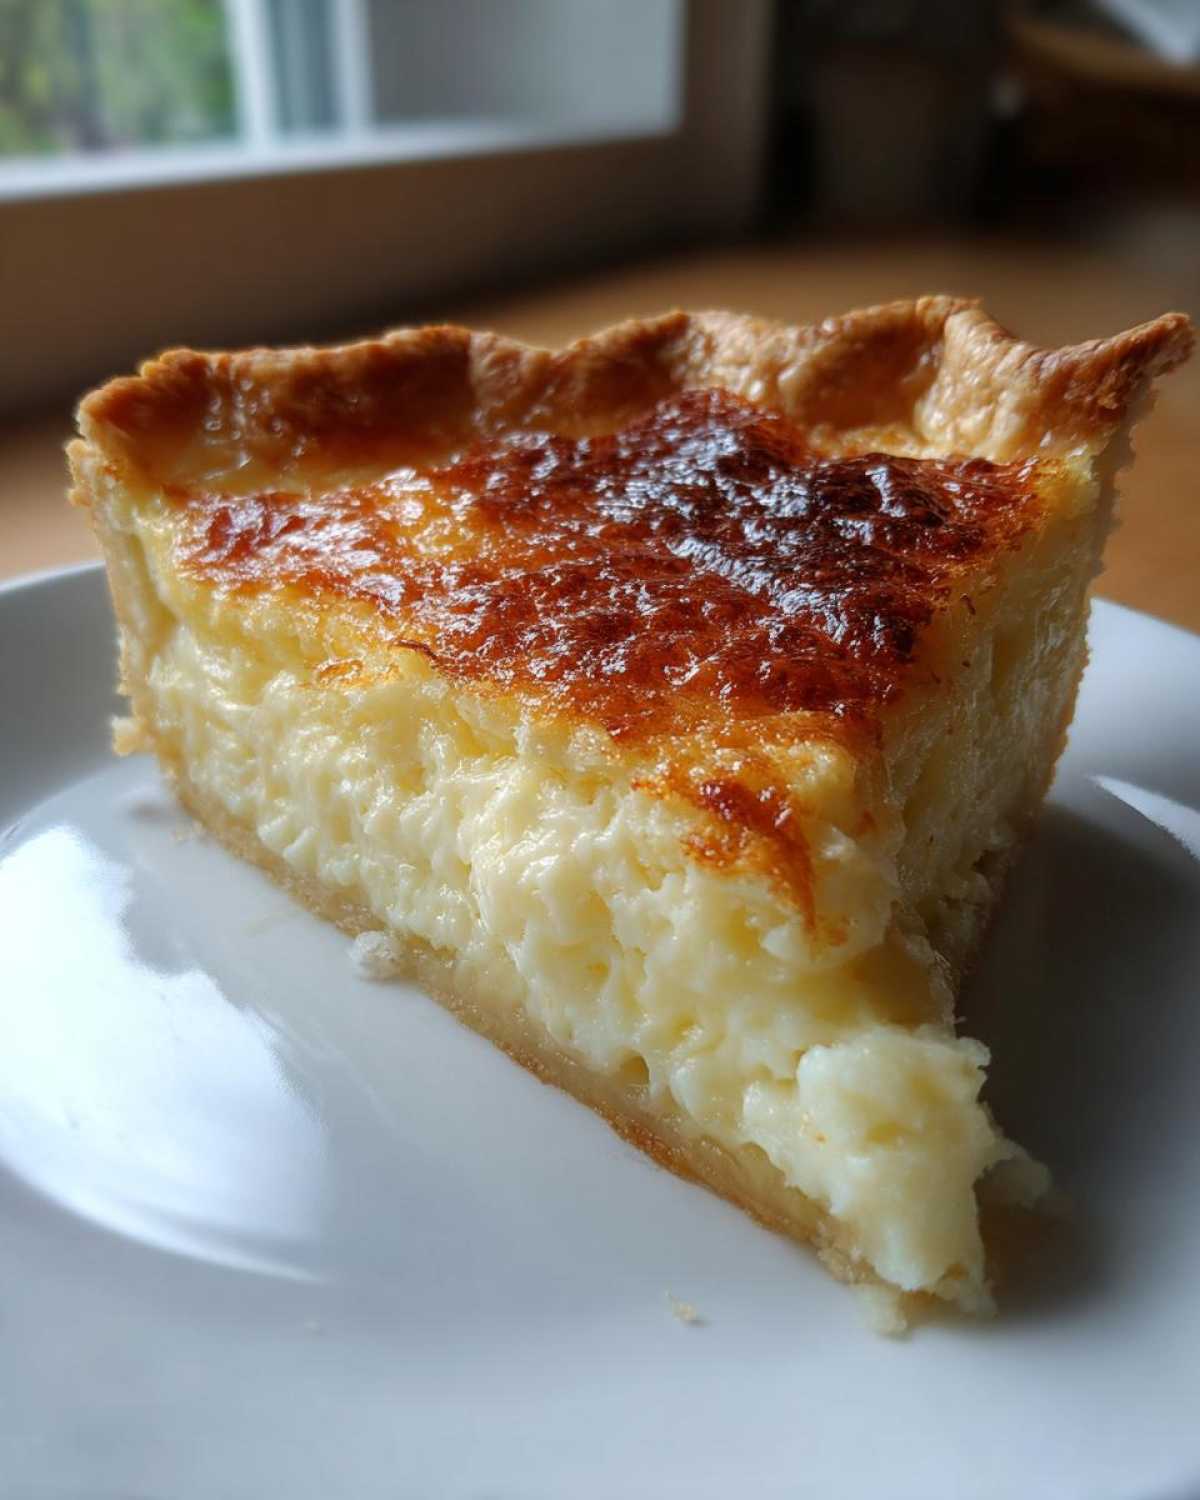
- What am I looking for? The edges of the filling should look mostly firm, but the very center should still have a slight, gentle jiggle when you nudge the rack. It needs that wobble!
- If you notice the crust rim starting to get too dark before the custard is set, just run to the kitchen and quickly wrap that delicate edge with a strip of aluminum foil. That protects the crust while the inside finishes cooking.
- When you see that lovely, rich golden brown shade start to spread across the top, it’s time! Pull that beautiful buttermilk pie out. You can check the linked Southern Buttermilk Pie recipes for visual confirmation; everyone wants that lovely color!
Now, and this is non-negotiable, you must let it cool completely on a wire rack. I know you want to slice into it right away, but the pie is still cooking as it cools. If you cut it too soon, that beautiful custard will turn into a puddle. We want elegance here, not soup! If you are looking for other slow-baked, wonderful treats, check out my recipe for moist vanilla cake; patience pays off in baking!
Troubleshooting Common Buttermilk Pie Issues
Oh, don’t you worry if your first attempt at a classic buttermilk pie doesn’t look exactly like the magazine photo! This is true for any custard pie, especially when you are dealing with something as sensitive as eggs and acid. Don’t toss it! We can usually fix these quirks, or at least learn from them for next time. I’ve certainly run into my own kitchen dramas over the years!
The two biggest headaches I hear about when folks try this Southern Custard Pie are weeping custard and cracking tops. Let’s tackle those head-on so you can achieve that smooth perfection.
Why is my custard weeping or releasing liquid? (Weeping)
Weeping happens when the custard separates a bit during cooling, usually leaving a syrupy layer underneath the set top. For my Old Fashioned Pie Recipe, this usually comes down to one thing: having too much sugar or not enough stabilizer.
Did you measure that sugar exactly? Sugar is hydrophilic, meaning it loves water, and if you have too much, it pulls moisture out of the eggs as it cools, causing the separation. Also, double-check that three tablespoons of flour! That flour is binding everything together. If you are missing even a teaspoon of that flour, you risk weeping. Next time, make sure your dry items are whisked incredibly well before adding any liquid!
Why did my Buttermilk Pie crack on top?
Cracking almost always relates to heat shock or too much air in the filling. Remember how I told you to gently fold in those beaten eggs? If you whip them vigorously, you beat in tons of air. When that air hits the hot oven, it expands rapidly, and when it cools, it contracts too fast, causing that beautiful surface to split wide open. Think slow and steady when mixing in the eggs for this Simple Custard Pie.
Another cause? Overbaking! If you pull the pie when the center is completely solid, it means the eggs cooked way past their needed temperature. You want that little jiggle—that’s residual heat doing the final setting on the cooling rack! Don’t forget to use that foil trick if the top is browning too fast before the center is set.
Fixing a Soggy Bottom Crust
Oh, the nemesis of every filled pie! A soggy bottom on your beautiful buttermilk pie is usually from moisture seeping up from the filling before the crust has a chance to set. This is why I always recommend making sure your pie plate and crust are nice and cold going into the oven. Cold fat creates a steam barrier!
If you find this is a chronic issue in your oven, you have two great options. First, place your pie dish on the lowest rack for the first 20 minutes of baking; lower heat exposure helps ensure the bottom gets hot enough to cook quickly. Second, you can use a light egg wash brushed onto the unbaked crust before you pour the filling in—that creates a waterproof layer! It’s all about creating layers of protection for that flaky crust pie!
Serving Suggestions for Your Classic Buttermilk Pie
Now that you have wrestled your majestic, golden-brown buttermilk pie out of the oven and let it cool—patience is a virtue, my friend!—it’s time for the fun part: how to serve this masterpiece. A slice of this pie deserves more than just a plate; it deserves a presentation!
For me, this pie screams cozy elegance. It fits so perfectly into that lovely “Sunday dinner” tradition. While some folks get tempted by adding things like nuts, remember, this classic version shines when its simple, creamy texture is allowed to speak for itself. It’s already a star!
The Essential Topping: Whipped Cream!
If you look around at almost any great Southern recipe for this pie, you’ll see one thing pop up again and again: whipped cream! A big, billowy cloud of freshly whipped cream is just the perfect counterpoint to that sweet, tangy custard. It adds lightness and a fresh dairy flavor that makes every bite feel brand new.
Don’t buy the canned stuff, please! It takes two minutes to make real whipped cream. Just take heavy whipping cream, a little powdered sugar (just enough to sweeten it lightly—we don’t want to overpower the pie!), and a tiny splash of vanilla. Whip it until it holds soft peaks. You want peaks that slump just a little bit when you lift the whisk—that’s the perfect texture for dolloping onto that slice of perfection.
Serving Temperature Matters
This is a tricky one! Some families swear by eating this pie slightly warm, and honestly, I can’t blame them. When it’s just slightly warm (not hot, or it will collapse!), the crust is so delightful and the filling is extra custardy. You might try that for a few lucky family members!
However, for the neatest slices, room temperature is usually best after it has fully set overnight. If you serve it cold from the fridge, the butter in the filling firms up too much, and you lose some of that beautiful melt-in-your-mouth quality. So, take it out of the fridge about 30 minutes before slicing. It’s the sweet spot between firm structure and creamy texture.
Pairing with Fresh Fruit Accents
If you absolutely feel the need for a complementary flavor, keep it bright and simple. Citrus or berries are your friends here. A small side of fresh raspberries or perhaps a light macerated strawberry topping works beautifully because their sharpness echoes the tanginess provided by the buttermilk.
Avoid heavy sauces or anything overly rich; this pie is already decadent in its simplicity! For more inspiration on how to use that wonderful buttermilk in other breakfast favorites—like my fluffy pancakes recipe—be sure to check out my other kitchen adventures!
Storage and Make-Ahead Tips for Your Buttermilk Pie
Now that you’ve successfully navigated the baking process for your perfect buttermilk pie, let’s talk about keeping that beautiful custard in prime condition. Unlike cake, custard pies need a little extra respect when it comes to cooling and storage. If you want that melt-in-your-mouth texture to last, you have to let it cool properly first!
This pie really shines when served the day it’s made because the crust is at its flakiest, but let’s be real—we usually bake these beauties ahead of time for gatherings. So, here is my tried-and-true method for keeping your Homemade Buttermilk Pie tasting like it just came out of the oven.
The Crucial Cooling Stage
You cannot rush this step, or you risk weeping, cracking, or simply a messy slice! Once your pie comes out of the oven, you need to let it cool down completely at room temperature on a wire rack. I know it’s hard to resist, but you need to wait until it is fully cooled—this usually takes at least two to three hours, depending on how warm your kitchen is.
Why? As the pie cools slowly, the egg and flour structure tightens up the custard. If you rush it into a cold fridge while it’s still warm, the sudden temperature shift can cause the custard to contract too quickly, usually resulting in cracking or moisture pooling beneath the surface. Be patient; this resting period is just as important as the baking!
Refrigerating for Later Enjoyment
Once your Classic Buttermilk Pie is completely cool—I mean, room temperature—you can cover it loosely and move it to the refrigerator. A loose covering is important; if you seal it tightly right away, condensation builds up, and that moisture will soften your beautiful crust from the top down.
I always say this pie lasts beautifully for about three days refrigerated when covered lightly. If you are worried about the crust getting too soft, you can carefully cover just the filling with plastic wrap, only placing a light cover over the crust itself. Remember the notes from the recipe: it tastes best when you pull it out about 30 minutes before serving so it loses that refrigerator chill!
Make-Ahead Strategy for Convenience
If you are hosting a big luncheon or need to prep for a holiday, you can absolutely make your buttermilk pie ahead of time! The best strategy for this Easy Buttermilk Dessert is to bake it completely the day before you need it. Once it is fully cooled and set in the fridge, it travels well and keeps beautifully overnight.
Can you prepare the filling ahead? Yes, you can mix all your ingredients (sugar, flour, eggs, etc.) except the buttermilk and melted butter. Keep those dry ingredients mixed and the wet ingredients measured separately. Then, the morning of baking, just mix everything together as directed and pour it into your shell. Since the filling components are stable, this cuts down on your active prep time right before serving!
Frequently Asked Questions About This Old Fashioned Pie Recipe
I always get so many wonderful questions after sharing this buttermilk pie recipe! It’s so lovely to see everyone embracing this piece of Southern baking history. Here are some of the most common things I hear from fellow bakers trying to achieve that perfect, classic custard pie right at home.
Can I use regular milk instead of buttermilk?
Oh, I always get asked this when people are looking for an Easy Buttermilk Dessert but don’t have the specific ingredient on hand! While you *can* use regular milk in a pinch, I really, truly discourage it for this specific recipe. Buttermilk isn’t just there for flavor; it brings essential acidity to help the custard structure. If you absolutely must substitute, try this trick from my grandmother’s resourceful days: take 1 cup of whole milk and stir in 1 tablespoon of white vinegar or fresh lemon juice. Let it sit on the counter for about five minutes until it looks slightly curdled. That mimics buttermilk well enough for a pinch, but honestly, the true tang of a genuine Classic Buttermilk Pie comes from the real thing!
What is the best way to tell when the buttermilk pie is done?
This is the million-dollar question for any custard dessert! You are watching for two main signals on this wonderful Old Fashioned Pie Recipe. First, the edges of the filling should look mostly set and firm, and the top should have that gorgeous, slightly browned, golden color we are aiming for. Second, and this is key, the very center—about a two-inch circle—should still have a slight, gentle jiggle when you carefully move the oven rack.
It should not look liquidy, but it shouldn’t be completely solid either. If it’s solid, it’s already overcooked, and you’ve just missed that perfect window! Remember, it continues to set up beautifully as it cools on the counter. If you’re having trouble visualizing that jiggle, sometimes checking out a few visual guides online helps—you can browse around for tips on buttermilk pie recipes to see what others consider “set.”
Can I add pecans to this buttermilk pie?
That’s a fun idea, turning it into a hybrid treat! You absolutely can add pecans, but you need to remember you are fundamentally changing this from a classic, light buttermilk pie to a buttermilk *pecan* pie, which changes the structure a bit. Pecans are heavy and oily!
If you want to try it, I’d suggest reducing the sugar by about 1/4 cup and folding in about 1 cup of chopped pecans right before you pour the filling into the crust. You might need to add 5-10 minutes onto the baking time since the pecans will weigh the filling down slightly. If you love adding nuts to baked goods, you should see how I use them in my moist date nut bread recipe—they bake up so wonderfully in that context!
Does this recipe need an egg wash on the crust?
For this specific Southern Custard Pie, I usually skip applying an egg wash to the crust before pouring in the filling. The filling itself is liquid enough that it tends to seal the bottom crust as it bakes, giving you a decent barrier against sogginess. However, if you know your crust is historically a bit delicate or you are worried about that bottom layer, a quick brush of a single egg white mixed with a splash of water over the unbaked shell will create a fantastic sealant against moisture. It’s an extra step, sure, but it guarantees a crisp bottom!
Nutritional Estimate for This Tangy Sweet Pie
Now, I’m an Italian cook at heart, and when we make something this wonderful, we aren’t typically reaching for the calculator, are we? We’re reaching for seconds! But because I want you to have all the information you need for your beautiful family gatherings, here is an estimate based on the standard ingredients in this buttermilk pie.
Please remember, this is just a guide, my loves! How you serve it—with mountains of whipped cream or maybe a buttery pecan topping—will change these numbers right away. This is based on 1/8th of the entire pie made exactly as written in the ingredient list.
- Serving Size: 1 slice
- Calories: 350 (A perfectly reasonable number for a slice of heaven!)
- Sugar: 35g
- Fat: 18g
- Saturated Fat: 9g
- Trans Fat: 0g (Thank goodness!)
- Carbohydrates: 45g
- Fiber: 1g
- Protein: 5g
- Cholesterol: 80mg
See? Not too bad for such a rich and fulfilling bite of pure Southern tradition! It’s important to enjoy these moments. Baking brings comfort, and you shouldn’t feel guilty enjoying the fruits (or in this case, the custard!) of your labor. That’s my honest opinion!
Share Your Classic Buttermilk Pie Experience
And just like that, my friends, we have arrived at the most rewarding part! You have conquered the creaming, you have mastered the gentle pour, and you have patiently waited for that magnificent, golden top to appear on your buttermilk pie. You’ve baked a true piece of Southern Comfort Baking!
Now, I would absolutely love, *love*, to hear about it! Food is about community, sharing the warmth, and celebrating those little victories in the kitchen. Did it set perfectly? Did your family devour it before you could get a picture? Tell me everything!
Rate Your Homemade Buttermilk Pie
If you followed along, you now officially know how to make a phenomenal Southern Custard Pie that honors the old ways. If you have a minute, please come back and leave a star rating right below the recipe card! Your feedback helps other bakers feel confident jumping into this recipe.
I always look at the ratings first thing in the morning with my espresso. Seeing those five stars pop up for this recipe truly makes my day. It’s confirmation that the time-honored techniques we honor here at Gourmet Gusto are still delivering pure joy!
Send Me Your Photos and Stories
I mentioned when I started Gourmet Gusto that these recipes tell a story, and now, *you* are writing the next chapter for this buttermilk pie! I desperately want to see how your pies turned out. Did you serve yours with that cloud of fresh whipped cream we talked about? Did you use an all-butter crust?
Please tag me on social media if you share a picture, or better yet, you can send me a private note directly through my contact page. I cherish seeing your beautiful results and reading about the memories you are making over a slice of this delicious, tangy pie.
Thank you so much for baking with me today. I hope this Classic Buttermilk Pie becomes as much a staple in your home as it is in mine. Happy baking, and come back soon for more adventures at the table!
Print
Classic Old-Fashioned Southern Buttermilk Pie
- Total Time: 1 hour 5 min
- Yield: 8 servings
- Diet: Vegetarian
Description
Bake this easy, traditional Southern Buttermilk Pie for a comforting dessert. You get a creamy, tangy custard filling inside a flaky crust, perfect for Sunday dinner or any family gathering.
Ingredients
- 1 (9-inch) unbaked pie crust
- 1 1/2 cups granulated sugar
- 3 tablespoons all-purpose flour
- 1/4 teaspoon salt
- 1 cup buttermilk
- 1/2 cup unsalted butter, melted
- 2 large eggs, lightly beaten
- 1 teaspoon vanilla extract
Instructions
- Preheat your oven to 350 degrees F (175 degrees C). Place your unbaked pie crust into a 9-inch pie plate.
- In a medium bowl, whisk together the sugar, flour, and salt until combined.
- Add the buttermilk, melted butter, lightly beaten eggs, and vanilla extract to the dry ingredients. Whisk until the mixture is smooth and fully incorporated.
- Carefully pour the buttermilk filling into the unbaked pie crust.
- Bake for 40 to 50 minutes. The center should be mostly set, with only a slight jiggle remaining. The top should turn a golden brown color.
- Remove the pie from the oven and let it cool completely on a wire rack. This allows the custard to fully set.
- Serve your pie slightly warm or at room temperature, often with a dollop of fresh whipped cream.
Notes
- For a crispier crust edge, cover the rim of the pie with aluminum foil halfway through baking.
- If you do not have buttermilk, mix 1 cup of whole milk with 1 tablespoon of white vinegar or lemon juice and let it sit for 5 minutes before using.
- This pie tastes best when served the day it is made, but you can store leftovers covered in the refrigerator for up to three days.
- Prep Time: 15 min
- Cook Time: 50 min
- Category: Dessert
- Method: Baking
- Cuisine: American
Nutrition
- Serving Size: 1 slice
- Calories: 350
- Sugar: 35
- Sodium: 250
- Fat: 18
- Saturated Fat: 9
- Unsaturated Fat: 9
- Trans Fat: 0
- Carbohydrates: 45
- Fiber: 1
- Protein: 5
- Cholesterol: 80

Comments are closed.