

Forget those dry, stiff breadsticks you grab from the freezer aisle—we are not settling for that tonight! I swear, getting that impossibly soft, chewy, melting-in-your-mouth texture that haunts your dreams is actually totally doable right here on your kitchen counter. If you’ve ever secretly wished you could snag a whole basket of those famous garlic sticks from your favorite Italian chain, good news: this is our new **Olive Garden Copycat Breadsticks** recipe. I spent way too many weekends fussing over yeast activation and dough hydration, but trust me, getting that yeast happy and proofing correctly is 90% of the magic. Once you nail the dough, everything else is just dipping and sprinkling!
Why You Will Make These Soft & Chewy Breadsticks Again and Again
Listen, I’m not one to be dramatic, but these are seriously the best dinner side dish you’ll ever make. If you need a reason to ditch the store-bought tubes, here are a few reasons why this recipe is going into heavy rotation:
- They are unbelievably soft! Seriously, the chew factor on these breadsticks is unmatched.
- That garlic parmesan butter topping? It sings. I might just eat it with a spoon, don’t judge.
- We’re talking homemade dough that comes together faster than you think—perfect for a weeknight surprise!
- They taste exactly like that restaurant classic you crave, but way better because you know exactly what went into them.
If you ever made my soft, easy skillet naan, you know I love a great dough, and this one is definitely a winner!
Essential Ingredients for Perfect Homemade Breadsticks Recipe
The beauty of these restaurant-style sticks is that they use stuff you probably already have in the pantry, but the *details* matter. Don’t skimp on the warm water temperature—it needs to be between 105 and 115 degrees F, or your yeast won’t wake up! We need both flour and salt for the dough base, plus two different amounts of butter.
Here’s what you need to gather before you start rolling out these amazing breadsticks. If you look at my garlic knots recipe, you’ll see we treat the dough with the same love and attention!
- 1 cup warm water (make sure it’s 105-115 degrees F, please!)
- 2 1/4 teaspoons active dry yeast
- 1 teaspoon granulated sugar (just to feed the yeast, sweetie)
- 2 3/4 cups all-purpose flour, plus a bit more for dusting
- 1 teaspoon salt
- 2 tablespoons unsalted butter, melted (for inside the dough)
- 1/4 cup unsalted butter, melted (this is reserved for the magic topping!)
- 2 cloves garlic, minced super fine
- 1/2 cup grated Parmesan cheese (use the good stuff!)
- 2 tablespoons fresh parsley, chopped finely
Step-by-Step Instructions for Olive Garden Breadsticks Copycat
Alright, time to get our hands dirty! Making the dough is straightforward, but we need to treat our yeast gently—it’s the secret ingredient that makes these breadsticks so light. We’re going to move from mixing to oven preheating pretty quickly, so make sure you have everything ready to go, especially that 1/4 cup of butter for the topping! My trick is to get the topping simmering gently on the stove while the dough starts to rise, so everything is synchronized. If you’ve mastered my soft skillet naan, you know you can handle this dough with confidence!
Activating the Yeast and Mixing the Breadsticks Dough
First thing’s first: wake up that yeast! In a small bowl, pour in your warm water—it should feel warm, not hot, like a baby’s bath (around 110°F is perfect). Whisk in the yeast and that tiny bit of sugar. Let it hang out for about five minutes. If it gets foamy and bubbly on top, that’s your signal. If it doesn’t foam? Dump it and start over; your water was too hot or your yeast is dead! In a big bowl, mix your flour and salt. Then pour in that happy yeast mixture and the first measurement of melted butter (that 2 tablespoons). Just mix it until it looks messy and shaggy.
Kneading and First Rise for Chewy Breadsticks
Now we knead! Turn that shaggy mess onto a lightly floured surface—you don’t want it sticking everywhere. Work that dough for a solid five to seven minutes. Keep pushing, folding, and turning it until it doesn’t feel sticky anymore and it bounces back when you poke it. It should feel smooth and really elastic. Pop the dough into a lightly oiled bowl, give it a swirl so the top is coated. Cover it up tight with plastic wrap or a clean tea towel, and stick it somewhere warm. It needs to double in size, which usually takes about 1 hour, or until it looks puffy and ready for action.
Shaping, Baking, and Applying the Garlic Parmesan Breadsticks Topping
Okay, fire up that oven to 400 degrees F and line a baking sheet with parchment paper now so you’re ready to go. Once the dough has doubled, punch it down gently—that’s satisfying! Divide the dough into 12 equal portions. Take each piece and gently roll it out into a long stick, maybe 8 to 10 inches long; they don’t have to be perfect little soldiers! Lay them onto your sheet. Bake them for just 10 to 12 minutes until they are lightly golden brown. While they are baking, let’s make the magic happen: Melt that remaining 1/4 cup of butter gently in a saucepan. Add your minced garlic and let it cook for just 1 minute until it smells incredible. Pull that off the heat! When the sticks come right out of the oven, brush that amazing **Garlic Parmesan Breadsticks** butter all over them immediately. Then, shower them generously with the Parmesan and parsley. Serve these babies warm!

Expert Tips for Achieving Restaurant Style Breadsticks Texture
I learned the hard way that making bakery-quality breadsticks isn’t just about the ingredients; it’s about technique. Listen to these few things I picked up that truly stop the dough from getting dense and sad. First, never skip the kneading time! That five to seven minutes builds the gluten network, which gives you that characteristic pull and chew rather than a crumbly texture. Don’t worry about your dough tearing a little; pushing it through that kneading process is essential.
Second, about the rising environment: if your kitchen is chilly, your yeast will throw a tantrum and hardly rise. I often turn my oven on for just two minutes, turn it OFF completely, and then put my covered dough in that gently warmed spot. It loves the warmth! This keeps the fermentation going strong, leading to beautifully light breadsticks. I also try to make the dough the day before! If you have time, the cold fermentation in the fridge is amazing. You can check out how I use slow rising in my no-knead bread recipe, and the principle is the same—slow and cold equals huge flavor!
Finally, when you brush on the garlic butter, do it the second they come out of the oven. Those few minutes while they are piping hot allow the butter and Parmesan to soak down into the crust instead of just sitting on top like a greasy layer. That’s the secret to flavor distribution!
Making Variations of Your Homemade Breadsticks Recipe
Once you master the base dough, you can go wild! Honestly, the best part about these breadsticks is how easily they adapt to whatever you’re craving. Since everyone goes wild for cheese, let’s talk about turning these into something extra decadent. If you want that gooey pull, you should definitely check out my cheesy garlic breadsticks recipe for inspiration, but here’s a quick idea for this batch!
For seriously good cheesy breadsticks, wait until the breadsticks are almost done baking—maybe the last two minutes—then sprinkle a generous handful of shredded mozzarella cheese right on top. Pop them back in until the cheese is bubbly and golden. Also, don’t be afraid to add Italian seasoning or dried oregano right into that garlic butter mixture before you brush it on! That just kicks the Italian flavor up a notch, making them the perfect appetizer bread sticks!
Storage and Reheating Instructions for Buttery Breadsticks
Nobody wants sad, stale breadsticks, right? Thankfully, these are sturdy enough that you can absolutely make them ahead! If you have any leftovers, toss them into an airtight container once they are completely cool. They’ll stay fresh on the counter for about two days, but honestly, they taste best the first day. When you are ready for round two of these amazing buttery breadsticks, skip the microwave!
The microwave just turns them tough and rubbery. Instead, pop them in a 350°F oven or an air fryer for just three to five minutes. That gentle heat warms them all the way through and brings back that delicious outer crispness. If you want to revisit the garlic flavor from my famous garlic butter rice, you can even brush on a tiny bit of fresh garlic butter before reheating!
Frequently Asked Questions About Making Breadsticks
I get so many messages asking about tweaks and troubleshooting when folks try this recipe the first time, which is totally normal with yeast dough! Don’t worry if your first batch isn’t restaurant-perfect; that’s why we experiment. I’ve gathered a few of the most common questions I get about making the best easy breadsticks at home.
Why didn’t my yeast foam up when I started the dough?
This is the biggest bummer! The most frequent culprit is the water temperature being too hot and actually killing the yeast, or the water being too cold, which makes the yeast lazy. If your water was hotter than 120°F, you need to start over with fresh yeast and slightly cooler water, around 110°F is perfect. If you want a trick like I sometimes use for my honey garlic mix, use a thermometer just for the water to be sure!
My breadsticks came out too dense, not soft breadsticks—what went wrong?
Density is usually a kneading or rising issue! You either didn’t knead long enough to develop the strong gluten structure needed for that good chew, or you didn’t let the dough rise long enough to create enough air bubbles. Remember, after the rise, the dough should feel airy and look puffy. If it looks flat before baking, they are going to be dense!
Can I freeze the dough and bake them later, like make ahead breadsticks?
Yes, absolutely! This is a wonderful make-ahead move. Once the dough has risen and you’ve divided and shaped your sticks, lay them out on a baking sheet lined with parchment (don’t let them touch!) and freeze them solid. Once frozen, transfer them to a heavy-duty freezer bag. You can bake them straight from frozen, just add about 5 to 7 minutes to the baking time. They still come out perfectly chewy!
How do I make sure the garlic butter topping is evenly distributed?
Timing is everything here! You want the butter mixture to be warm, but not scorching hot, when you brush it on right after they come out of the oven. The heat of the breadsticks instantly melts the garlic mixture and allows the Parmesan to adhere without drying out too quickly. If you wait five minutes after they come out, the topping will just sit on the surface.
Estimated Nutritional Information for Garlic Breadsticks
Okay, let’s talk numbers for a minute. I know when you’re making something this delicious, you’re probably not thinking about macros, but I always keep rough track just so I know where I stand! Remember, since these are homemade and you might be adding extra Parmesan or extra butter—because, honestly, who wouldn’t?—these figures are just an estimate based on the 12 individual Garlic Breadsticks that this recipe yields.
This isn’t meant to be health food, obviously, but it gives you a good baseline for what you’re enjoying alongside your pasta dish. If you’re super strict, maybe skip brushing on all that amazing garlic butter, but I certainly wouldn’t recommend it!
- Serving Size: 1 breadstick
- Calories: Approximately 185
- Total Fat: Around 7g
- Carbohydrates: About 27g
- Protein: Roughly 5g
Also, you’ll notice a small amount of sugar—that’s mostly just what the yeast ate up during the rise. I try not to dwell on the sodium when I’m eating something this comforting, but it’s right there in the recipe from the salt we added to the dough!
Share Your Homemade Breadsticks Success
Whew! We did it! We made restaurant-quality dough from scratch! I seriously hope your kitchen smells like a giant bowl of garlic butter right now because mine totally does. Now that you’ve managed to pull off these amazing homemade breadsticks, I would absolutely love to hear about it!
Did you try leaving them plain, or did you go all-out with the mozzarella like I suggested? Did they turn out perfectly soft and chewy? Please tell me everything!
Leave a rating right down in the comments below—it really helps other bakers know that they should stop worrying and just jump into making this dough. And if you snapped a picture of your golden brown, butter-soaked sticks right off the baking sheet, tag me on social media! I live for seeing your kitchen wins. Seriously, sharing your results keeps me motivated to keep testing and sharing recipes like this one, maybe something sweet next, like my apple cinnamon oatmeal!
Happy dipping, my friends!
Print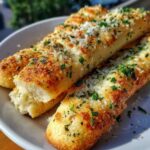
The Ultimate Soft & Chewy Olive Garden Copycat Breadsticks with Garlic Parmesan Butter
- Total Time: 92 min
- Yield: 12 breadsticks
- Diet: Vegetarian
Description
Make soft, chewy, restaurant-style breadsticks at home using this easy recipe, topped with rich garlic parmesan butter.
Ingredients
- 1 cup warm water (105-115 degrees F)
- 2 1/4 teaspoons active dry yeast
- 1 teaspoon granulated sugar
- 2 3/4 cups all-purpose flour, plus more for dusting
- 1 teaspoon salt
- 2 tablespoons unsalted butter, melted
- 1/4 cup unsalted butter, melted (for topping)
- 2 cloves garlic, minced
- 1/2 cup grated Parmesan cheese
- 2 tablespoons fresh parsley, chopped
Instructions
- Combine the warm water, yeast, and sugar in a small bowl. Let stand for 5 minutes until foamy.
- In a large bowl, whisk together the flour and salt. Pour in the yeast mixture and the 2 tablespoons of melted butter. Mix until a shaggy dough forms.
- Turn the dough out onto a lightly floured surface. Knead for 5 to 7 minutes until the dough is smooth and elastic.
- Place the dough in a lightly oiled bowl, turning to coat. Cover the bowl with plastic wrap or a clean towel and let it rise in a warm place for 1 hour, or until doubled in size.
- Preheat your oven to 400 degrees F (200 degrees C). Line a baking sheet with parchment paper.
- Punch down the risen dough gently. Divide the dough into 12 equal pieces. Roll each piece into a long, thin stick, about 8 to 10 inches long. Place the breadsticks on the prepared baking sheet.
- Bake for 10 to 12 minutes, or until lightly golden brown.
- While the breadsticks bake, prepare the topping: In a small saucepan, melt the 1/4 cup of butter over low heat. Stir in the minced garlic and cook for 1 minute until fragrant. Remove from heat.
- Once the breadsticks are out of the oven, immediately brush them generously with the garlic butter.
- Sprinkle the tops evenly with the grated Parmesan cheese and chopped parsley. Serve warm.
Notes
- For extra cheesy breadsticks, sprinkle mozzarella cheese over the tops during the last 2 minutes of baking before applying the garlic butter.
- If you prefer a quicker rise, place the dough in a slightly warmed oven (turned off) to proof.
- You can make the dough ahead of time and refrigerate it for up to 24 hours; let it come to room temperature before shaping.
- Prep Time: 20 min
- Cook Time: 12 min
- Category: Appetizer
- Method: Baking
- Cuisine: American
Nutrition
- Serving Size: 1 breadstick
- Calories: 185
- Sugar: 1
- Sodium: 250
- Fat: 7
- Saturated Fat: 4
- Unsaturated Fat: 3
- Trans Fat: 0
- Carbohydrates: 27
- Fiber: 1
- Protein: 5
- Cholesterol: 15

Comments are closed.