

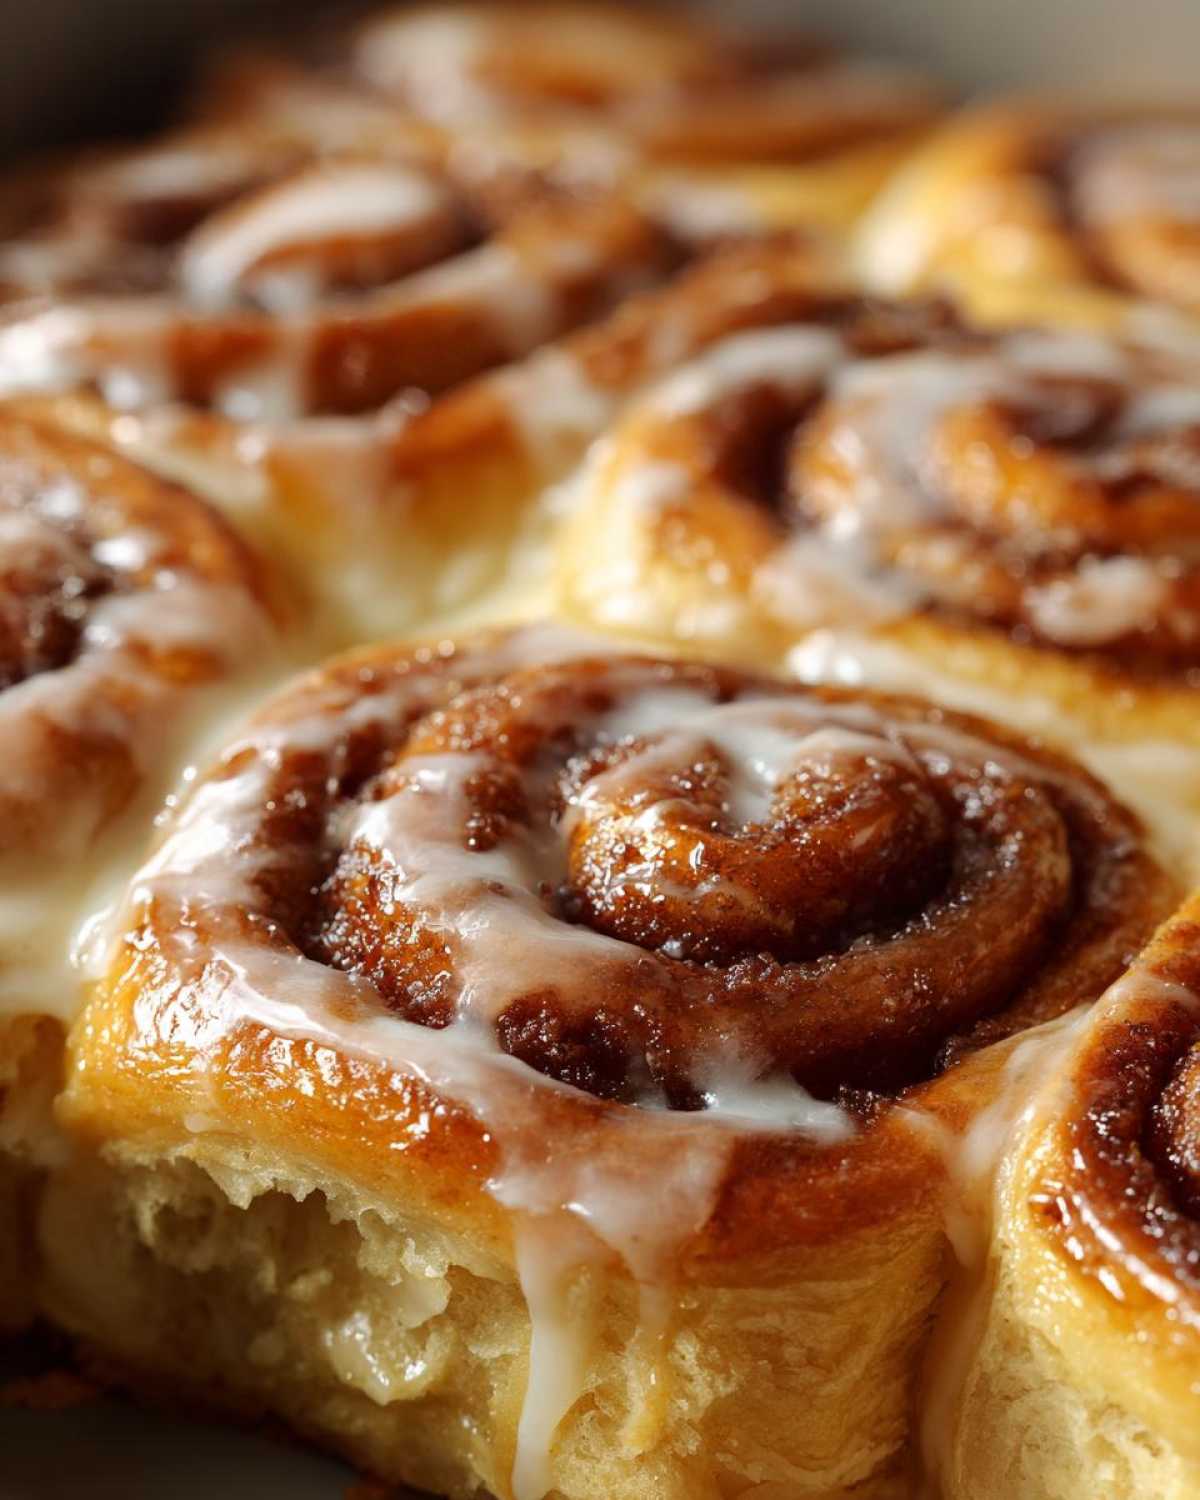
Oh, friends, there’s nothing quite like that first breath you take when you pull a pan of piping hot cinnamon buns out of the oven. It’s pure, unadulterated comfort, isn’t it? For years, I chased that mythical bakery quality—that impossible combination of structure and melt-in-your-mouth softness. I tried every cheat, every rushed shortcut, but they just never lived up to the dream. So, I went back to basics, spending what felt like a million weekends tweaking the yeast, the butter content, and the second rise.
What I landed on? This recipe for Homemade Cinnamon Buns. Trust me when I say these aren’t just good; they ruin you for store-bought rolls forever. We are achieving the softest, fluffiest dough imaginable, swirled tight with that perfect dose of spiced filling, and topped with a decadent brown butter cream cheese glaze. This recipe took me years to nail down, ensuring every single roll is perfectly gooey.
Why These Homemade Cinnamon Buns Are the Best EVER
Seriously, ditch the can opener. These aren’t just sweet rolls; they are an experience! I spent way too long trying to perfect the structure, and I finally cracked the code on getting that pillowy texture without having them collapse. When you bite into these, you understand why they are worth the time.
- Incredibly Soft and Fluffy Rolls: We use a specific technique during the kneading phase that guarantees a light, airy dough, avoiding that dense, chewy texture so many recipes end up with.
- Gooey Cinnamon Swirls Center: The secret to getting that irresistible, sticky middle? It’s all in how the butter and brown sugar melt together during baking. It’s pure magic, and you can’t stop at just one!
- The Brown Butter Glaze: Forget thin icing. The Cream Cheese Frosting Recipe gets an upgrade here with nutty, caramelized brown butter. It adds such a gourmet touch to what is essentially the best comfort food dessert.

Ingredients for the Ultimate Soft & Gooey Cinnamon Buns
I always tell people that baking is science, but I think of it more like following a treasure map—every item on this list is a necessary landmark to find that perfect, gooey treasure!
Don’t try to substitute ingredients in the dough, especially the butter and the eggs; room temperature is key for everything to integrate properly. You’ll see that some butter is melted for the dough, but the other stick is softened for the filling. Pay close attention to how it’s needed!
Here is exactly what you’ll need for 12 perfect cinnamon buns:
- 1 cup whole milk, warmed (needs to be between 105-115°F!)
- 2 1/4 teaspoons active dry yeast
- 1/2 cup granulated sugar, divided
- 1/4 cup unsalted butter, melted (for the dough)
- 1/2 cup unsalted butter, softened to room temperature (for filling)
- 4 tablespoons unsalted butter (for the brown butter glaze)
- 2 large eggs, room temperature
- 1 teaspoon vanilla extract
- 3 1/2 cups all-purpose flour, plus more for dusting
- 1 teaspoon salt
- 1/2 cup packed light brown sugar, for filling
- 2 tablespoons ground cinnamon, for filling
- 4 ounces cream cheese, softened, for glaze
- 2 cups powdered sugar, for glaze
Having these items ready before you start makes the whole process feel so much calmer. Seriously, measure everything out first—it helps immensely when you’re working with yeast dough!
Mastering the Fluffy Sweet Dough for Perfect Cinnamon Buns
Okay, this is where we earn those soft rolls! Making great Cinnamon Buns from scratch means respecting the yeast. If you rush this step or get the temperature wrong, you end up with something closer to a biscuit, and we absolutely do not want that. The key to that ‘fluffy sweet dough’ texture is time and gentle handling during the dough formation. The whole process hinges on waking up those little yeast guys so they can get to work puffing things up.
We need that dough to get strong enough to hold all that gooey filling later. That’s where kneading comes in, developing the gluten structure. It feels like a lot of work, but honestly, listening to music while you knead turns it into a fantastic workout!
Activating the Yeast: The First Step to Soft and Fluffy Rolls
You absolutely must treat your yeast gently. If the milk is too hot—say, over 120 or 125°F—you are basically steaming your yeast to death, and then nothing will rise! Bad yeast means sad, flat rolls. We are aiming for that sweet spot between lukewarm and hot, which is 105°F to 115°F. Sprinkle the yeast and a tiny bit of sugar right on top of that warm milk, leave it alone for about 10 minutes, and wait for the foam party to start. If you don’t get foam, toss it and grab new yeast; it was dead!
Kneading Technique for Superior Cinnamon Buns Dough
Once you add your melted butter, sugar, eggs, and vanilla to that foamy base, start incorporating the flour slowly. It will look messy—a ‘shaggy dough’ like Grandma used to call it—but that’s exactly where we want to be before turning it out. Lightly flour your counter, and then get to work! You need to knead for a good 6 to 8 minutes. You’re looking for the dough to change completely. It should stop sticking like crazy and feel smooth and tight, almost like velvet.
When you press a finger into the dough, it should slowly spring back. That means the gluten is happy! Once it’s perfect, tuck it into a clean, oiled bowl, cover it tight, and put it somewhere warm. I usually just use the oven that’s turned OFF with the light on. Give it a good hour and a half to see it double up in size. For more on making great dough structures, I always refer back to my notes on my honey sandwich loaf recipe!
Creating the Gooey Cinnamon Swirls Filling
Okay, the dough is puffy and ready for its reward! This filling is what separates the good cinnamon buns from the ones that make people close their eyes and moan happily. We are making a cinnamon sugar paste, and the key here is using softened butter, not melted. Melted butter just runs everywhere when you roll the dough, making a sad, thin layer.
You need that 1/2 cup of softened butter mixed well with the packed light brown sugar and the cinnamon. I use my hands for this part—it’s messy, but you can really work out any clumps in the butter and make sure that cinnamon is spread throughout evenly. This paste is what creates the glorious, gooey texture when it melts.
When you roll out your dough rectangle—aim for about 12 by 18 inches—spread this filling mixture right to the edges. My top tip, which I learned after wasting an entire batch once, is to leave about a one-inch border only on one of the long edges. Leave that one edge clean! This border acts like glue when you seal the roll, making sure your log stays tight and doesn’t unravel while baking. If you spread it to the very edge all the way around, the filling oozes out too fast, and you end up with sticky pan messes instead of perfect swirls.
Once you’ve got that filling smeared on, roll it up nice and tight! For more secrets on getting the absolute best flavor out of your filling, check out my deep dive on cinnamon roll secrets revealed!
Baking Preparation: Rolling and Second Rise for Bakery Style Cinnamon Rolls
The dough has risen beautifully, and the rich cinnamon filling is ready to go—now we get to the assembly! This is where we turn that big fluffy pancake of dough into the amazing Cinnamon Buns we’ve been dreaming of. Everything here is about technique to maximize fluffiness before they even see the oven.
Remember that clean edge you left on the long side of the dough? Now it’s time to use it! You want to roll that dough up as tightly as you possibly can, starting from the opposite, fully covered long edge. If you roll it too loosely, you get gaps in the finished roll, and those gaps turn into dry spots instead of glorious, gooey centers. Roll it like you are trying to secure a very precious sleeping baby inside!
Once you have that long, beautiful log, you need to slice it up. I use a smooth, sharp knife, but honestly, dental floss works miracles here because it cuts cleanly without squishing the delicate layers! We are aiming for 12 equal pieces. Lay them cut-side up in your well-greased 9×13 inch baking dish. They should fit snugly, but not squashed against each other yet.
Okay, here comes the second rise, sometimes called the proof. Cover the pan loosely—plastic wrap is perfect—and leave them again in that warm spot for about 30 to 45 minutes. They shouldn’t double again, but they need to look puffy and visibly crowd each other in the pan. This final puff ensures the rolls bake up light and soft, not heavy. While they’re puffing up, get that oven preheated to 375°F so everything is ready to roll when they are! If you want a super easy version later, check out my thoughts on making a Cinnamon Roll Casserole.
Baking and Glazing: Achieving Bakery-Quality Cinnamon Buns
The last hurdle before pure joy! Getting these Cinnamon Buns baked perfectly means paying close attention to time and temperature. We preheated to 375°F, so when those puffy rolls slide into the oven, they start getting that beautiful golden color right away. They need about 20 to 25 minutes in there.
Now, here’s a little trick I learned from a very stressed baker friend: If you want those absolutely drippingly moist centers—the kind that make strangers stare—pour about 1/4 cup of heavy cream evenly over the hot rolls right after they come out of the oven, just before you glaze them. The rolls soak it up instantly, and bye-bye dryness!

Glazing while they are warm is non-negotiable! If you wait until they cool completely, the glaze just sits on top like thick frosting. When they are warm, the glaze melts slightly, seeping down into every crack and crevice, making those lovely swirls extra sticky and gooey. Trust me on this timing!
Preparing the Brown Butter Cream Cheese Frosting Recipe
While the rolls are baking, you absolutely MUST get your topping ready, especially that Brown Butter Cream Cheese Frosting Recipe. This is what makes people think you bought these from some fancy downtown bakery!
Remember in the ingredient list? We need those 4 tablespoons of butter to brown. Melt it slowly in a pan until you see little brown specks forming at the bottom and it smells nutty and amazing. This step is crucial! You have to pour that browned butter into a small bowl to let it cool before adding it to the cream cheese. If you dump hot butter into room temperature cream cheese, you get soup, and soup is not a great topping for rolls!
Once the brown butter has cooled a bit—warm is fine, hot is not!—beat your softened cream cheese until it’s super smooth. Then, mix in the cooled brown butter, the powdered sugar, and about one tablespoon of milk. You might need another teaspoon of milk after that, just to get the consistency right so it drizzles beautifully over your Cinnamon Buns. If you skip the brown butter, that’s fine, but you’ll need to adjust the milk slightly since the brown butter adds back some fat!
Tips for Success with Yeast Rolled Dough
Even with the best recipe, working with yeasted dough can sometimes feel tricky, especially when you’re aiming for that ‘Bakery Style’ pillowy height. Don’t panic if it seems a little temperamental! I’ve learned a few tricks through trial and error—okay, maybe a lot of error—that really help ensure your rolls come out perfectly soft and never dry.
The biggest thing I preach about when it comes to any sweet breakfast bread is temperature control. It’s the difference between light, airy layers and heavy, sad pucks. You have to be patient with the rising times we listed; forcing it never works out well.
Room Temperature Eggs and Milk Are Not Suggestions
I know when you’re rushing on a Saturday morning, it’s tempting to just crack those cold eggs right into the mix, but please, please resist! Cold ingredients shock the yeast we worked so hard to activate, and they also don’t mix into the softened butter properly. We need everything—the eggs, the milk for the dough—to be that happy room temperature.
If you forget to pull your eggs out early, here’s my favorite kitchen hack: place the eggs in a bowl of warm (not hot!) tap water for about 10 minutes. That little warm bath gets them just pliable enough to incorporate without slowing down your yeast’s momentum. It’s a lifesaver when you are trying to get these delicious warm baked goods out before brunch starts!
Avoiding Dry Rolls in the Oven
Even if the internal temperature reads perfectly, sometimes rolls emerge a little drier than I’d like. This usually happens if the second rise wasn’t long enough, or if you accidentally over-baked them by just a minute or two. If you want the absolute moistest experience, remember that heavy cream tip I mentioned earlier? Drenching them right before they go into the oven is fantastic insurance against dryness.
Another thing people forget? Covering them while they bake for the first 10 minutes helps trap steam, keeping the tops soft while the sides bake through. I use a loose sheet of foil draped over the top. Once you take the foil off, you can blast them for the last 10 minutes to get that perfect golden brown color. If you want to check out how I do this over-proofing thing with my famous French toast, you can see my notes on classic French toast recipe!
Storing and Reheating Your Perfect Cinnamon Buns
I swear, sometimes these cinnamon buns taste even better the next day—especially when that buttery glaze has completely melted into the swirls overnight! But if you’re lucky enough to have leftovers (which rarely happens in my house!), you need to store them correctly to maintain that dreamy soft texture we worked so hard to achieve.
If you know you’re going to eat them all within 48 hours, keeping them on the counter is totally fine. Just make sure they are completely cooled down first! Don’t seal them up while they are warm, or you trap condensation, which leads straight to soggy spots—and nobody wants a soggy bottom on their rolls.
Keeping Them Fresh on the Counter vs. In the Fridge
For one or two days, simply cover the entire baking dish tightly with plastic wrap or transfer the rolls to an airtight container. They should stay pretty fluffy this way. If you are storing them for longer than two days, or if your kitchen is super humid, the fridge is a safer bet.
When refrigerating, always cover them well! The cold dries things out fast, so airtight is key. If you store them naked in the fridge, they will turn into hockey pucks before you know it. If you go the fridge route, plan on giving them a good reheat before serving!
The Best Way to Reheat for That Fresh-from-the-Oven Gooeyness
Reheating is essential! We need to bring back that melt-in-your-mouth softness. You have options depending on how many you’re warming up.
For one roll, the microwave is your best friend. Pop it on a microwave-safe plate and heat it for about 15 to 20 seconds. If you go longer than that, the dough starts to seize up on you, so test it early!
If you have half a pan left or just want that slightly crisper edge that only an oven can deliver, wrap the rolls snugly in foil. Yes, foil! This traps the moisture in while allowing the heat to penetrate slowly, essentially steaming them slightly to perfection. Heat them in a 300°F oven for about 10 to 15 minutes. When they are fully warmed through, pull them out, and either pop them under the broiler for about 30 seconds (watch them like a hawk!) or drizzle on a little extra glaze. That warmth melts the sugar coating beautifully, and boom—you have fresh, gooey rolls again!

Frequently Asked Questions About Making Cinnamon Buns
I always get so many questions when people try this recipe for the first time, which just tells me you are all aiming for the best results! Honestly, these are simple rolls, but the yeast part always trips people up. Here are the top things I hear most often about achieving the ultimate soft and fluffy rolls!
Can I make the dough for these cinnamon buns ahead of time?
Yes, you totally can! This is one of the best secrets for easy Weekend Brunch Baking. After you knead the dough (Step 4), instead of letting it rise on the counter, lightly coat the bowl with oil, cover it tightly, and pop it straight into the fridge. You can let it cold-ferment overnight—up to 24 hours! The cold slows the yeast way down, letting the flavors deepen beautifully. Just make sure you pull it out of the fridge about an hour before you plan to roll and fill it, so it can warm up enough to be easily rolled out.
Can I use instant yeast instead of active dry yeast?
Oh, absolutely! I use instant yeast sometimes when I’m in a huge hurry, and it works just fine. The only real difference is that you don’t need to proof it separately in the milk first. You can skip Step 1 entirely! Just whisk the instant yeast right into your dry ingredients along with the flour and salt. Then, you just add the lukewarm milk, sugar, butter, and eggs right on top and mix it all together. It saves about 10 minutes, but honestly, seeing that yeast foam up in the milk gives me peace of mind!
What if I don’t want to make the brown butter for the glaze?
I get it; brown butter is an extra step, even if I think it’s worth every second for that rich depth! If you’re just wanting a quick fix for your Sweet Morning Treats, you can skip the browning entirely. Just use 4 tablespoons of regular melted (and slightly cooled) unsalted butter in place of the brown butter when you mix up your Cream Cheese Frosting Recipe. You might need to add an extra teaspoon of milk since regular melted butter is less concentrated than brown butter, but it will still be deliciously creamy!
My rolls didn’t puff up much during the second rise—will they still be good?
Don’t panic! As long as they doubled during the *first* rise, they will usually bake up okay, though they might be slightly denser—more like a rich pastry than my super-fluffy rolls. If they didn’t rise at all during the second proof, check how hot your oven was for the first rise; maybe the yeast died early on. If they look a bit flat but your oven is preheated, just bake them immediately. They will still taste amazing warmed up, even if they aren’t towering high!
Print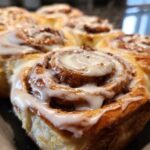
The Ultimate Soft and Gooey Homemade Cinnamon Buns with Brown Butter Cream Cheese Glaze
- Total Time: 2 hours 55 min
- Yield: 12 servings
- Diet: Vegetarian
Description
Make bakery-quality cinnamon buns at home. This recipe yields soft, fluffy rolls with a rich, gooey center and a decadent brown butter cream cheese glaze.
Ingredients
- 1 cup whole milk, warmed
- 2 1/4 teaspoons active dry yeast
- 1/2 cup granulated sugar, divided
- 1/4 cup unsalted butter, melted, plus 1/2 cup (1 stick) for filling and 4 tablespoons for glaze
- 2 large eggs, room temperature
- 1 teaspoon vanilla extract
- 3 1/2 cups all-purpose flour, plus more for dusting
- 1 teaspoon salt
- 1/2 cup packed light brown sugar, for filling
- 2 tablespoons ground cinnamon, for filling
- 4 ounces cream cheese, softened, for glaze
- 2 cups powdered sugar, for glaze
Instructions
- Warm the milk until it reaches 105-115°F. Pour it into a large bowl and sprinkle the yeast and 1 teaspoon of the granulated sugar over the top. Let stand for 5-10 minutes until foamy.
- Add the remaining granulated sugar, melted butter, eggs, and vanilla extract to the yeast mixture. Whisk lightly to combine.
- In a separate bowl, whisk together the flour and salt. Gradually add the dry ingredients to the wet ingredients, mixing until a shaggy dough forms.
- Turn the dough out onto a lightly floured surface. Knead for 6-8 minutes until the dough is smooth and elastic. Place the dough in a lightly oiled bowl, turning to coat. Cover the bowl with plastic wrap and let it rise in a warm place for 1 to 1 1/2 hours, or until doubled in size.
- While the dough rises, prepare the brown butter for the glaze: Melt 4 tablespoons of butter in a small saucepan over medium heat. Cook, swirling occasionally, until the butter foams, then brown bits form at the bottom and it smells nutty (about 5 minutes). Pour the brown butter into a small heatproof bowl, leaving any dark sediment behind if desired, and let it cool slightly.
- Punch down the risen dough. On a lightly floured surface, roll the dough into a large rectangle, about 12×18 inches.
- In a small bowl, mix the 1/2 cup softened butter (for filling), brown sugar, and cinnamon until combined into a paste. Spread this mixture evenly over the entire surface of the dough rectangle, leaving a small border on one long edge.
- Starting from the long edge opposite the border, tightly roll the dough into a log. Pinch the seam closed.
- Slice the log into 12 equal rolls. Place the rolls cut-side up in a greased 9×13 inch baking pan. Cover the pan loosely and let the rolls rise again for 30-45 minutes, or until puffy.
- Preheat your oven to 375°F. Bake the rolls for 20-25 minutes, or until golden brown.
- While the rolls bake, make the glaze: Beat the softened cream cheese until smooth. Whisk in the cooled brown butter, powdered sugar, and 1 tablespoon of milk (add more milk, 1 teaspoon at a time, if needed for desired consistency).
- Remove the rolls from the oven. Immediately spread the cream cheese glaze generously over the warm rolls. Serve warm.
Notes
- For extra gooey centers, pour 1/4 cup of heavy cream over the rolls just before baking.
- If you prefer a thinner glaze, use only powdered sugar and milk, omitting the brown butter step.
- Ensure your milk is not too hot, or it will kill the yeast.
- Prep Time: 45 min
- Cook Time: 25 min
- Category: Breakfast
- Method: Baking
- Cuisine: American
Nutrition
- Serving Size: 1 roll
- Calories: 450
- Sugar: 45
- Sodium: 350
- Fat: 22
- Saturated Fat: 14
- Unsaturated Fat: 8
- Trans Fat: 0.5
- Carbohydrates: 58
- Fiber: 2
- Protein: 7
- Cholesterol: 75


Comments are closed.