

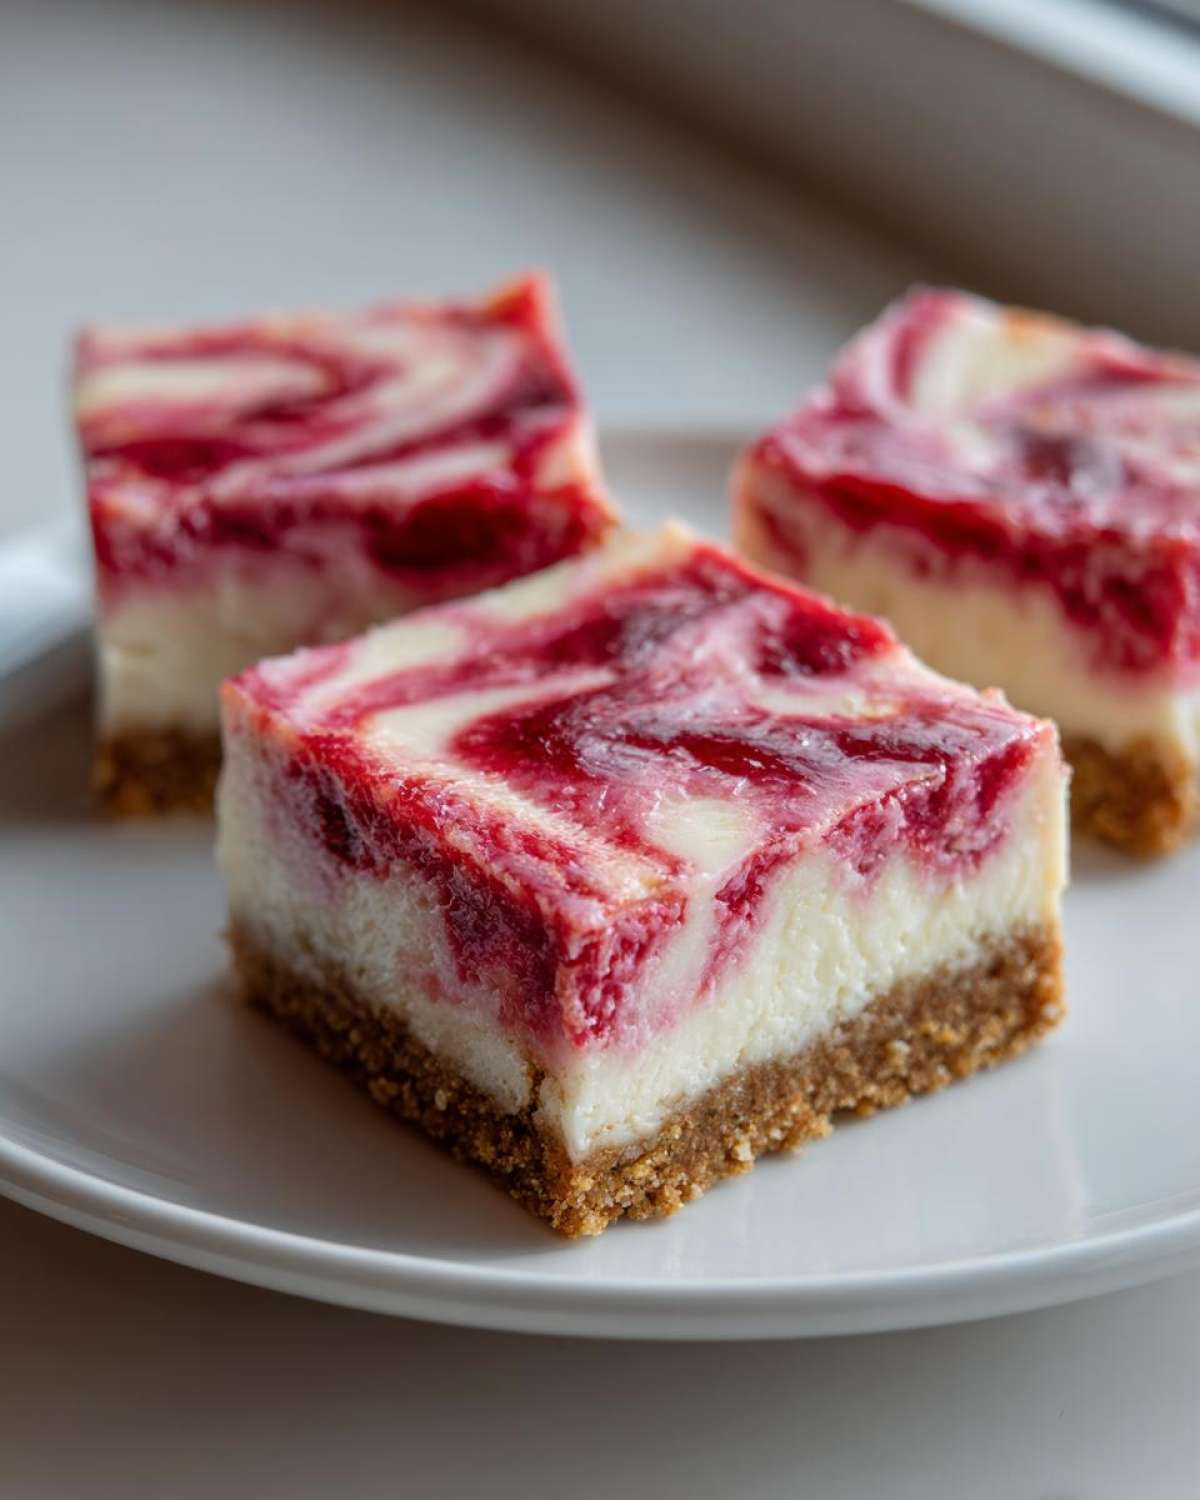
Oh my gosh, when that first batch of ruby red rhubarb comes in, I immediately shut my oven off before it even thinks about turning on! Seriously, we need sweet and tart treats during the warm months, but not the heat that comes with baking. That’s why I’m sharing my absolute favorite recipe for **No Bake Rhubarb Bars**—they are ridiculously easy and feature the dreamiest, creamiest filling you can imagine sitting on top of that buttery graham crust. Forget the mess of traditional pie; these refrigerated fruit bars come together in minutes. Trust me, the combination of the tangy rhubarb swirl and the cool, velvety cheesecake layer makes this my go-to spring and summer dessert. You’re going to wonder why you ever bothered with an oven!
Why You Will Love These No Bake Rhubarb Bars
These bars aren’t just a substitute for a baked treat; they are the *best* treat when you want something bright, tangy, and super quick to assemble. I mean, zero heat required? Yes, please! If you’re looking for something that satisfies that spring dessert craving without turning your kitchen into a sauna, this is it. They set up beautifully in the fridge and stay perfect!
- You don’t have to wait for the oven to preheat—prep time is less than 20 minutes, total!
- The texture is out of this world; you get that snap from the crust, followed by that smooth, cool cream cheese layer.
- They freeze beautifully, making them fantastic for make-ahead plans.
- They use real, fresh rhubarb, which is always a win when the season hits!
- These are the ultimate grab-and-go snack or dessert for picnics.
Perfect for Spring Season Baking Alternatives
When rhubarb starts showing up at the farmer’s market, I grab way too much, honestly. Instead of laboring over a crisp or crumb topping that needs constant guarding from neighborhood squirrels, these bars are my answer for guilt-free spring season baking alternatives. We get all the tartness and beautiful color without any of the fuss. It’s just pure, chilling goodness!
Simple Dessert Bars Assembly
I love recipes where the steps are straightforward, and you don’t need professional equipment. This is truly just mixing, pressing, beating, and swirling. If you can make pudding, you can master these simple dessert bars. It’s honestly quicker than making cookies, and the payoff is huge when you slice into that perfectly set square.
Essential Ingredients for No Bake Rhubarb Bars
Okay, this is where we make sure we have everything ready *before* we start mixing, because once the cream cheese comes out, we have to move quickly! Since we aren’t baking anything, the quality of these refrigerated fruit bars really shines through. You need things to be at the right temperature, especially the cream cheese. Don’t eyeball those measurements, either—these bars rely on ratios to set up perfectly!
Graham Cracker Crust Ingredients and Notes
The base is non-negotiable for me; it’s the crunch factor that balances out the creamy top. For the crust, you’ll need graham cracker crumbs—about 1 and 1/2 cups of those sweet little crumbs. Mix that with 1/4 cup of plain white sugar and 6 tablespoons of butter that you’ve melted down completely. Melted butter is the glue here! It binds the *Graham cracker crust desserts* base together so it holds its shape when you slice it later on.
Creamy Filling Components for No Bake Rhubarb Bars
Now for the star. You absolutely must have 8 ounces of cream cheese, and listen, it has to be completely softened. Leave it out on the counter for at least an hour before you tackle this. This softness is what gives you that beautiful, smooth texture, much like a proper *Rhubarb cheesecake bars no bake* filling. Once the cream cheese is fluffy, you mix in 1/2 cup of powdered sugar—don’t use granulated here, powdered sugar dissolves better and keeps things silky! Add a teaspoon of vanilla extract for warmth. The rhubarb element comes from about 1/4 cup of your favorite rhubarb jam or preserves swirled right on top. If you want more texture, you can fold in some finely diced, blanched rhubarb, but the jam swirl is the secret sauce for color!
Step-by-Step Instructions for No Bake Rhubarb Bars
Okay, getting these bars assembled is shockingly fast, which is why I love them so much for those busy weeknights. We’re talking about the whole hands-on part only taking about 20 minutes before they head to the fridge for their long rest! Remember, because these are *No oven desserts*, setup time is really your biggest work time. Make sure you line that 8×8 inch pan with parchment paper first, leaving those helpful little overhangs on two sides—you’ll thank me later when you try to lift them out!
Preparing the Crust: Setting Up Your No Oven Desserts Base
First things first: grab your graham cracker crumbs, your 1/4 cup of granulated sugar, and the 6 tablespoons of melted butter. Mix all that together until it looks like damp sand. Then, take that buttery mix and press it down into the bottom of your lined pan. And I mean *press* it! Get it even and nice and tight. If you leave any soft spots, the crust will fall apart when you try to slice it later. Once it looks perfectly uniform, pop that whole thing into the freezer for about 15 minutes to firm up. This quick chill sets the butter so the filling doesn’t mix into it.
Mixing and Swirling the Cream Cheese Filling for No Bake Rhubarb Bars
While the crust is chilling, whip your softened cream cheese until it’s truly smooth. Don’t rush this part; lumps in the cream cheese mean lumps in your final bar! Beat in the powdered sugar and vanilla extract until it’s light and fluffy. If you decided to blanch and fold in that fresh rhubarb—you go, you overachiever!—fold it in gently now. Spread this gorgeous, creamy layer over your chilled crust. Now for the fun part: take that 1/4 cup of rhubarb jam and dollop it randomly all over the top surface. Use a knife or even just a toothpick to gently swirl the red jam into the white filling. Don’t over-swirl; we want distinct ribbons of tartness running through the sweet cream for the best look in these **No Bake Rhubarb Bars**.

Here’s the most important part: Cover it loosely and put it away. We need a minimum of four hours out in the cold to get these bars firm enough to cut cleanly. If you’re making these ahead, check out my guide on making no-bake peanut butter energy bites for more make-ahead tips!
Expert Tips for Perfect No Bake Rhubarb Bars
Look, making something without the oven is great, but it takes a little finesse to make sure it holds up! If you want these bars to look professional and slice without looking like a messy puddle, you need to pay attention to a couple of details. These trips are what take my recipe from just ‘good’ to legitimately amazing. It’s all about getting the structure right since we skipped the heat setting the ingredients for us!
Handling Fresh Rhubarb: Blanching Technique
If you’re using that gorgeous, fresh rhubarb, you can’t just toss it in raw! Trust me, it stays way too stringy and tough in a refrigerated bar. The trick is a super quick blanch. We are talking fast! You boil a little water, toss your finely diced rhubarb in for exactly one minute—no more!—and then immediately plunge it into an ice bath. This stops the cooking process right away and softens it just enough so it blends perfectly texture-wise with the cream cheese. Make sure you drain those tiny pieces really, really well after the ice bath before you fold them in, or you’ll add too much water back into the filling.
Achieving the Firmest No Bake Fruit Squares
Sometimes, depending on the humidity or how soft your cream cheese was, your bars might feel a little too soft even after four hours chilling. If you are really worried about them falling apart—especially if you plan on taking them to a picnic!—I highly recommend using the gelatin trick I learned for my other quick no-bake treats. Just dissolve one teaspoon of unflavored gelatin into two tablespoons of hot water until it completely clears up. Stir that mixture gently into your cream cheese filling right before you spread it. It acts like an invisible stabilizer, making sure these *No bake fruit squares* cut like a dream!
Making No Bake Rhubarb Bars Ahead of Time
This is genuinely one of my favorite features of this recipe—they are total heroes for meal planning because they *have* to be made ahead! In fact, they taste better the next day once everything has really settled together. I usually whip these up the evening before I plan to serve them.
I always cover the pan tightly with plastic wrap, making sure the plastic doesn’t touch the jam swirls on top, and let it chill overnight in the refrigerator. Four hours is the *minimum* you need for them to set firmly enough to slice, but eight hours or overnight is perfection. This is why these are such fantastic make ahead rhubarb desserts; you do all the work when you have time, and then they are just waiting patiently for dessert time.
When you are ready to serve them, pull them out of the fridge, use those parchment sling handles to lift the entire slab onto a cutting board, and then slice them. They will hold their shape beautifully. If you’re taking them to a party, they travel really well in the pan, too—just keep them cool!
Variations on Your No Bake Rhubarb Bars Recipe
One of the best parts about having a dynamite *no bake bars recipe* foundation is how easily you can swap things up depending on what’s in your pantry or what flavor combo you’re craving! Since we aren’t committed to a baked structure, we have a lot of freedom here. I love playing with the flavor intensity of the swirl—if you want something even sweeter to balance the tartness, try using strawberry rhubarb jam instead of plain rhubarb preserves. It offers a gorgeous color contrast, too!
Alternatively, if you want to lean into that nutty, crunchy vibe without relying solely on crackers, you can get super creative with the base. These refrigerator fruit bars really welcome texture changes. If you happen to have some leftover oats, definitely try them!
Crust Substitutions for No Bake Rhubarb Bars
The graham cracker crust is classic, right? It’s got that nostalgic flavor that just sings with cheesecake filling. But if you’re out of crackers, or maybe you’re trying to use up some whole oats, those are excellent swaps! For a chewier base, you can substitute half of the graham cracker crumbs with quick oats. Mix them right in with the butter and sugar—it just adds a little wholesome chew that I adore.
For a totally different texture, think about nuts! Almond flour or even finely pulsed pecans make amazing bases for these kinds of treats. If you try a nut-based crust, you might even want to add a pinch of salt to the mix to really boost the nutty flavor. If you are experimenting with different textures in your crusts, you might want to check out my rhubarb oat bars recipe for inspiration on how to blend fruits and grains!
Serving Suggestions for Your Quick Rhubarb Squares
Everyone loves these bars straight out of the fridge—they are super satisfying standing all on their own with that cool, creamy interior and tart swirl. But sometimes, you want to elevate these simple dessert bars just a little bit, especially if you’re serving them after a nice dinner. Don’t keep these fabulous **Quick Rhubarb Squares** hidden away! They deserve a little fanfare, even if they took zero time to make.
For me, the absolute number one topping has to be a simple dollop of freshly whipped cream. You know, the kind you whip yourself with a hint of vanilla and just a touch of sugar? That light, airy cream cuts through the tartness beautifully and just screams summer dessert. The contrast between the cold, dense bar and the fluffy cloud of cream? Perfection!
If you’re feeling fancy, especially if you’ve made the dairy-free version, try a light dusting of extra powdered sugar right before serving. It just gives them a lovely, professional look. And honestly, because rhubarb is so tart, sometimes a drizzle of something sweet is nice. I’ve used a thin drizzle of honey over the top, which complements the graham cracker crust flavor surprisingly well. Anything that adds a little creaminess or extra sweetness works wonders to balance those beautiful, tangy rhubarb ribbons!
Storing and Reheating No Bake Rhubarb Bars
Since these are refrigerator fruit bars, proper storage is key to keeping that beautiful, creamy texture intact! The good news is these hold up really well, which means they’re perfect for leftovers—if you even have any, ha! You definitely don’t want to reheat them, though, since they have zero baking involved, so keep that in mind.
The best place for them is definitely the fridge. Once they are completely set, I slice them, place them in an airtight container, and layer them between sheets of wax or parchment paper. That paper layer ensures that the sticky topping doesn’t fuse to the next layer of bars. In the refrigerator, they keep wonderfully for about four to five days. They stay cool, firm, and ready to grab when that sweet tooth hits!
Now, if you are a master planner like I try to be, you can absolutely freeze them! Wrap the uncut slab (or firmly wrapped individual slices) tightly in plastic wrap and then slip them into a freezer-safe bag or container. They should last well for about two months in the deep freeze. When you want to serve them, just move the bars—still wrapped—to the refrigerator to thaw overnight. Pull them out the next morning, slice them up, and they’ll taste almost exactly like you just pulled them from the fridge!
Frequently Asked Questions About No Bake Rhubarb Bars
I know you might have a few little questions before you dive into making these creamy **No Bake Rhubarb Bars**, especially since we skipped the oven entirely! It’s totally normal; when you deviate from a traditional recipe, a few uncertainties pop up. I gathered a few of the most common things people ask me about transforming these into perfect *make ahead rhubarb desserts* because I want you to succeed!
Can I substitute the rhubarb jam in these No Bake Rhubarb Bars?
Yes, you absolutely can! The jam is mostly there for that beautiful tart swirl and extra color, so feel free to swap it out based on what you have on hand or your favorite flavors. If you prefer a classic cheesecake vibe, use a plain tart berry jam like raspberry or even a nice cherry preserve. If you want to lean into that summer fruit vibe, strawberry-rhubarb jam is amazing here too! Just make sure whatever you use isn’t too watery, or it might bleed too much into the cream cheese layer.
What is the best way to cut these bars cleanly?
This is the question I get asked most often about all my refrigerated treats! Because the filling is so soft and creamy, trying to cut it cold straight from the fridge can result in messy edges, which breaks my heart! The secret is to warm up your knife. Seriously! Once the bars are fully set (after those 4 hours minimum), run a long, sharp kitchen knife under very hot water for about 30 seconds. Wipe the blade dry quickly, and then slice. You get the cleanest cut possible! If you are cutting a large batch, you might need to re-warm the knife between every few slices. This is the trick that makes these *simple dessert bars* look gourmet!
Can I use frozen rhubarb instead of fresh in this recipe?
Oh, that’s a great question for those of us who buy too much rhubarb and stash some away for later! Yes, you can generally use frozen rhubarb, but you MUST follow the blanching instruction carefully. If you use frozen and don’t blanch it, it will release way too much liquid into your cream cheese filling, making everything soupy. If using frozen, thaw it completely first, and then run it through that quick boil and ice bath—the blanching step is even more critical here to drive out that extra moisture. You can find some tips on managing fruits like this in my guide on dairy free no bake desserts rhubarb variations too!
How can I make these dairy-free?
I totally get wanting to make sure everyone can enjoy these! It’s quite easy to adapt these for a *dairy free no bake desserts rhubarb* situation. Swap the butter in the crust for melted coconut oil—it works just as well as a binder. For the cream cheese, you’ll want a really firm, block-style vegan cream cheese substitute, not the soft tubs. If you want the absolute best texture, I always recommend swapping the cream cheese for a homemade cashew cream base, but that requires a little more prep work than just opening a tub! If you go the vegan cream cheese route, make sure it’s chilled really well before you start mixing with the powdered sugar.
Print
No Bake Rhubarb Cheesecake Bars
- Total Time: 4 hr 20 min
- Yield: 16 bars
- Diet: Vegetarian
Description
Make easy, sliceable rhubarb bars without turning on your oven using a simple graham cracker crust and a creamy filling.
Ingredients
- 1 1/2 cups graham cracker crumbs
- 1/4 cup granulated sugar
- 6 tablespoons unsalted butter, melted
- 8 ounces cream cheese, softened
- 1/2 cup powdered sugar
- 1 teaspoon vanilla extract
- 1/4 cup rhubarb jam or preserves (for topping)
- 1/4 cup fresh rhubarb, finely diced and blanched (optional, for texture)
Instructions
- Line an 8×8 inch baking pan with parchment paper, leaving an overhang on two sides for easy removal.
- Combine graham cracker crumbs, 1/4 cup granulated sugar, and melted butter in a bowl. Mix until the crumbs are evenly moistened.
- Press the crumb mixture firmly and evenly into the bottom of the prepared pan. Place the crust in the freezer for 15 minutes to set.
- In a separate bowl, beat the softened cream cheese until smooth.
- Add the powdered sugar and vanilla extract to the cream cheese. Beat until the mixture is light and fluffy. If using blanched rhubarb, gently fold it in now.
- Spread the cream cheese mixture evenly over the chilled crust.
- Spoon small dollops of the rhubarb jam over the top of the cream cheese layer. Use a knife or toothpick to gently swirl the jam into the filling for a marbled effect.
- Cover the pan loosely with plastic wrap and refrigerate for at least 4 hours, or until the bars are firm enough to slice.
- Use the parchment paper overhang to lift the bars from the pan. Cut into 16 squares before serving.
Notes
- To quickly blanch the fresh rhubarb, place the finely diced pieces in boiling water for 1 minute, then immediately transfer them to an ice bath. Drain well before using.
- For a dairy-free version, substitute the cream cheese with a firm cashew cream base or store-bought vegan cream cheese alternative.
- If you prefer a firmer bar, you can add 1 teaspoon of unflavored gelatin dissolved in 2 tablespoons of hot water to the cream cheese mixture before spreading.
- Prep Time: 20 min
- Cook Time: 0 min
- Category: Dessert
- Method: Refrigeration
- Cuisine: American
Nutrition
- Serving Size: 1 bar
- Calories: 185
- Sugar: 15
- Sodium: 120
- Fat: 11
- Saturated Fat: 7
- Unsaturated Fat: 3
- Trans Fat: 0
- Carbohydrates: 19
- Fiber: 0
- Protein: 3
- Cholesterol: 35


Comments are closed.