

Honestly, the hunt for a truly satisfying, healthy snack that doesn’t taste like cardboard or cost a fortune feels endless, right? I get so frustrated staring at the candy bar aisle disguised as health food. That’s why I’m practically shouting from the rooftops about these Easy No-Bake 5-Ingredient Peanut Butter Protein Bars! This recipe changed my snack game entirely. Forget those crumbly, overly processed store-bought protein bars; making your own is so much cheaper and lets you control every single bit of goodness that goes in. Seriously, these are going to be your new favorite quick protein treats.
Why Homemade Protein Bars Beat Store-Bought Options
I’ve wasted so much money on those colorful, crinkly packages at the checkout. You open one up, hoping for a real treat, and you end up with something that tastes artificially sweet and cracks into dust. Ugh! Making your own protein bars gives you complete control, which is non-negotiable for me now. Our recipe uses just five simple things you probably already have, which saves a ton of cash!
When you skip the store, there are no weird fillers or gums hiding in there. I want substance, not sugar substitutes that leave a strange aftertaste. If you’re looking for the best tasting protein bars, trust me—homemade wins every single time. These homemade protein bars are exactly what you need after a tough workout or when you need a quick boost!
Controlling Ingredients in Your Protein Bars
My biggest issue with the big brands is what they sneak in! I’m talking about high fructose corn syrup and stabilizers that make the texture weirdly gummy. When I make my own, I know exactly what I’m eating. If you’re watching your sugar intake, you don’t have to worry about hidden syrups.
Plus, if you need a specific type of protein powder, say, a vegan option, you can put that right in! It’s just so much cleaner. If you’re interested in another quick, healthy fix made with fewer ingredients, you should absolutely check out my recipe for peanut butter protein balls; it’s another super simple powerhouse snack!
The Essential Ingredients for Easy No-Bake Protein Bars
Okay, here’s the beautiful part about keeping things simple: this recipe relies on just five core ingredients! That’s it. We aren’t messing around with twenty different items that make cleanup a nightmare. These specific measurements are what make these homemade protein bars chewy, satisfying, and perfectly balanced for a post-workout recovery or a busy afternoon.
If you stick to what I’ve listed here, you’ll have the best tasting results, hands down. Remember, even though we’re aiming for simplicity, precision matters when you’re creating the structure of these high protein recipes!
Ingredient Breakdown and Preparation
Make sure you grab everything before you start mixing—it all comes together so fast! For the oats, I always use old-fashioned rolled oats; they give the best chew and structure for these bars. If you use quick oats, they tend to get a little mushy.
- 1 cup rolled oats (Use old-fashioned, please!)
- 1/2 cup peanut butter (Make sure it’s creamy, not the natural oily kind that separates easily, unless you adjust the liquids later!)
- 1/2 cup vanilla or unflavored protein powder (If you use flavored, it might change the sweetness slightly, so start with vanilla or unflavored.)
- 1/4 cup maple syrup or honey (This is our main binder and sweetener—don’t skimp here!)
- 2 tablespoons melted dark chocolate (I go for at least 70% cocoa for that nice little bittersweet drizzle on top of these peanut butter protein bars.)
Tips for Perfect No Bake Protein Bars Success
Even with just five ingredients, sometimes these no bake protein bars need a little nudge to cooperate! You want that perfect stiff dough that presses together neatly—not a crumbly mess or something that sticks everywhere. I’ve learned a few tricks over the years that make sure your mixture is spot on every single time, so save yourself the frustration!
Don’t panic if your mix seems stiff right away. Because peanut butter consistency varies so much between brands, you might need a tiny adjustment to hit that sweet spot where everything binds. These small tweaks ensure you end up with chewy protein bars, not dry rocks!
Ingredient Notes and Substitutions for Protein Bars
Let’s talk adjustments, because everyone has different needs in their kitchen. If you’re keeping these strictly vegan, just make absolutely certain you swap out the honey for maple syrup—that’s the easiest fix!
Now, if your dough is just stubbornly dry and won’t quite hold hands, don’t throw it out! Add water or your favorite non-dairy milk, one teaspoon at a time. Mix well after each addition until it just starts to clump nicely. On the flip side, if it’s too sticky, add a tiny splash more protein powder.
Critically, when you press it into the pan, be firm! Really use the back of a spoon or clean, slightly wet fingers to compact that mixture down hard. That firm pressing is what locks everything together during the chill time, giving you those clean slices later. If you want more great tips on handling protein mixtures, check out my guide on peanut butter protein balls!
Step-by-Step Instructions for Your Easy Protein Bar Recipe
Okay, ready to whip these up? This is why I love this easy protein bar recipe so much—you don’t even need to turn the oven on! This whole process is just mixing, pressing, and waiting. Seriously, the prep time is barely ten minutes, which is fantastic when you need immediate healthy snacks.
First things first, you have to get your pan ready. Grab an 8×8 inch pan and line it completely with parchment paper. Make sure you leave plenty of overhang on two opposite sides—those flaps are going to be your handles later to lift the whole block of deliciousness right out when it’s set! Trust me on the overhang; it saves your sanity later.
Mixing the Dough and Pressing into Pan
Time to combine the dry stuff first in a medium bowl: the oats and the protein powder. Give those a quick whisk just to make sure everything is loosely combined before we add the wet ingredients. Pour in your peanut butter and that maple syrup (or honey, if you used it). Now, you need to mix this vigorously!
Keep stirring until you genuinely have a stiff, uniform dough. It should pull away from the sides of the bowl almost entirely. Once it looks like thick cookie dough, dump it into your prepared pan. Use the back of a spoon, or even the bottom of a clean measuring cup, and press that mixture down as firmly as you can get it! Make the top as level and compact as possible. This step is super important for making sure your bars don’t fall apart!
Chilling, Cutting, and Chocolate Drizzle for Protein Bars
Now comes the hardest part: waiting! You must pop that pan straight into the refrigerator for at least one full hour. This chilling time lets that peanut butter and sweetener firm up, giving you those beautiful, clean cuts. Seriously, don’t rush this—if you cut it early, you’ll just have sticky peanut butter mush!
Once it’s totally firm, lift the whole slab out using those parchment paper handles and set it on a cutting board. Slice it into 10 or 12 equal bars. Next, melt your dark chocolate. I do mine in the microwave in 30-second bursts, stirring in between so it doesn’t seize up. Once it’s silky smooth, drizzle it artistically all over your peanut butter protein bars. Pop them back in the fridge just until that beautiful chocolate hardens. You can see another great no-bake option here, though this one uses pudding: easy no-bake chocolate eclair cake!
Making These Protein Bars Ideal for Meal Prep
You know how much I love anything that saves me time during the week, and these simple homemade snacks are amazing for meal prep bars! Because they require zero baking and are so sturdy once chilled, I make a double batch every Sunday. They are just perfect for throwing into my lunch bag for a mid-morning protein boost or for a quick grab-and-go energy bar when I’m running out the door.
The best part? They stay chewy and fresh all week long, provided you store them correctly. This recipe truly is one of the best high protein recipes for busy folks. If you’re looking for other meal prep wonders, you have to see my Greek Mason Jar Salad ideas—they pair perfectly with these bars!
Storage Guidelines for Chewy Protein Bars
Listen closely, because how you store these chewy protein bars affects their texture! You absolutely must keep these in the refrigerator. Throw them into an airtight container—I like to put a small piece of wax paper or parchment between the layers so the chocolate drizzle doesn’t stick to the next layer.
When stored properly in the fridge, these peanut butter protein bars stay good for up to one full week. They firm up a little more when cold, which I actually love, but if you want them softer, just let them sit on the counter for about ten minutes before you eat them. Simple storage for simple eating!
Variations on Your Favorite Peanut Butter Protein Bars
Don’t feel like you have to stick to peanut butter every single time! That’s the fun of these homemade protein bars—they are totally adaptable. If you have an allergy or just want to switch things up, you can easily swap out the peanut butter for creamy almond butter or even sunflower seed butter for a nut-free option. Just know that some nut butters are drier than others, so you might need that extra teaspoon of milk!
Want a little more cozy flavor? Mix in a half teaspoon of cinnamon or a tiny pinch of nutmeg with your dry ingredients! Oh, and if you happen to grab chocolate protein powder instead of vanilla, you’ll end up with rich chocolate protein bars no bake style! These little tweaks keep these simple protein bars exciting week after week.
For a truly indulgent drizzle, try mixing a tiny bit of instant coffee powder right into your melted dark chocolate. That mocha kick goes perfectly with the peanut butter base. If you enjoy chocolate-flavored protein snacks, you absolutely need to check out my recipe for a wonderful chocolate protein shake for another easy win!
Frequently Asked Questions About Homemade Protein Bars
I get so many questions when people try making these for the first time, especially since they are so quick! These easy protein bar recipes sometimes raise little eyebrows because they don’t use eggs or bake. Here are a few things folks always ask me about making these fantastic little fuel packs!
Can I make these low sugar protein bars?
That’s a fair question, especially when watching sugar counts! You absolutely can try to make these low sugar protein bars. You’d need to swap out the maple syrup or honey for a granulated zero-calorie sweetener, like erythritol or monk fruit blend.
Now, fair warning: liquid sweeteners like honey do more than just sweeten—they help bind everything. If you switch to a granular sweetener, your mixture will instantly feel much drier, so you’ll likely need to add back moisture. Start with just a tablespoon of water or plain unsweetened almond milk and mix really well until you get that stiff dough consistency again. You might need a touch more, but go slow!
Are these good protein bars for beginners?
Oh my goodness, yes! If you’re new to the world of homemade protein bars, this recipe is your absolute starting line. It’s truly one of the best quick protein treats you could make because there is zero chance of burning them, and you only need one mixing bowl!
You don’t need any fancy equipment—just some elbow grease and a spatula to press everything down firmly. If you can mix five things and put a container in the fridge, you can master these bars. They are a fantastic way for beginners to jump right into making satisfying, healthy snacks without stress.
Estimated Nutritional Snapshot for These Protein Bars
I know a lot of you are tracking macros—I totally get wanting to know what you’re fueling your body with! Since these are homemade protein bars made with specific ingredients like peanut butter and protein powder, these numbers are a solid estimate based on the standard types of ingredients I use in my batches.
Take these figures as a great starting point, but remember that if you use a different brand of peanut butter or a different type of protein powder, your final count for these simple homemade snacks might shift a touch. It all depends on what you choose to put in!
Based on dividing the full recipe into 10 servings, here’s what you can generally expect from one of these squares:
- Calories: 180
- Protein: 10g
- Total Fat: 9g
- Carbohydrates: 18g
- Sugar: 8g
See? That 10 grams of protein per serving is fantastic for how quick and easy these are to make—you really can’t beat that for meal prep bars! We are keeping the saturated fat pretty low on these, too, which is a big win considering how much peanut butter is involved. Just remember, this breakdown doesn’t account for the dark chocolate drizzle on top, as that can vary wildly based on how heavy-handed you are with that sweet topping for your protein bars!
Share Your Homemade Protein Bars Experience
Whew! That’s it—your very first batch of ridiculously easy, no-bake protein bars is chilling in the fridge! I hope you’re as excited as I am for that first bite when they are perfectly set. Now that you’ve got the secret to these simple homemade snacks, I really want to see what you come up with!
Did you manage the chocolate drizzle without getting chocolate on your nose? (It happens to the best of us!) Did you try almond butter instead? Let me know how it turned out! These recipes thrive on community feedback, so please drop a rating below to let me know how much you loved these quick protein treats.
Don’t be shy—tell me about any little tweaks you made to your peanut butter protein bars. Did you add flax seeds? Did you use vanilla whey or unflavored powder? Every little bit of feedback helps our whole community figure out the best ways to make these fantastic homemade protein bars. I can’t wait to read your comments and see your pictures of these amazing meal prep bars!
Print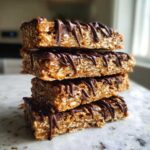
Easy No-Bake 5-Ingredient Peanut Butter Protein Bars
- Total Time: 1 hour 10 min
- Yield: 10 servings
- Diet: Vegetarian
Description
Make simple, chewy peanut butter protein bars at home with only five ingredients. These require no baking and are perfect for quick meal prep.
Ingredients
- 1 cup rolled oats
- 1/2 cup peanut butter
- 1/2 cup vanilla or unflavored protein powder
- 1/4 cup maple syrup or honey
- 2 tablespoons melted dark chocolate (for drizzle)
Instructions
- Line an 8×8 inch baking pan with parchment paper, leaving an overhang on the sides for easy removal.
- In a medium bowl, combine the rolled oats, protein powder, and peanut butter.
- Pour in the maple syrup or honey. Mix all ingredients thoroughly until a stiff, uniform dough forms.
- Press the mixture evenly into the prepared pan. Use the back of a spoon or your fingers to compact it firmly.
- Place the pan in the refrigerator for at least 1 hour to set.
- Once firm, lift the block out using the parchment paper overhang. Cut into 10 to 12 bars.
- Melt the dark chocolate in a microwave-safe bowl in 30-second intervals, stirring until smooth. Drizzle the melted chocolate over the bars.
- Return the bars to the refrigerator until the chocolate sets, then slice completely and store.
Notes
- For a vegan option, use maple syrup instead of honey.
- If the mixture seems too dry, add one teaspoon of water or milk alternative at a time until it holds together.
- Store the finished bars in an airtight container in the refrigerator for up to one week.
- Prep Time: 10 min
- Cook Time: 0 min
- Category: Snack
- Method: No-Bake
- Cuisine: American
Nutrition
- Serving Size: 1 bar
- Calories: 180
- Sugar: 8
- Sodium: 85
- Fat: 9
- Saturated Fat: 2
- Unsaturated Fat: 7
- Trans Fat: 0
- Carbohydrates: 18
- Fiber: 2
- Protein: 10
- Cholesterol: 0

Comments are closed.