

Ah, the convenience struggle! We’ve all been there, right? You’re busy, rushing between tasks, maybe getting that familiar 3 PM energy slump, and you reach for a store-bought snack only to find it’s packed with ingredients that sound more like a chemistry lesson than food. It’s frustrating! That’s why, after testing what felt like a million options, I landed on this absolute marvel: my five-ingredient, no-bake peanut butter and chocolate **protein bars**. Trust me, these are the **homemade protein bars** that actually taste like a treat, not sawdust! I keep a batch ready in my kitchen, and they zero out that afternoon crash instantly. It’s Italian efficiency meeting American fitness needs! If you love this kind of quick fuel, you should also check out my recipe for easy peanut butter energy balls for rotating your snack rotation.
Why You Will Love These Easy Protein Bars
If it isn’t delicious, I simply won’t make it, and these bars pass my taste test with flying colors! They solve so many problems that those chalky, overly processed bars at the checkout counter create. You’ll want to make these **protein bars** for:
- They are perfectly **chewy protein bars**—no crumbling, no chalkiness, just smooth satisfaction.
- Pure speed! They are **no bake protein bars** that take maybe 10 minutes of actual work.
- They are ideal for **quick protein snacks** when you need sustained energy immediately.
- You control the sweetness, meaning less hidden sugar than the store-bought versions.
They are honestly my favorite way to keep up my energy between my kitchen explorations and family time. If you love quick prep, check out my one-bowl banana protein muffins too!

Essential Ingredients for Perfect No Bake Protein Bars
This recipe is famous for being budget-friendly because it only asks for five core ingredients—five! That’s it. Seriously, I love recipes where I don’t have to rush to the store for six different specialty items. You probably have most of this on hand already. We need simple things like rolled oats and your favorite protein powder.
We use natural peanut butter, and I stress *natural*—meaning nothing added but peanuts and maybe salt. Those oils separated at the bottom of the jar just blend in better than hydrogenated stuff. The sweetener is honey or maple syrup, and we finish it with a sprinkle of mini chocolate chips if we’re feeling fancy. See? Simple, high-quality building blocks for amazing **high protein snacks**.
If you want more ideas on make-ahead breakfasts, take a peek at my favorite protein-packed overnight oats recipes!
Ingredient Notes and Substitutions for Your Protein Bars
Now, every ingredient plays a role in the binding, so if you swap, you must balance! If you make these **protein bars** vegan, which is easy to do, just swap that honey for pure maple syrup. Maple syrup is a bit runnier than honey, so you might need just a tiny bit less sweetener overall, maybe a teaspoon less, to keep the dough from getting too loose.
When choosing protein powder, remember that whey generally absorbs liquid differently than plant-based powders. If you use a plant powder, your mix might feel a bit drier, so don’t panic! Just add a teaspoon of water or milk until it holds together nicely when you squeeze it. That little bit of adjusting makes sure you get those satisfyingly **chewy protein bars** every single time!
Step-by-Step Guide to Making Homemade Protein Bars
Okay, this is the fun part—where we turn simple pantry items into magic fuel! The best thing about these **homemade protein bars** is that we don’t turn the oven on once. No cooking required snacks here, just mixing and chilling. My mother used to say that the secret to any great bar is preparation, so pay attention to that parchment paper overhang. It saves your sanity later when trying to lift the block out!
We mix everything dry first, make sure it’s uniform, and then incorporate the wet ingredients until we get that perfect, thick dough. And here is my biggest secret, straight from my Italian kitchen experience: you must press! Press that dough into the pan with determination, maybe using the bottom of a measuring cup. The firmness you achieve now directly translates to slices that won’t crumble into a mess later. It’s all about creating that dense, satisfying structure we all want in a great **protein bar**!

If you’re looking for other simple make-ahead items, you absolutely must try my easy homemade breadsticks recipe—just as satisfying, but savory!
Mixing and Setting Up Your Easy Protein Bars
First things first, get that 8×8 inch dish ready with parchment paper hanging over the sides. This sling is crucial! In your bowl, toss in the oats and powder, followed by what I call the glue—the peanut butter and sweetener. Mix it until it looks completely blended, like a thick, slightly sticky paste. If you see dry pockets of oats anymore, keep mixing! We want that thick, uniform dough, which is how we guarantee these **protein bars** hold their shape perfectly when we slice them later.
Chilling and Cutting Your High Protein Snacks
Once everything is pressed down firmly into that lined pan (remember my pressing tip?), we move to the chill phase. They need at least one full hour in the refrigerator to firm up completely; don’t cheat this step! If you rush it, they just become sticky lumps instead of neat **high protein snacks**.
When it’s time to cut, here’s a little bonus trick: run your sharp knife under hot water for a second and dry it quickly. Warm the blade just slightly! This melts the peanut butter and chocolate just enough to glide through without tearing. You’ll get those clean, beautiful edges you see in the photos!
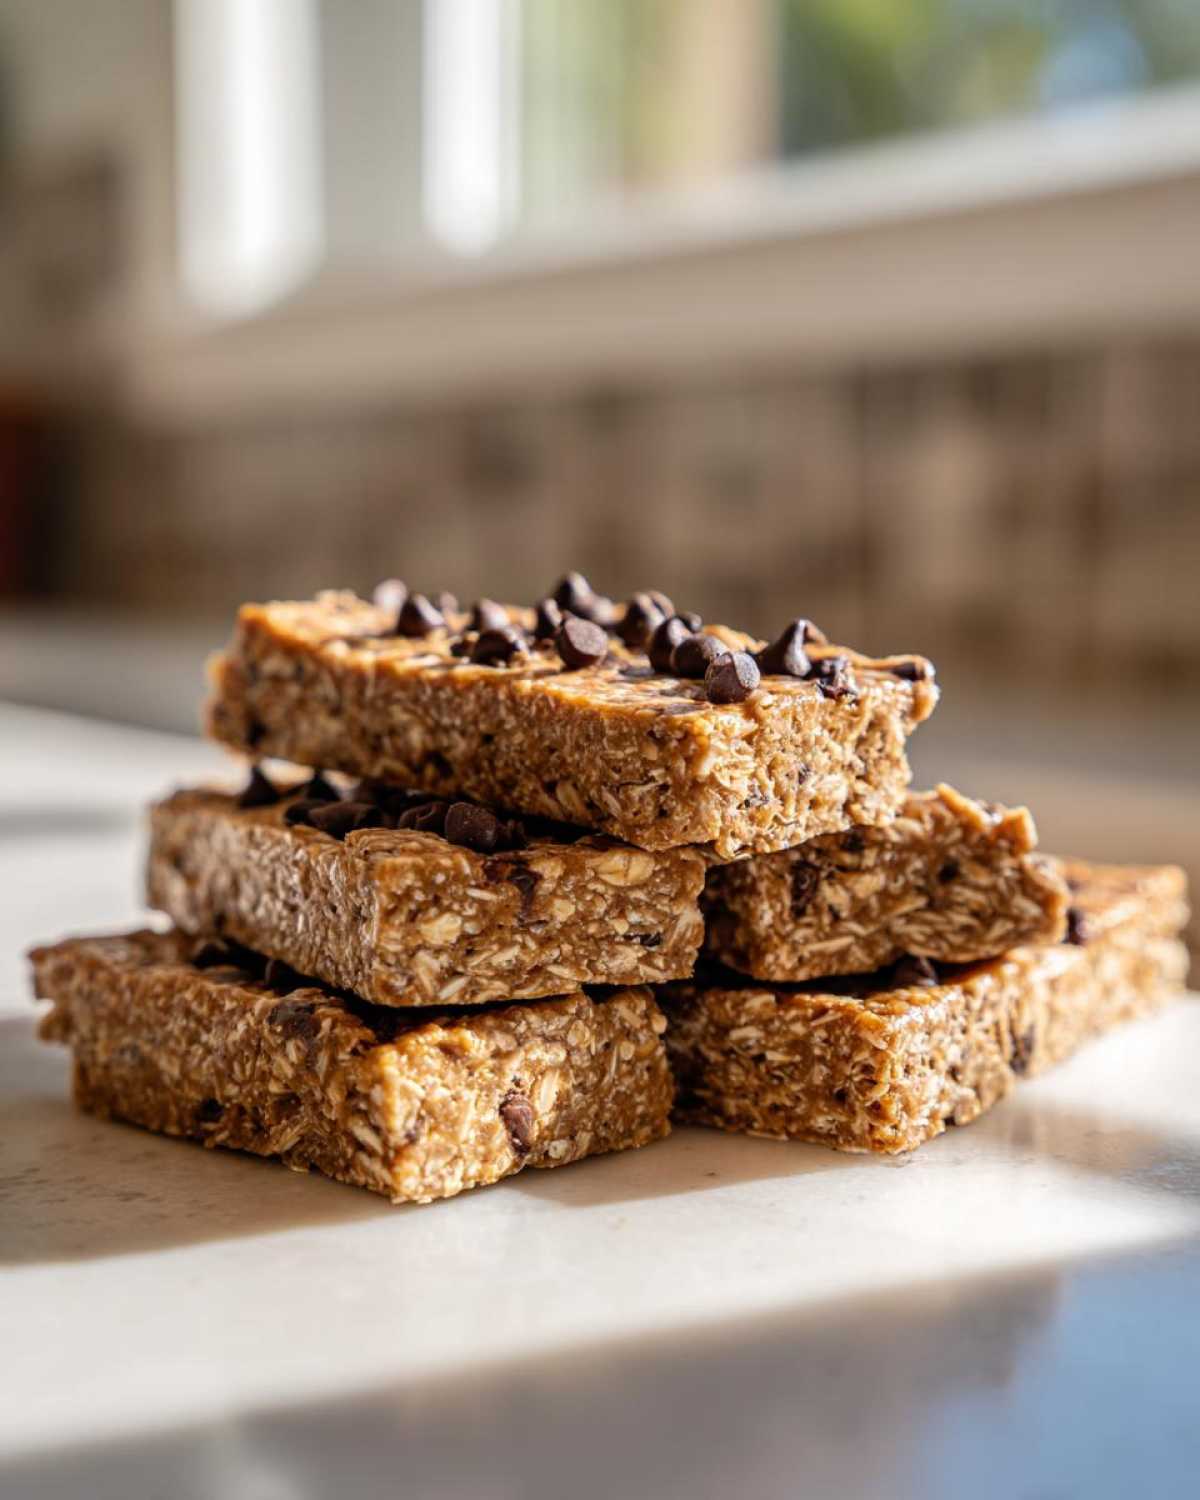
Tips for Success with Homemade Protein Bars
Making any **protein bar recipe** at home is rewarding, but sometimes the dough just doesn’t cooperate, right? Don’t throw it out! We can almost always fix it. If your mixture looks too dry and crumbly—meaning it won’t stick when you squeeze it—that usually means your protein powder absorbed more moisture than expected. Just add liquid, a teaspoon at a time. A splash of water, milk, or even a tiny drizzle more of honey will bring it back together. This ensures you get those perfectly bound, **best homemade protein bars**!
Now, if you’re dealing with the opposite problem—too sticky, refusing to leave your hands when pressing into the pan—you need a little more dry bulk. Add one tablespoon of oats or protein powder at a time until the mixture firms up enough to handle. A little troubleshooting goes a long way toward perfect **meal prep bars**. For more of my favorite kitchen fixes, check out this simple best egg salad recipe; troubleshooting textures is key for everything!
Customizing Your Protein Bars: Flavor Variations
While my peanut butter and chocolate version is classic—truly unbeatable for a quick fix—you know I love variety! Once you master this base, switching things up is simple. It shows off your skills, and keeps your snacks interesting so you don’t get bored with your **high protein snacks**. Think of this recipe as your foundation!
First up, ditch the peanut butter for almond butter. Hello, sophisticated flavor! These **peanut butter protein bars** become rich, slightly earthier **almond butter protein bars**, and they are fantastic, especially if you add a pinch of cardamom for warmth.
If you are actively looking for **low sugar protein bars**, skip the honey entirely. Instead, use a sugar-free maple syrup alternative—make sure it’s one that really binds well—and add 1/2 teaspoon of cinnamon and a dash of vanilla to build flavor where the sugar used to be. It works beautifully!
Finally, my favorite indulgent twist: the “Mocha Treat.” Replace half the vanilla protein powder with chocolate powder, and add 1/2 teaspoon of instant espresso powder to the dry mix. It transforms them into decadent little **chocolate protein bars** that taste like dessert! For more ways to reduce sugar beautifully, take a look at my sugar-free banana bread recipe.
Storage and Make Ahead Protein Bars
This is where these **protein bars** truly shine for people like us who are running around! Because they are no-bake, they excel as **meal prep bars**. Once they are cut, I layer mine between squares of wax paper inside an airtight container. They keep beautifully in the refrigerator for a solid week. I find the texture is best when served cold, honestly!
But if you make a huge batch like I tend to do—because why only make ten when you can make twenty?—toss them into a freezer-safe bag. They freeze beautifully! You can pull one out the night before you need it, and it thaws perfectly overnight in the fridge. This is the secret to having **quick protein snacks** available thirty seconds before you run out the door. You can see how I apply this concept to my chia pudding meal prep, too; make-ahead is key to staying organized!

Serving Suggestions for Your Quick Protein Snacks
These **quick protein snacks** are so versatile, which is why I adore them! If you need something substantial before heading to the gym, just grab one of these bars alongside your water bottle. They offer sustained energy without weighing you down. For an after-dinner replacement when you’re craving something sweet, they handle that job perfectly too. Honestly, my favorite thing is pairing them with my strong Italian morning coffee—it’s like a little treat before the day starts. For a truly powerful pick-me-up, try having it alongside my ultimate energizing protein coffee smoothie!
Frequently Asked Questions About Protein Bars
When you’re making **homemade protein bars** for the first time, you always have questions floating around in your head! I’ve gathered the most common ones I receive about getting these results exactly right. Don’t worry if you need to tweak things; that’s what cooking is all about!
I want you to succeed in making these the **best homemade protein bars** you’ve ever had. Do you need to use peanut butter? Can I sneak in more protein? Here are the quick answers I’ve gathered from testing these recipes for years.
Can I make these protein bars chewy instead of firm?
Oh yes, you absolutely can! The firmness comes from the chilling time. If you prefer a truly soft, **chewy protein bar**, chill them for only 45 minutes instead of a full hour, or just reduce the time they sit in the fridge before cutting. That little bit of warmth keeps them softer!
What is the best type of protein powder for these no bake protein bars?
For the best binding and that classic flavor, I usually reach for a vanilla whey concentrate. However, if you are making **vegan protein bars**, a plant-based blend works beautifully, though you might need that extra dash of water I mentioned earlier. Avoid powders that are high in coconut flour, as they can soak up too much moisture.
For more ideas on boosting your daily protein intake with simple, wholesome ingredients, you must see my recipe for high-protein cottage cheese egg bites. They are amazing for meal prep!
Nutritional Estimates for These Protein Bars
When you’re making your own **protein bars**, you gain fantastic control over what goes in, which is half the fun! Based on the five-ingredient recipe using standard ingredients, here is what you can generally expect per bar. Remember, this is an estimate because the exact brand of peanut butter or protein powder you select can change things slightly. This is why I say these are **healthy snack bars**—you know exactly what you’re consuming!
- Serving Size: 1 bar
- Calories: 180
- Protein: 12g
- Carbohydrates: 18g
- Fat: 9g
- Sugar: 6g
Always keep in mind these figures are approximations based on the standard ingredients list. If you swap peanut butter for almond butter or use a sugar-free syrup, those numbers will change! That’s the beauty of creating your own **energy bars homemade**; you tweak the numbers to fit your goals perfectly.
Print
Easy 5-Ingredient No-Bake Peanut Butter Protein Bars
- Total Time: 70 min
- Yield: 10 servings
- Diet: Vegetarian
Description
Make your own high protein snacks at home with this easy, no-bake recipe. These chewy peanut butter protein bars use only five simple ingredients and are perfect for quick meal prep or on-the-go energy.
Ingredients
- 1 cup rolled oats
- 1/2 cup natural peanut butter
- 1/2 cup vanilla or unflavored protein powder
- 1/4 cup honey or maple syrup
- 1/4 cup mini chocolate chips (optional, for topping)
Instructions
- Line an 8×8 inch baking dish with parchment paper, leaving an overhang on the sides for easy removal.
- In a medium bowl, combine the rolled oats, protein powder, and peanut butter.
- Add the honey or maple syrup to the mixture.
- Mix all ingredients thoroughly until a thick, uniform dough forms. You may need to use your hands to fully incorporate everything.
- Press the mixture firmly and evenly into the prepared baking dish. Pack it down well to ensure the bars hold their shape.
- If using, sprinkle the mini chocolate chips over the top and gently press them into the surface.
- Place the dish in the refrigerator and chill for at least 1 hour, or until the bars are firm.
- Use the parchment paper overhang to lift the block out of the pan. Cut into 10 even bars.
- Store your homemade protein bars in an airtight container in the refrigerator for up to one week.
Notes
- For a vegan option, ensure you use maple syrup instead of honey and a plant-based protein powder.
- If the mixture seems too dry, add one teaspoon of water or milk at a time until it comes together.
- These are excellent for make ahead protein bars; they freeze well for longer storage.
- Prep Time: 10 min
- Cook Time: 0 min
- Category: Snack
- Method: No Bake
- Cuisine: American
Nutrition
- Serving Size: 1 bar
- Calories: 180
- Sugar: 6
- Sodium: 95
- Fat: 9
- Saturated Fat: 2
- Unsaturated Fat: 7
- Trans Fat: 0
- Carbohydrates: 18
- Fiber: 2
- Protein: 12
- Cholesterol: 0


Comments are closed.