

Oh, my friends, is there anything more satisfying than biting into perfectly cooked seafood? I’m thinking of that glorious crunch followed by the tender, juicy center. When I moved here from Italy, one of the first American dishes I truly fell in love with was a proper plate of golden, deep-fried seafood. Forget the soggy, limp versions you sometimes find; we are going for perfection today!
This fried shrimp recipe is what I call the ultimate guide—it’s my **Crispy Southern Fried Shrimp with Buttermilk Soak**. It’s fast, it’s flavorful, and honestly, it proves that you don’t need hours and complicated steps to achieve gourmet results. Trust Lina Kohn when I say, the secret to texture lies in the soak. Get your skillet ready; we are making the best fried shrimp you’ll ever have at home!

Why This Crispy Southern Fried Shrimp Recipe Works
When I first started making this dish, I needed a method that was reliable. You deserve a crispy fried shrimp recipe that doesn’t fail you, especially when you’re hoping to get dinner on the table quickly. This one never lets me down, and I think you’ll love how straightforward it is. Think of it as my little secret for capturing that wonderful, crunchy texture we all crave, much like my crispy buttermilk fried chicken!
- This method guarantees that ultra-crispy crust you dream about—no more soggy coating!
- It’s an incredibly easy fried shrimp option, perfect even if you’re having a busy day.
- The seafood stays naturally juicy; nobody wants dry shrimp, *mai vero*?
Achieving the Perfect Buttermilk Fried Shrimp Texture
The buttermilk is magic, truly. It tenderizes the shrimp a bit while it rests, which keeps the inside soft. More importantly, that slightly thick, acidic bath helps the seasoned flour cling on tight. When that coating hits the hot oil, it locks on instantly, giving you that fantastic crunchy shell.
Quick Preparation for a Weeknight Win
If you’re looking for easy seafood dinner ideas, listen up! Aside from the marinating time, the actual cooking is so fast. Seriously, the shrimp only needs a few minutes to turn golden. You can have this amazing homemade fried shrimp ready to serve faster than it takes to decide what takeout to order! It’s a true quick seafood dinner win.
Gathering Ingredients for Perfect Fried Shrimp
Okay, now for the fun part—getting everything together! For recipes like this, especially when frying, using good, fresh ingredients makes such a difference. I make sure my flavor base is solid before we even think about turning on the heat. Remember, we are aiming for that super-popular southern fried shrimp experience, so don’t skimp on the seasoning in that flour!
You will need 2 pounds of lovely, large shrimp. And listen to me carefully: they must be peeled and perfectly deveined, but please leave the tails on! They make beautiful handles for dipping later. The full list is right below, focusing on that crucial buttermilk soak and that vibrant, savory coating mix.
Here is what you need to gather:
- 2 pounds extra large shrimp, peeled and deveined, tail on
- 2 cups buttermilk
- 1 large egg
- 1 tablespoon hot sauce (optional)
- 1 1/2 cups all-purpose flour
- 1/2 cup cornstarch
- Plenty of vegetable or peanut oil, for deep frying
- Seasonings: salt, black pepper, smoked paprika, garlic powder, onion powder, and a pinch of cayenne if you like a little fire!
Expert Tips for the Best Batter for Fried Shrimp
Now we talk texture! This is where we elevate this from good to unforgettable. Getting the **best batter for fried shrimp** isn’t just about adding spices; it’s about the ratio of ingredients in that flour dredge. Trust me, mixing the flour with cornstarch is the absolute key to that crackly exterior we are aiming for. This simple step ensures you get that beautiful, rough coating that fries up perfectly golden.
My favorite little trick is this: I use a bit more cornstarch than some traditional recipes call for. This makes the coating lighter and prevents it from feeling heavy or greasy once it’s done. If you want that beautiful crunch that shouts ‘Southern cooking,’ don’t skip this step. It’s a game-changer, similar to how I get my potato cakes so wonderfully crisp!

The Role of Cornstarch in Your Shrimp Coating
Why cornstarch? It’s all about water absorption when it hits the heat. Cornstarch doesn’t absorb oil the way plain flour does, so when you fry it up, that little addition creates a much drier, crispier surface layer. This is what keeps your **homemade fried shrimp** from steeping in oil and turning soft. It’s a small thing that delivers huge results!
Step-by-Step Instructions: How to Make Fried Shrimp Crispy
Alright, *bello*, it’s time to put our theory into practice! Watching this process happen is almost as satisfying as eating the final product. We need clear steps here because consistency is what separates good fried shrimp from incredible fried shrimp. The key is in the timing and making sure that beautiful coating sticks exactly how we planned.
We start with the marinade, which works its magic while you set up your fryer. Then, we build that crust layer by layer. If you’ve already made my crispy orange chicken, you know the drill: hot oil and careful batch management keep everything perfect.
Prepping the Buttermilk Soak and Seasoning
First, you whisk together that buttermilk, the egg, and the hot sauce—just a quick combo. Toss your cleaned, tail-on shrimp right into that mixture. Now, this is important: cover it and put it in the fridge. You want them to soak for at least 30 minutes, but 2 to 4 hours is much better for tenderness and flavor infusion!
Frying Technique for Golden Fried Shrimp
While the shrimp is chilling, get your oil ready. You absolutely must use a thermometer here; we are aiming for a steady 350 degrees F (175 degrees C). If the oil is too cool, your shrimp gets oily. Too hot, and the outside burns before the inside cooks! That’s how you learn **how to make fried shrimp crispy**—temperature control is everything!
Once the oil is ready, working quickly, pull the shrimp from the buttermilk, let the heaviest drips fall off, and press it HARD into your seasoned flour mix. Really pat it on! Fry them in small batches only; overcrowding drops the oil temperature immediately. They only need 2 to 3 minutes per side until they are perfectly golden. Use a slotted spoon to transfer them straight to a wire rack—never paper towels—to keep that gorgeous crunch fresh. If you want true southern fried shrimp, don’t rush this final frying stage. You can peek at what my friends over at Miss in the Kitchen do when they tackle this tough technique, too!
Tips for Success When Making Homemade Fried Shrimp
Even with a great recipe, sometimes the difference between good and *amazing* **homemade fried shrimp** comes down to those little habits we develop over years in the kitchen. I’ve gathered a couple of my most important rules here that will ensure that crust stays perfect from the first batch to the last. It’s about temperature management and making sure that coating sets!
Remember that tip about letting the shrimp rest in the flour for five minutes before frying? That’s crucial! It lets the coating hydrate just enough so it doesn’t blow off the second it hits the oil. Also, when you pull the shrimp out, please, please drain them on a wire rack set over a baking sheet, just like I do for my chicken parmesan. Laying them flat allows air to circulate underneath, preventing steam from building up and making the bottoms soggy.

If you want to see how a few other trusted sources approach keeping their shrimp perfectly crisp, check out the helpful guide over at The Cozy Cook here. Happy frying!
Serving Suggestions: Fried Shrimp Dipping Sauces
We’ve made beautiful, golden shrimp—now we need the perfect partners for dipping! You can’t have excellent **fried shrimp** without a fantastic sauce ready to go. The classics are classics for a reason, so for me, that means a vibrant cocktail sauce and a creamy tartar sauce are mandatory on the table.
But, if you want to keep things interesting, try something a little different! I love whipping up a quick spicy aioli—just mayo, a squeeze of lemon, and a tiny bit of smoked paprika mixed in. It totally elevates the experience. Having a variety of **fried shrimp dipping sauces** ensures everyone finds their perfect flavor pairing. Don’t forget a side of fresh lemon wedges!

If you need inspiration on making great accompanying sides, check out my recipe for the best egg salad—it makes a surprisingly rich base for a creamy dip too!
Storage and Reheating Instructions for Leftover Fried Shrimp
Oh, the tragedy of finding leftover fried shrimp the next day! If you are lucky enough to have any leftovers—which rarely happens in my house—we need a method to bring that crunch back. The absolute cardinal rule? Do not, I repeat, do not try to use the microwave!
Microwaving fried foods is the fastest way to steam the coating and guarantee a soggy mess. We worked so hard to get that beautiful texture, and we won’t let a microwave ruin it. Instead, we rely on dry heat to crisp things up again, much like when I reheat things for my applesauce!
For the crispiest results, your best friend is either a hot oven or an air fryer. Preheat your conventional oven to about 400 degrees F (200 degrees C). Place the shrimp in a single layer on a wire rack set over a baking sheet. This allows air to circulate all around them. Bake them for about 8 to 10 minutes. If you have an air fryer, toss them in at 375 degrees F for 4 to 6 minutes until they are sizzling hot again.
For storage, just let the shrimp cool completely after frying, and then keep them in an airtight container in the refrigerator. They should be good for two or, maybe, three days. Honestly, though, the best way to eat them is straight from the oil, piping hot!
Frequently Asked Questions About Crispy Fried Shrimp
I know that sometimes when you look at a recipe, you still have little doubts floating around. That’s totally normal! I try to answer everything I can right here because I want your kitchen adventure to be stress-free, just like when I make my easy pork steak. These questions come up a lot, especially regarding texture and different cooking styles.
Can I make this fried shrimp recipe without deep frying?
Oh, yes, you certainly can try alternatives, my dear! If you don’t want to deep fry, the air fryer is your next best friend for making **easy fried shrimp**. You should still use the buttermilk soak and the seasoned flour coating. Pop them in the air fryer basket and cook them until golden brown, maybe flipping halfway through. Now, I won’t lie—it won’t have the exact same rich, all-over crispiness as the deep-fried version, but it’s much lighter. Pan-frying works too, but you need to use enough oil to come halfway up the side of the shrimp, and be prepared to cook in smaller batches!
What is the secret to making fried shrimp crispy every time?
If you remember nothing else, remember this: temperature control and letting the coating set! That is the real secret to perfect **southern fried shrimp**. First, your oil must be steady at 350 degrees F. If it dips, the coating gets soggy immediately. Second, after you dredge the shrimp in the flour, let them rest on a wire rack for about five minutes before they go into the oil. This resting time is essential; it lets the flour hydrate slightly, locking it on tight so that it crisps up beautifully. You can read more about the classic approach over at Liam Jayne’s site here!
Do I have to use buttermilk for this recipe?
While buttermilk is the absolute best way to achieve that tender interior and help the coating stick, if you are in a real pinch, you can substitute. A close second is mixing regular milk with a tablespoon of lemon juice or white vinegar and letting it sit for ten minutes to curdle slightly. It mimics the acidity of the buttermilk! But honestly, for the best crispy fried shrimp recipe, the buttermilk truly shines through.
Can I use pre-cooked shrimp?
No, *cara mia*, please don’t! We are aiming for succulent, perfectly cooked shrimp. Pre-cooked shrimp are already firm, and when you put them in hot oil, they will immediately overcook, becoming tough and rubbery very quickly. Always use fresh, raw shrimp for this recipe so they finish cooking at the exact same moment the coating turns golden brown.
Estimated Nutritional Information for Fried Shrimp
It’s always good to have a general idea of what you are enjoying, even when it’s a treat! As someone who loves to cook with passion, I believe in transparency with my ingredients and measurements. Because this recipe involves frying, the fat content will naturally be higher because of the oil absorbed by the coating, but look at that protein content—it’s fantastic!
Please keep in mind that these numbers are just estimates, *tesoro mio*. They’re calculated based on the recipe yielding 4 servings (about 6 shrimp per person) using the ingredients listed. If you use a different type of oil, use less coating, or have a wildly different portion size, these figures will shift! This information should suffice for general planning when you are enjoying this delicious fried shrimp!
- Serving Size: 6 shrimp
- Calories: 350
- Fat: 18g
- Saturated Fat: 3g
- Carbohydrates: 25g
- Protein: 24g
- Sodium: 650mg
- Sugar: 2g
Disclaimer: Nutritional values provided are estimates and depend heavily on specific brands, ingredient variations, and precise cooking techniques used.
Print
Crispy Southern Fried Shrimp with Buttermilk Soak
- Total Time: 55 min
- Yield: 4 servings
- Diet: Low Lactose
Description
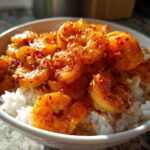
Make the best homemade fried shrimp with this easy recipe. The buttermilk soak guarantees juicy shrimp inside and a super crispy, golden coating outside. Perfect for a quick seafood dinner or appetizer.
Ingredients
- 2 pounds extra large shrimp, peeled and deveined, tail on
- 2 cups buttermilk
- 1 large egg
- 1 tablespoon hot sauce (optional)
- 1 1/2 cups all-purpose flour
- 1/2 cup cornstarch
- 1 teaspoon salt
- 1 teaspoon black pepper
- 1 teaspoon smoked paprika
- 1 teaspoon garlic powder
- 1/2 teaspoon onion powder
- 1/2 teaspoon cayenne pepper (optional, for heat)
- Vegetable or peanut oil, for deep frying
Instructions
- In a medium bowl, whisk together the buttermilk, egg, and hot sauce until combined. Add the cleaned shrimp, toss to coat completely, and cover. Refrigerate for at least 30 minutes, or up to 4 hours, for the best results.
- In a shallow dish, whisk together the flour, cornstarch, salt, black pepper, smoked paprika, garlic powder, onion powder, and cayenne pepper. This is your seasoned flour coating.
- Pour enough oil into a heavy-bottomed pot or deep fryer to reach about 2 inches deep. Heat the oil to 350 degrees F (175 degrees C). Use a thermometer to monitor the temperature; maintaining this heat is key to crispy fried shrimp.
- Working in batches, remove the shrimp from the buttermilk mixture, letting excess drip off slightly. Dredge each shrimp thoroughly in the seasoned flour mixture, pressing the flour onto the shrimp to create a thick coating.
- Carefully place the coated shrimp into the hot oil, making sure not to overcrowd the pot. Fry for 2 to 3 minutes per side, turning once, until the shrimp are golden brown and cooked through.
- Remove the shrimp with a slotted spoon and place them on a wire rack set over a baking sheet to drain excess oil. This helps keep your fried shrimp crispy.
- Serve immediately with your favorite dipping sauces, like cocktail sauce or tartar sauce.
Notes
- For the crispiest coating, after dredging the shrimp in the flour, let them rest on a wire rack for 5 minutes before frying. This allows the coating to hydrate slightly.
- If you prefer a thinner coating, shake off any excess flour before placing the shrimp in the oil.
- If you are making a large batch, keep the cooked shrimp warm in a 200 degree F oven while you finish frying the rest.
- Prep Time: 15 min
- Cook Time: 10 min
- Category: Dinner
- Method: Deep Frying
- Cuisine: American
Nutrition
- Serving Size: 6 shrimp
- Calories: 350
- Sugar: 2
- Sodium: 650
- Fat: 18
- Saturated Fat: 3
- Unsaturated Fat: 15
- Trans Fat: 0
- Carbohydrates: 25
- Fiber: 1
- Protein: 24
- Cholesterol: 180


Comments are closed.