

Listen, sometimes I feel like my kitchen is an adventure park, and if a vegetable seems weird in a jar, my instinct is *always* to throw some chili flakes on it and see what happens! We all have that one random garden item nobody knows what to do with, right? Well, when I first looked at a pile of bright pink rhubarb, I thought, “This screams sweet dessert, but what if it screams *spicy* instead?”
Trust me on this: rhubarb makes absolutely incredible kimchi. Seriously. The incredible tartness cuts through the garlic and ginger perfectly. If you’ve been meaning to try fermenting but are scared of committing an entire gallon jar to something new, stop right there. This recipe is the answer!
I absolutely adore this Small-Batch Rhubarb Kimchi because it’s just the right size—we’re aiming for about a pint jar. It’s my go-to Kitchen Experiment Recipe when I just have a few stalks leftover from spring baking prep. The first time I tried this, I was sure it would be a total flop, but wow, was I wrong. It was tangy, fizzy, and had the best kick. It’s an easy project, and I think you’re going to love it!
Why You Need This Small-Batch Rhubarb Kimchi Recipe
When you dive into fermenting, you don’t always want to make a giant batch, especially when you’re testing out a flavor combo that sounds a little wild, like rhubarb and gochugaru!
This recipe is your secret weapon for trying something new without commitment. It’s so much fun to dip your toes into Seasonal Fermenting. Here’s the quick scoop on why you should make this pint-sized jar today:
- Perfect for Small Quantity Fermentation: Forget wasting expensive ingredients or filling up your counter space. This recipe yields about one pint, which is perfect for trying out the process or for a small household that eats kimchi slowly.
- Achieving the Perfect Tart and Spicy Recipes Balance: This recipe nails the flavor profile you didn’t know you needed. The natural, sharp tartness of the rhubarb gets beautifully balanced out by the warming spice paste. It’s addictive! For more ideas on fun, seasonal dips, check out my take on seasonal fermenting projects.
Perfect for Small Quantity Fermentation
Honestly, this is the best introduction if you’re looking for a Beginner Kimchi Project. Since we are only making about a pint, cleanup is minimal, and you don’t need a fancy airlock system if you don’t have one.
It’s incredibly practical for using up just a few stalks of rhubarb you might have leftover. Less waste means more flavor enjoyed!
Achieving the Perfect Tart and Spicy Recipes Balance
Traditional kimchi relies on the savory nature of cabbage, but we’re swapping that out for rhubarb’s incredible tang. You’ll find that the small amount of sugar and umami boost from the fish sauce (or soy) really grounds the tartness, making the final result delightfully bright and spicy. It’s way more complex than just a sour pickle, I promise!
Essential Ingredients for Your Small-Batch Rhubarb Kimchi
For this small project, we need incredibly fresh ingredients, which makes getting quality much easier than buying in bulk. Since we’re working with just one cup of rhubarb, every piece truly counts! You want your rhubarb to be firm and vibrant.
Here is exactly what you need for your pint jar of this fantastic spring ferment:
- 1 cup chopped fresh rhubarb (about 1/2 inch pieces)
- 1/2 cup finely chopped napa cabbage (optional, for texture)
- 1 tablespoon coarse sea salt
- 1 tablespoon gochugaru (Korean chili flakes)
- 1 teaspoon minced garlic
- 1/2 teaspoon grated fresh ginger
- 1 teaspoon fish sauce or soy sauce (for vegan)
- 1/2 teaspoon sugar
- 1 teaspoon water
Pro-tip on sourcing: If you have a garden or a local farmer’s market stand selling rhubarb, grab it there! This is the perfect recipe to use up a small, overflow harvest. When you check out these ingredient amounts, you’ll see how precise this recipe is for our seasonal fermenting goals.
Ingredient Notes and Substitutions for Small-Batch Fermentation
Because rhubarb is so different from traditional cabbage, a couple of these ingredients are non-negotiable, and others need a little pointer!
First, let’s talk about the cabbage. I added a tiny bit of Napa cabbage here—just half a cup—because rhubarb gets very soft when it brines. The cabbage gives the final kimchi a little bit of that satisfying “crunch” that people expect. If you don’t have any, don’t stress; the rhubarb kimchi will just be softer, which is still delicious!
For the umami, I listed fish sauce, but please feel free to swap that out for an equal amount of soy sauce or tamari if you’re keeping it vegetarian. That little bit of savory depth is what keeps the flavor balanced against the sharp tartness of the rhubarb.
And finally, the salt! That tablespoon of coarse sea salt isn’t for flavor balance; it’s for texture. It sits on the rhubarb for 30 minutes and magically draws out excess water. This drawing-out process helps keep your final kimchi from turning into pink mush during fermentation. Don’t skip that initial salting step!
Equipment Needed for Your Kitchen Experiment Recipes
Now, since we are keeping this project small and manageable, you don’t need a fancy dedicated fermentation setup. That’s the beauty of these Kitchen Experiment Recipes! We are using simple stuff you probably already have floating around.
For this batch—remember, we’re only making about a pint—you only need three main things, plus the standard mixing gear. Making sure your equipment is clean is the most important first step for any fermentation, no matter the size!
Here’s your quick equipment checklist:
- A medium-sized mixing bowl for the salting process.
- A clean towel or paper towels for rinsing and squeezing.
- A clean, glass jar that holds roughly one pint (16 oz). Mason jars work perfectly.
- A spoon or small spatula for mixing the paste and packing the jar.
That’s it! See how easy that is? You don’t need special weights or fancy bubbling lids for this quick pickle. We rely on pressing the ingredients down hard to keep the rhubarb submerged, which is key for safe Small Batch Fermentation.
Step-by-Step Instructions for Small-Batch Rhubarb Kimchi
Alright, now for the fun part—turning those pretty pink pieces into something punchy and delicious! Since we’re working with a small batch, keeping track of the steps is super easy. We really focus on getting that texture right first because rhubarb is so much wetter than cabbage.
Follow these steps exactly, and you’ll have the best Fermented Rhubarb you’ve ever tasted. It’s worth paying close attention, especially when we handle that water extraction!
Salting and Draining the Rhubarb for Small-Batch Fermentation
Grab your chopped rhubarb (and that optional cabbage, if you’re using it) and toss it in your mixing bowl. Now, sprinkle over the tablespoon of coarse sea salt. Mix it well—make sure every piece gets coated! Then, you need to let this sit for 30 minutes. This is where the magic starts: the salt pulls out all that extra water trapped inside the rhubarb stalks.
Once the timer goes off, you MUST rinse this mixture really well under cold running water. We don’t want it tasting like a salt lick! After rinsing, you absolutely have to squeeze it dry. I mean *squeeze* it, like wringing out a wet sponge. You can use your hands, or if you have a clean cotton tea towel, give it a good twist. This squeezing step is crucial for good texture in your final product!
Creating the Paste and Mixing Your Small-Batch Rhubarb Kimchi
While that rhubarb is getting salty, it’s paste time! In that little empty bowl, mix up your gochugaru, garlic, ginger, fish sauce (or soy sauce), sugar, and the teaspoon of water. Stir it around until you get a nice, thick spice mash. Give it a quick smell—does it grab you? If you know you like things fiery, sneak an extra pinch of chili flakes in here. This is your chance to customize for your perfect tart and spicy recipe!
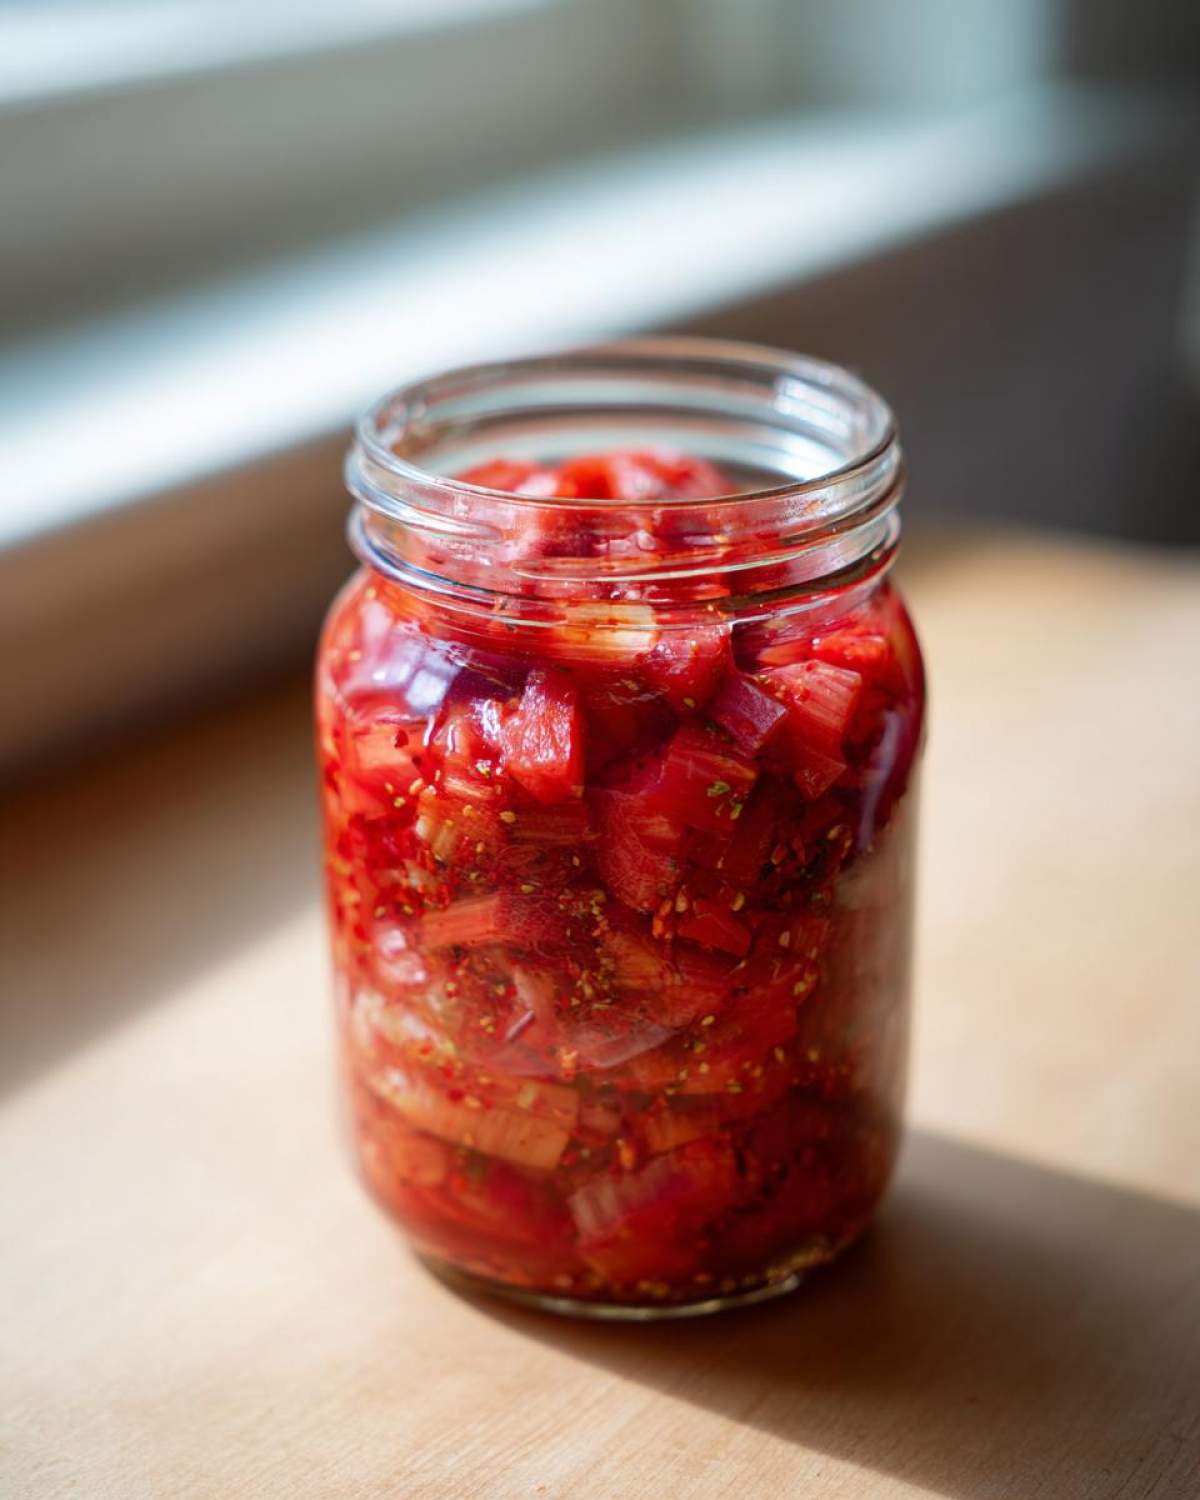
Now, dump your nice, dry, rinsed rhubarb into that spice paste bowl. Use your hands to mix it all up until every single piece of pink rhubarb is coated in that gorgeous red paste. Wow, the color is already incredible!
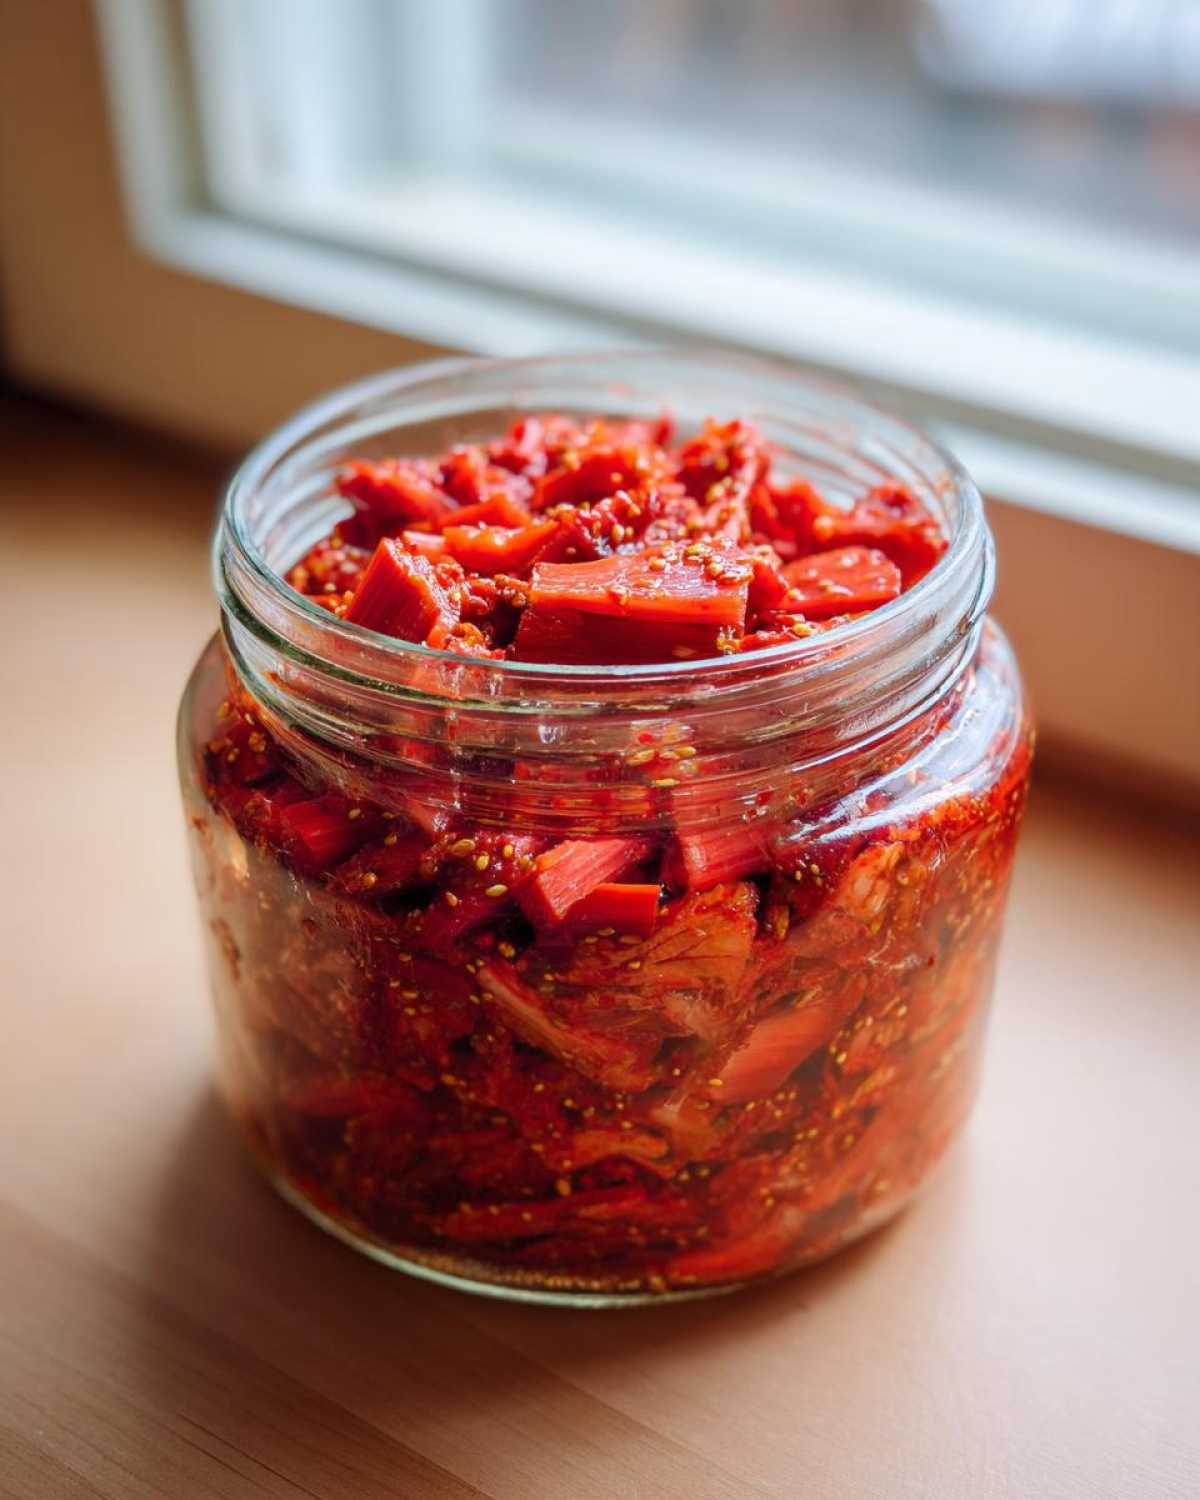
Packing and Sealing for Fermented Rhubarb
Time to get this into your clean pint jar. You need to pack it down hard—really press it into the bottom of the jar using your spoon or even your clean knuckles. We have to eliminate any big air pockets. Press, press, press! This ensures the brine (the little bit of liquid left in the paste) covers the vegetables, which is how Small Batch Fermentation stays safe.
Leave about an inch of space—headspace—at the top of the jar! Remember, fermentation creates gas. Seal the jar loosely—just screw the lid on gently, or use an airlock if you have one. We need to let that built-up gas escape over the next couple of days. If you seal it tight right away, you might have a little kimchi explosion later! Oops!
Fermentation Timing for Your Non Traditional Kimchi
Okay, you’ve packed your pint jar tight, and now we wait. This waiting game is what makes all Unique Kimchi Recipes worthwhile! Since rhubarb is an unusual base for kimchi, you might be watching it like a hawk, but don’t worry too much about timing.
You need to keep your jar happy at room temperature, ideally between 68°F and 72°F. If your kitchen is super warm, things will move fast. If it’s chilly, it’ll take a little longer. But generally, you’re looking at 1 to 3 days on the counter.
You need to check it daily, especially after day one. How do you know when that tart rhubarb is ready to move to the fridge? You’re looking for two things: The first sign is that the kimchi will start to taste slightly sour—not just tart, but tangy like yogurt. The second sign, which is even better, is seeing or hearing bubbles! Lift the lid slightly (burp it!) and you should hear a little hiss. That fizz tells you your healthy bacteria are working hard on your homemade kimchi starter!
Once it tastes pleasantly sour and you get that fizzy sensation on your tongue, it’s done fermenting on the counter. Move that jar straight into the refrigerator. Once it’s cold, the fermentation slows way down, and it’s ready to eat with whatever you’re having!
Tips for Success with Small Quantity Fermentation
Making kimchi in tiny batches is fantastic, but since we’re using rhubarb, a couple of small details can make the difference between amazing and mushy. I’ve learned these things the hard way through my various Kitchen Experiment Recipes, so listen up, because texture is everything here!
The absolute biggest key is that squeezing step we talked about. Rhubarb is naturally dense with water, much more so than, say, cabbage stems. If you don’t press out that water after rinsing the salt off, you end up with a very watery brine sitting at the bottom of your jar. This watery environment encourages the wrong kinds of bacteria, and your spring vegetable kimchi can turn limp faster than you want.
Seriously, squeeze until your hands hurt! You want the rhubarb pieces themselves to feel pliable and slightly strained, not waterlogged. It should feel slightly denser before you mix it with the paste.
Next up: temperature control. Because this is such a Non Traditional Kimchi base, it can sometimes ferment a little faster than your standard napa cabbage batch once it gets going. If your kitchen runs above 75°F, you *must* check it after 24 hours instead of waiting the full 48. Cooler fermentation keeps that tart rhubarb flavor clean and bright, which is what we want. Warmer temps speed up the souring, which isn’t always a bad thing, but for a first-time bake, staying in that 68°F to 72°F sweet spot is ideal.
One last quick note that applies to all DIY small batch pickles: make sure that everything packed into the jar stays beneath the initial liquid line once it settles. If bits are sticking out above the brine on day two, just use a clean utensil or even a small, clean glass marble to gently push them back down. That separation from the air is the secret to keeping those probiotics happy and healthy!
Storage and Refrigeration for Your Fermented Rhubarb
The absolute best part about making a small batch is that you don’t have to worry about finding space for a massive crock jar! Once your rhubarb kimchi tastes perfectly tangy and fizzy—that signal telling you it’s done bubbling on the counter—it’s time to put it to bed in the fridge.
To halt the fermentation process, screw that lid on tight. No more loose seals needed! The cold temperature slows down the microbial activity almost completely. I know some people worry about putting kimchi away when it’s still slightly fizzy, but that’s perfectly fine. That remaining fizz just means you have a vibrant, active product.
Since this is Fermented Rhubarb, it actually tastes best after it’s chilled for a day or two, allowing the spice paste to fully meld with the tart vegetable. You can expect this small pint to last for several weeks, maybe even two months, in the main compartment of your refrigerator. It won’t spoil quickly; it just gets deeper and more complex in flavor the longer it sits happily cold.
Just to be clear, because this is a fresh ferment, you absolutely do *not* reheat this. Kimchi is meant to be enjoyed cold, crunchy, and tangy! It’s a side dish, a topping, or a bright pop of probiotics exactly as it comes out of the fridge.
Frequently Asked Questions About Rhubarb Kimchi
When you’re trying out something new like this, I always get a ton of questions from folks who are nervous about that first fermentation bubble. Don’t sweat it! Most questions usually revolve around texture or timing, especially when you stray from cabbage. Here are the things I get asked most often about making this little jar of probiotic goodness.
Can I skip the salt bath when making this Small Batch Fermentation?
Oh, please don’t skip the salt bath! I know it feels like an extra step, especially since we’re only working with one cup of rhubarb, but that 30-minute salting process is foundational for safe and successful fermentation. The salt doesn’t just season it; it pulls out that excess liquid that would otherwise make your final product watery.
More importantly, the salt kickstarts the brining process, which helps encourage the good lactic acid bacteria to take over before any potential bad guys can settle in. For a quick ferment like this, that initial preparation is key to a great texture and a clean flavor profile. It’s a small step that protects your whole homemade kimchi starter!
What if my Small-Batch Rhubarb Kimchi isn’t bubbling?
This is the anxiety that creeps in on day two! If you’ve packed it correctly, kept it sealed loosely, and you don’t see a single bubble after 36 hours, it almost always comes down to temperature. Fermentation is a living process, and the little bacteria buddies responsible for the fizz are temperature-dependent.
Check your kitchen. Is it chilly? Maybe below 65°F? Pop that jar somewhere warmer—like the top of your fridge or a cupboard away from drafts—and aim for that sweet spot of 68°F to 72°F. It should perk up within 12 to 24 hours once it warms up a touch! If you’ve waited three full days and still nothing, take a cautious taste; if it tastes sour, the bacteria are working slowly, and you can move it to the fridge anyway.
How long will this Unique Vegetable Kimchi last in the fridge?
Once you move your pint jar into the refrigerator, you are essentially hitting the pause button for most of the flavor activity. Because this is a smaller batch and we’ve packed it relatively tight, it stays really vibrant for longer! You should easily get several weeks out of it. I find that after about four weeks, the intense pink color starts to mellow out a bit, but the flavor only gets deeper and richer.
Honestly, good kimchi keeps for months in the fridge, and this Unique Vegetable Kimchi is no different. If you see any white film on top (that’s usually harmless yeast), just scrape it off. If it smells truly foul—like something rotten and not just sour—then toss it, but generally, the cold protects this little jar beautifully!
Share Your Tart and Spicy Recipes Results
Well, you did it! You successfully tamed the bright, wild flavor of rhubarb and turned it into something fizzy, spicy, and utterly addictive. How does your first batch of Small-Batch Rhubarb Kimchi taste? I am dying to know!
Because this is such a fun and unexpected combination, I really want to see your results. Did you add extra ginger? Did you find that just 24 hours was enough fermentation time in your warm kitchen? Don’t keep the secrets to yourself!
If this inspired you to try more tart and spicy recipes, please drop a comment below telling me what you thought of the flavor contrast. More importantly, if you gave this a rating—five stars or a polite three—let me know! Your feedback helps everyone else who is looking for a great Spring Vegetable Kimchi recipe try it out with confidence! Happy fermenting, friends!
Print
Small-Batch Rhubarb Kimchi
- Total Time: 20 min (plus 1-3 days fermentation)
- Yield: About 1 pint
- Diet: Vegetarian
Description
A recipe for making a small quantity of tart and spicy kimchi using fresh rhubarb.
Ingredients
- 1 cup chopped fresh rhubarb (about 1/2 inch pieces)
- 1/2 cup finely chopped napa cabbage (optional, for texture)
- 1 tablespoon coarse sea salt
- 1 tablespoon gochugaru (Korean chili flakes)
- 1 teaspoon minced garlic
- 1/2 teaspoon grated fresh ginger
- 1 teaspoon fish sauce or soy sauce (for vegan)
- 1/2 teaspoon sugar
- 1 teaspoon water
Instructions
- Place the chopped rhubarb and napa cabbage (if using) in a small bowl. Sprinkle with sea salt. Mix well and let it sit for 30 minutes to draw out moisture.
- Rinse the salted vegetables thoroughly under cold water to remove excess salt. Squeeze out as much water as possible using your hands or a clean towel.
- In a separate small bowl, combine the gochugaru, minced garlic, grated ginger, fish sauce (or soy sauce), sugar, and water to create the paste.
- Add the rinsed rhubarb mixture to the paste. Mix everything until the rhubarb is evenly coated.
- Pack the mixture tightly into a clean, small jar (about 1-pint capacity), leaving about 1 inch of headspace. Press down to remove air pockets.
- Seal the jar loosely or use an airlock lid. Let it ferment at room temperature (68-72°F) for 1 to 3 days, checking daily for bubbling.
- Once the kimchi tastes slightly sour and fizzy, move the jar to the refrigerator. It is ready to eat cold.
Notes
- Rhubarb releases more water than cabbage, so pressing it firmly after rinsing is important for good texture.
- If you prefer a spicier kimchi, increase the gochugaru slightly.
- Fermentation time depends on room temperature; warmer rooms ferment faster.
- Prep Time: 20 min
- Cook Time: 0 min
- Category: Side Dish
- Method: Fermentation
- Cuisine: Korean Inspired
Nutrition
- Serving Size: 1/4 cup
- Calories: 15
- Sugar: 1
- Sodium: 250
- Fat: 0
- Saturated Fat: 0
- Unsaturated Fat: 0
- Trans Fat: 0
- Carbohydrates: 3
- Fiber: 1
- Protein: 1
- Cholesterol: 0

Comments are closed.