

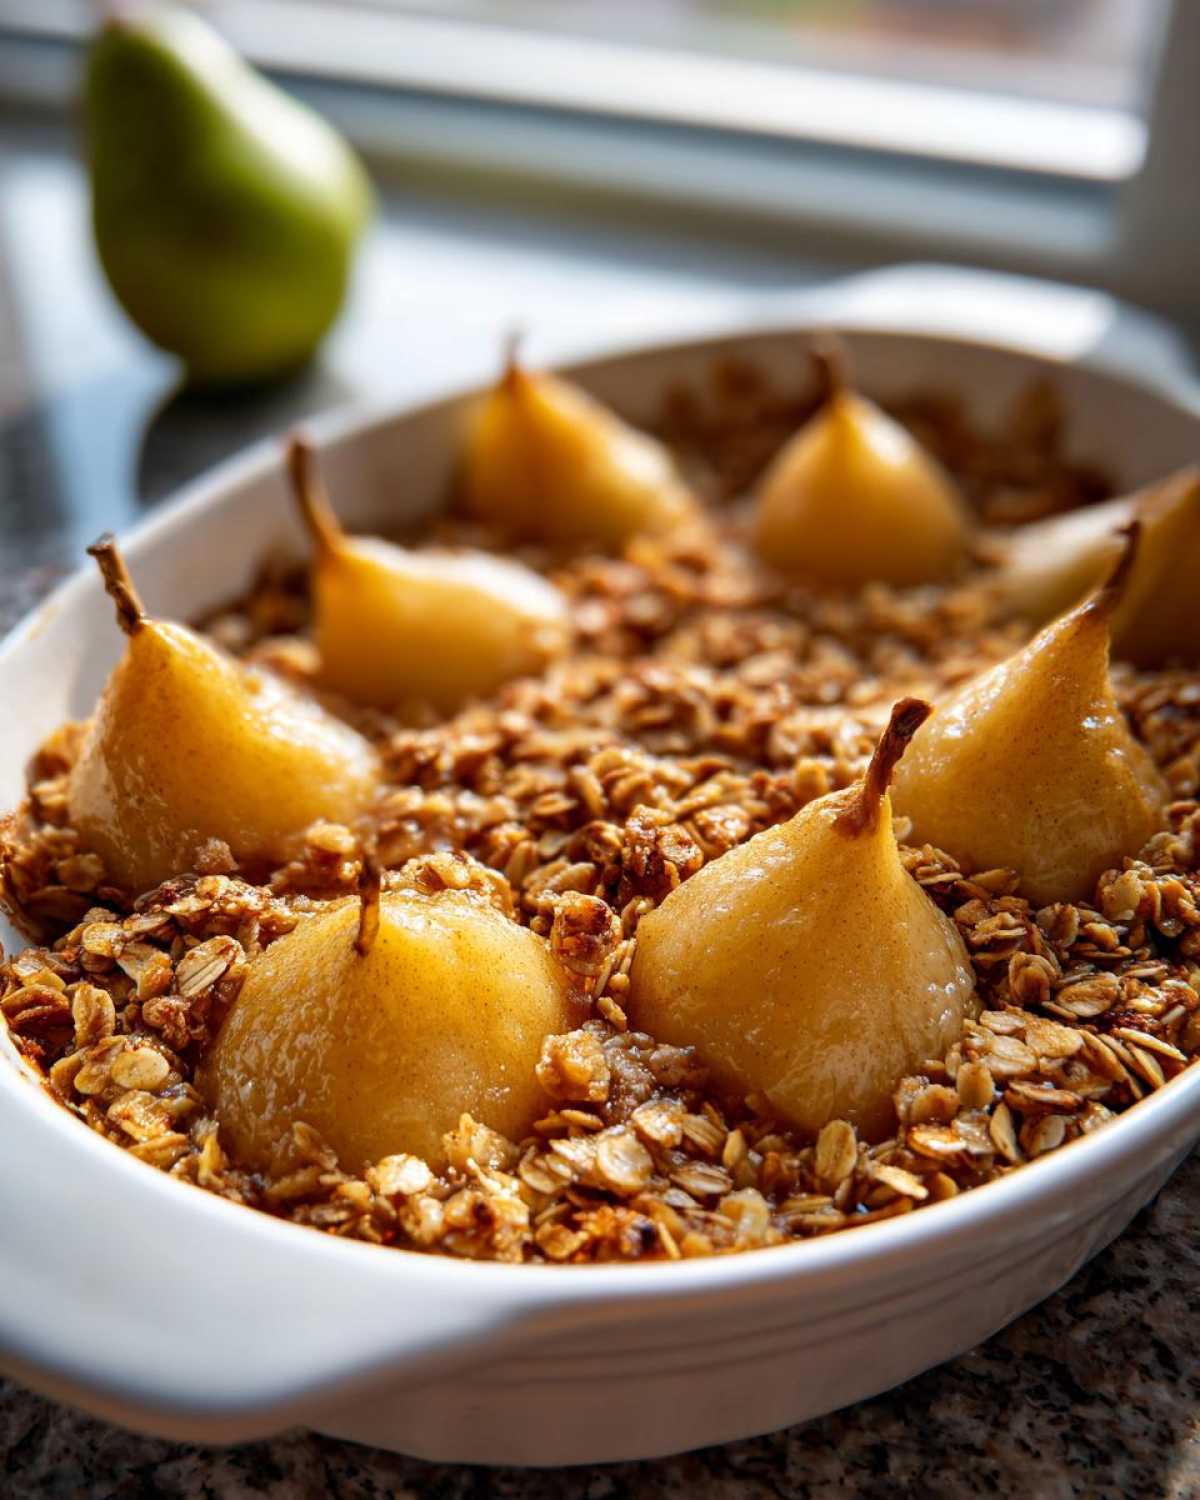
Oh, I just live for those chilly evenings when the air smells like woodsmoke and you just need something warm and deeply comforting straight from the oven, right? Forget overly complicated baking; sometimes you just need the easy magic of a fruit dessert with a crunchy lid. That’s where the incredible, soul-satisfying **pear crisp** comes in! This isn’t just any old baked fruit situation, either. My absolute favorite way to make it is with a heavy hand of brown sugar and cinnamon mixed right into the tender pears, followed by that glorious, buttery oat topping.
Trust me, once you try this simple combination, you’ll realize why this version became my go-to fall recipe. It fills the whole house with the best aroma, and it tastes way more fancy than the actual effort involved. It’s basically autumn in an 8×8 dish!
Why This Easy Pear Crisp Recipe is Your New Favorite Cozy Autumn Dessert
If you’re hunting for an easy pear crisp recipe that hits all the right notes, you’ve found it! This really is one of the best cozy autumn desserts you can pull together without breaking a sweat. It’s not complicated, but it delivers huge flavor. I actually made an incredible apple crisp recipe last week, but this pear one beats it out slightly because the brown sugar just melds so perfectly with the pears.
- The flavor is just spot-on: sweet pears hugged by warm brown sugar and cinnamon.
- The texture contrast is everything—tender fruit meeting that satisfying, crumbly oat topping.
- It comes together so fast, meaning less waiting and more eating!
Quick Prep Time for a Warm Spiced Fruit Dessert
Seriously, the best part? You only need about 15 minutes of active time! That’s what makes this a true warm spiced fruit dessert gem. I can whip this up right after work, and it’s baking before my show even starts. You’ll be amazed how quickly you go from fresh pears to a bubbly, delicious treat.
Gathering Ingredients for the Perfect Pear Crisp
Okay, before we get layering, let’s talk about what goes into this magic dish. The payoff for a pear crisp is directly related to the freshness of your starting ingredients, especially the fruit! Don’t skimp here; we want flavor, people. You’ll need 6 medium ripe pears—I cannot stress ‘ripe’ enough. If they are rock hard, they won’t soften up nicely under the topping.
For the filling, grab your sugars, a squeeze of tart lemon juice to keep things bright, and those warm spices: cinnamon and nutmeg. For the topping, make sure you have your flour, oats, brown sugar, and salt ready to go. And here’s the most important part for the topping’s texture: you need 6 tablespoons of cold unsalted butter, cut into small pieces. Do not use melted butter, or you’ll end up with a sad, dense crust instead of that perfect crumble.
Ingredient Notes and Substitutions for Your Pear Crisp
When picking your pears, I usually go for Bosc or Anjou; they hold their shape better than Bartlett when baked. If your pears seem just a touch firm, don’t worry! I sometimes microwave the mixed filling for just two minutes before I put the topping on—it gives the pears a little head start so they steam perfectly.
Now, about that amazing oat topping. If you want to boost the crunch factor, and I highly recommend you do, swap out 1/4 cup of those oats for some chopped walnuts or pecans. It adds a wonderful depth that makes this feel like a truly homemade dessert. It’s a quick fix that really elevates your cinnamon pear dessert!
Mastering the Buttery Oat Topping Recipe for Your Pear Crisp
Okay, let’s talk crust. Because honestly, the pear filling is great, but what makes this recipe *sing* is that crunchy, brown-sugar-packed layer on top. If you want that truly perfect texture—not mushy, not hard like a brick—you need to nail this buttery oat topping recipe. This is where all home bakers show their true colors!
You’ve already mixed your dry stuff: flour, oats, brown sugar, and salt. Now comes the butter. Remember how I said the butter needed to be cold for the filling? It needs to be freezing cold for the topping. That chill is what creates those lovely little pockets of steam when it hits the hot oven, preventing the topping from melting into one sheet.
I used to use a pastry blender, but I find my actual hands work best, even though they warm things up slightly faster. You want to work quickly! Take those cold butter cubes and just start pinching and rubbing them into the dry mixture. Don’t blend it smooth; you are looking for pieces ranging from pea-sized crumbs up to maybe a small kidney bean. Those chunky bits brown beautifully!
If you’re feeling adventurous, this is also a great time to toss in those nuts we mentioned earlier. A few swirls of that mixture around, and you’re ready to sprinkle the whole thing over your spiced pears. It gives such a satisfying texture contrast. I read about a neat trick for making cinnamon rolls where they freeze the butter first, and I bet that would be amazing here, too, if you have time to plan ahead!
Step-by-Step Instructions for Your Homemade Baked Pear Crisp
Alright, buckle up, because now we turn those beautiful ingredients into something glorious! This is where the actual magic happens, and I promise it couldn’t be easier. First things first: get that oven roaring! You need to preheat it to 375 degrees Fahrenheit. While it heats up, grab an 8×8 inch baking dish and give it a light grease—we don’t want any sticking drama later.
Next, let’s handle the pears. They need to be cozy before they go into the oven. In a big bowl, toss all those beautifully peeled and sliced pears with the granulated sugar, that little bit of bright lemon juice, and the cinnamon and nutmeg. Make sure every slice is coated! Then, spread that sweet, spiced fruit mixture out in an even layer in your prepared dish.
Now for the crowning glory! In a separate bowl, whisk together your dry topping bits: the flour, rolled oats, that rich brown sugar, and the salt. Then, using your fingers or a pastry cutter, work in those cold butter pieces until you get the coarse crumb we talked about—you want about the size of small peas mixed with those larger chunks. Sprinkle this golden mixture evenly right over the top of the pears. Don’t press it down!
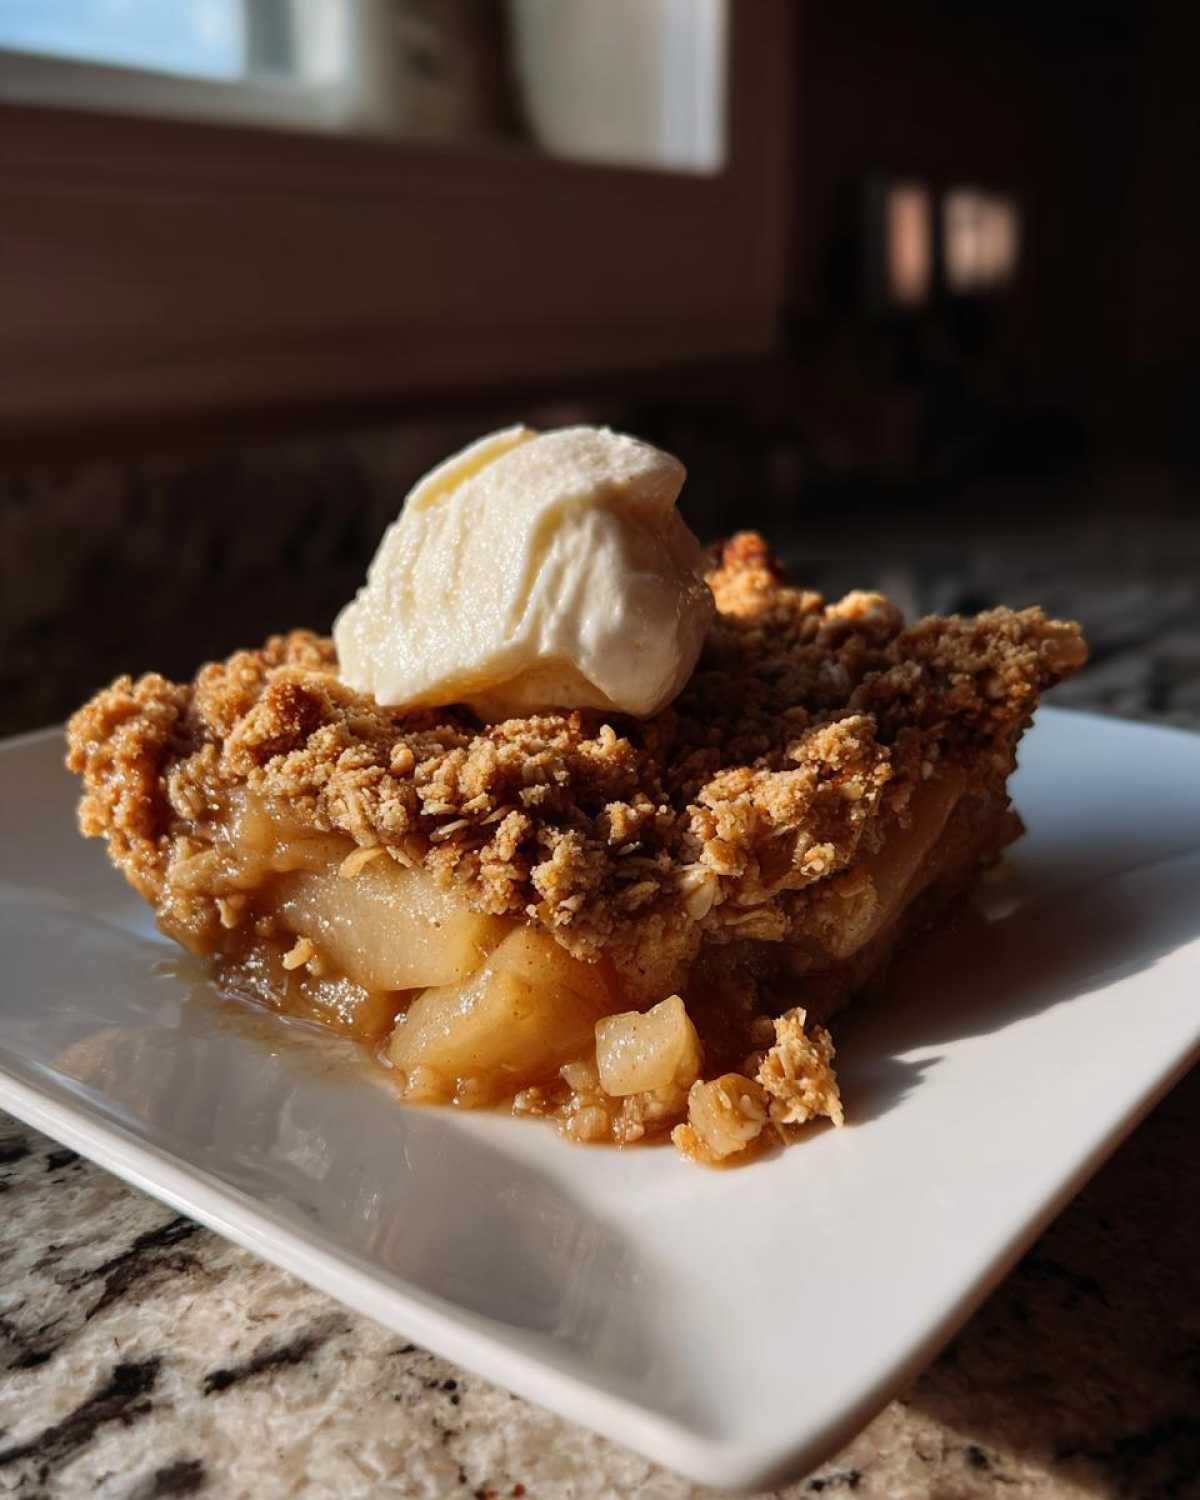
Pop the whole dish into the 375-degree oven. This baby needs to bake for about 35 to 40 minutes. You’ll know it’s done when the topping is golden brown, and honestly, you can see the filling bubbling enthusiastically around the edges. That bubbling means the fruit is perfectly tender. Once it’s out, you absolutely must let it rest for at least 15 minutes. It needs that time to set up so you don’t burn your mouth off on molten fruit! Don’t skip the resting period; it’s crucial for the final texture. For the best topping crunch, I’ve found spreading it thin on a cookie sheet works wonders, similar to how I prep my French toast topping next time!
Tips for Achieving the Best Pear Crisp Texture
Listen, texture is the difference between a good crisp and a *great* crisp. My number one rule here is to make sure that oat crumble topping is uneven! If you blend it until it’s uniform, it just bakes into a flat cookie. We want clumps that get nice and crispy!
Secondly, watch that filling, not just the top. If the topping is turning deep bronze shade but the filling underneath still looks watery, give it another five minutes. You need to see thick, slow bubbles coming up through the topping—that’s the sweet spot where the fruit has cooked down nicely. If you’re using a very deep pan, you might notice the edges getting done first, so you can always loosely tent the edges with a small piece of foil if the topping browns too fast before the center is hot.
Serving Suggestions for This Rustic Pear Crisp
Honestly, the best part about pulling a beautiful, bubbling rustic pear crisp out of the oven is deciding how to serve it, because it’s never truly finished until you add the topping, right? This recipe is built to be enjoyed warm—it’s the definition of one of those perfect crisp recipes for cooler weather. That contrast between the hot, spiced fruit filling and whatever cold, creamy thing you put on top is just unbeatable.
My absolute, non-negotiable choice is a big scoop of high-quality vanilla ice cream. The ice cream melts slowly into the warm oat topping, creating its own little pool of slightly sweet, buttery sauce. My kids like to sneak a dollop of whipped cream on top of the ice cream, which is totally decadent but hey, we deserve it!

If you’re not an ice cream person, don’t despair! A thick dollop of slightly sweetened fresh whipped cream is fantastic. Or, if you want to be super fancy—maybe for a holiday gathering—serve it with a drizzle of chilled crème fraîche. That little bit of tartness cuts through the richness of the brown sugar topping so nicely. I actually made a gorgeous banana cream pie last week, and this is the same principle: contrasting temperatures and textures make everything better!

It’s fantastic served as is for breakfast the next day, too, though I promise there won’t be much left! Pour a little milk over it straight from the fridge; it’s surprisingly good.
Storage and Reheating Instructions for Leftover Pear Crisp
Don’t fret if you actually have leftovers—which is rare in my house, but it happens! Storing this perfectly spiced dessert is easy, but you have to respect the topping if you want it crunchy the next day. Once the crisp has cooled down completely to room temperature, cover the baking dish tightly with plastic wrap or transfer the leftovers into an airtight container.
I generally don’t leave it sitting on the counter for more than a few hours. If you aren’t planning on eating it the next day, pop that covered dish right into the fridge. It should keep nicely for about three or four days, though the topping will start to soften up a bit as it absorbs moisture from the fruit underneath. That’s totally normal; it’s just melding flavors!
The Best Way to Bring Back the Crunch
This is the most important part of saving your pear crisp: reheating. Please, I beg you, resist the microwave! While a microwave is fast, it will turn that beautiful oat topping into soft, lukewarm mush, and nobody wants that experience. We need that rustic crunch back!
The oven is your best friend here. Preheat it to about 350 degrees Fahrenheit. If your crisp is in an oven-safe dish, just pop it right back in, uncovered, for about 10 to 15 minutes. You want to see it heat through to the center and watch those little butter spots bubble up again! If the topping is browning too fast, just loosely cover the top with a piece of foil for the first 10 minutes.
If you only have a small portion left, you can try an air fryer at 325°F for about 5 minutes—it works like a charm for crisping up single servings! Just make sure whatever method you use, you serve it immediately when it’s hot again. That’s when it tastes the freshest, just like when it first came out of the oven.
Frequently Asked Questions About Making Pear Crisp
Can I make a cranberry pear crisp variation with this recipe?
Oh, absolutely! Since this is such a great base for any fall fruit crisp recipes, trying a seasonal variation is highly encouraged. If you want a cranberry pear crisp, just add about 1 cup of fresh or frozen cranberries along with your sliced pears in Step 2. You might want to add an extra tablespoon of granulated sugar to the filling, just because cranberries can be quite tart!
What if I don’t have rolled oats? Can I skip them?
You *could* skip the oats, but then it stops being a crisp and starts becoming more like a crumble, which isn’t quite the same wonderful chewy texture! If you are completely out of oats, you can substitute them 1:1 with crushed cornflakes or even crushed graham crackers for a totally different vibe. I actually tried a simple graham cracker crisp version once, and it gave the topping a beautiful salty/sweet crunch that was unexpected but delicious!
How do I make sure my cinnamon pear dessert filling is sweet enough?
That totally depends on the fruit, doesn’t it? A good, flavorful cinnamon pear dessert starts with ripe fruit, like we discussed. If your pears aren’t quite sweet enough once you taste the filling before topping it, just mix in another teaspoon or two of brown sugar directly into the fruit while tossing. A little taste test before it goes into the oven saves the day every single time. If you need more general baking tips, I always go back to my favorite lemon pound cake notes when I need inspiration for balancing sweetness!
Is this recipe suitable if I only have dessert with fresh pears on hand?
Yes, this recipe is absolutely designed for fresh pears! That’s why we focused so much on ripeness. If you are working with dessert with fresh pears, just make sure they are firm enough to hold their shape after slicing but soft enough to yield slightly when squeezed. If they are too soft, they might turn more into an apple sauce consistency, but they will still taste amazing!
Can I use a different sugar instead of brown sugar for the topping?
You *can*, but I really advise against it for this specific recipe. Brown sugar is essential here because the molasses in it adds moisture and gives that beautiful darker, richer caramel flavor that plays so well with cinnamon. If you only have white sugar, use it, but maybe add 1/2 teaspoon of molasses if you have it tucked away somewhere! The white sugar topping will be lighter in color and slightly crisper, but it will miss that deep, comforting flavor profile we’re aiming for.
Estimated Nutrition Facts for Your Pear Crisp
Now, I always feel a little guilty after making something this delicious, but hey, we baked it, so it must be mostly healthy, right? Just kidding! Like any wonderful, comforting baked treat, this pear crisp packs a nice punch of pure joy. Think of this as a treat to enjoy after a long walk collecting leaves, not necessarily your everyday Tuesday snack! This delicious chocolate chip cookie recipe also falls into that category! But seriously, for a rich, warm dessert, these numbers aren’t too scary for a decent-sized portion.
- Serving Size: 1 serving
- Calories: Approximately 310
- Fat: About 15 grams (That’s the buttery topping doing its job!)
- Carbohydrates: Around 45 grams
- Protein: Roughly 3 grams (Oats help a little!)
- Sugar: Around 35 grams (Mostly natural sweetness from the fruit and brown sugar!)
The important thing is that it’s made with real fruit and real butter, which is always better than those mystery ingredients in store-bought desserts. Enjoy every single bite!
Share Your Perfect Pear Crisp Experience
So, there you have it! My favorite, ridiculously easy recipe for that ultimate cozy craving—the Brown Sugar Cinnamon Pear Crisp. This recipe has fueled so many of my autumn nights, and I really hope it becomes a staple in your house too, especially when the weather turns and you’re craving something warm and slightly spicy.
Now, I need to hear from you! Did you try the crunchy oat topping, or did you sneak in some pecans like I suggested? Did you pair it with ice cream or just eat it straight from the dish with a spoon when nobody was looking? Tell me everything!
Please, if this recipe hit the spot for your fall dessert cravings, don’t be shy—give it a solid 5 stars right down below! Ratings really help other hesitant bakers find their way to this delicious, simple recipe. Plus, I love reading about your successes. Whether you followed my instructions to the letter or put your own special spin on it, drop a comment and let me know. I’m always looking for ways to jazz up my next batch—who knows, maybe you’ll inspire my next chocolate chip cookie upgrade!
Happy baking, and enjoy that beautiful warm spiced fruit dessert!
Print
Easy Brown Sugar Cinnamon Pear Crisp
- Total Time: 55 min
- Yield: 6 servings
- Diet: Vegetarian
Description
Make this simple, comforting baked pear dessert featuring tender spiced pears under a buttery oat crumble topping.
Ingredients
- 6 medium ripe pears, peeled, cored, and sliced
- 1/4 cup granulated sugar
- 1 tablespoon lemon juice
- 1 teaspoon ground cinnamon
- 1/4 teaspoon ground nutmeg
- 1/2 cup all-purpose flour
- 1/2 cup rolled oats
- 1/2 cup packed brown sugar
- 1/4 teaspoon salt
- 6 tablespoons cold unsalted butter, cut into small pieces
Instructions
- Preheat your oven to 375 degrees Fahrenheit. Lightly grease an 8×8 inch baking dish.
- In a large bowl, toss the sliced pears with the granulated sugar, lemon juice, cinnamon, and nutmeg. Spread the pear mixture evenly into the prepared baking dish.
- In a separate medium bowl, combine the flour, rolled oats, brown sugar, and salt.
- Cut in the cold butter using a pastry blender or your fingers until the mixture resembles coarse crumbs.
- Sprinkle the oat mixture evenly over the pears.
- Bake for 35 to 40 minutes, or until the topping is golden brown and the filling is bubbly.
- Let the crisp cool for at least 15 minutes before serving warm.
Notes
- For a richer flavor, substitute 1/4 cup of the oats with chopped walnuts or pecans.
- Serve this warm dessert with vanilla ice cream or whipped cream.
- If your pears are very firm, you can microwave the filling mixture for 2 minutes before topping to start the softening process.
- Prep Time: 15 min
- Cook Time: 40 min
- Category: Dessert
- Method: Baking
- Cuisine: American
Nutrition
- Serving Size: 1 serving
- Calories: 310
- Sugar: 35
- Sodium: 110
- Fat: 15
- Saturated Fat: 9
- Unsaturated Fat: 6
- Trans Fat: 0
- Carbohydrates: 45
- Fiber: 5
- Protein: 3
- Cholesterol: 35


Comments are closed.