

Oh, trust me when I tell you that if there’s one thing a true baker needs in their life, it’s a pie crust that shatters perfectly when you cut into it. We’re talking layers, people! Butter is great, sure, but nothing—and I mean *nothing*—gives you that impossibly light, flaky texture like cold fat that melts away, leaving air pockets behind.
That’s why I hold so tightly to this one: Grandma’s Rhubarb Pie with Lard Crust. This isn’t some modern substitute situation; this is the real deal, an authentic spring tradition straight from her kitchen. I’ve tried every fancy shortening and oil combo out there, but when you need that nostalgic, tender lard pastry dough, you have to go back to basics. This recipe isn’t just about the slightly tart rhubarb filling; it’s about respecting the time-honored, almost magical way she handled simple flour and fat!
Why Grandma’s Rhubarb Pie with Lard Crust is the Best Spring Fruit Pie
When the first stalks of rhubarb pop up, you know it’s time to pull out this recipe. This isn’t some overly complicated, fussy dessert. It’s honest baking, and that’s why I consider it the absolute best homemade pie crust secrets holder. If you’re looking for a genuine old fashioned rhubarb pie recipe, this is your stopping point.
What makes this pie stand head and shoulders above the rest? It comes down to a few key things that Grandma insisted on:
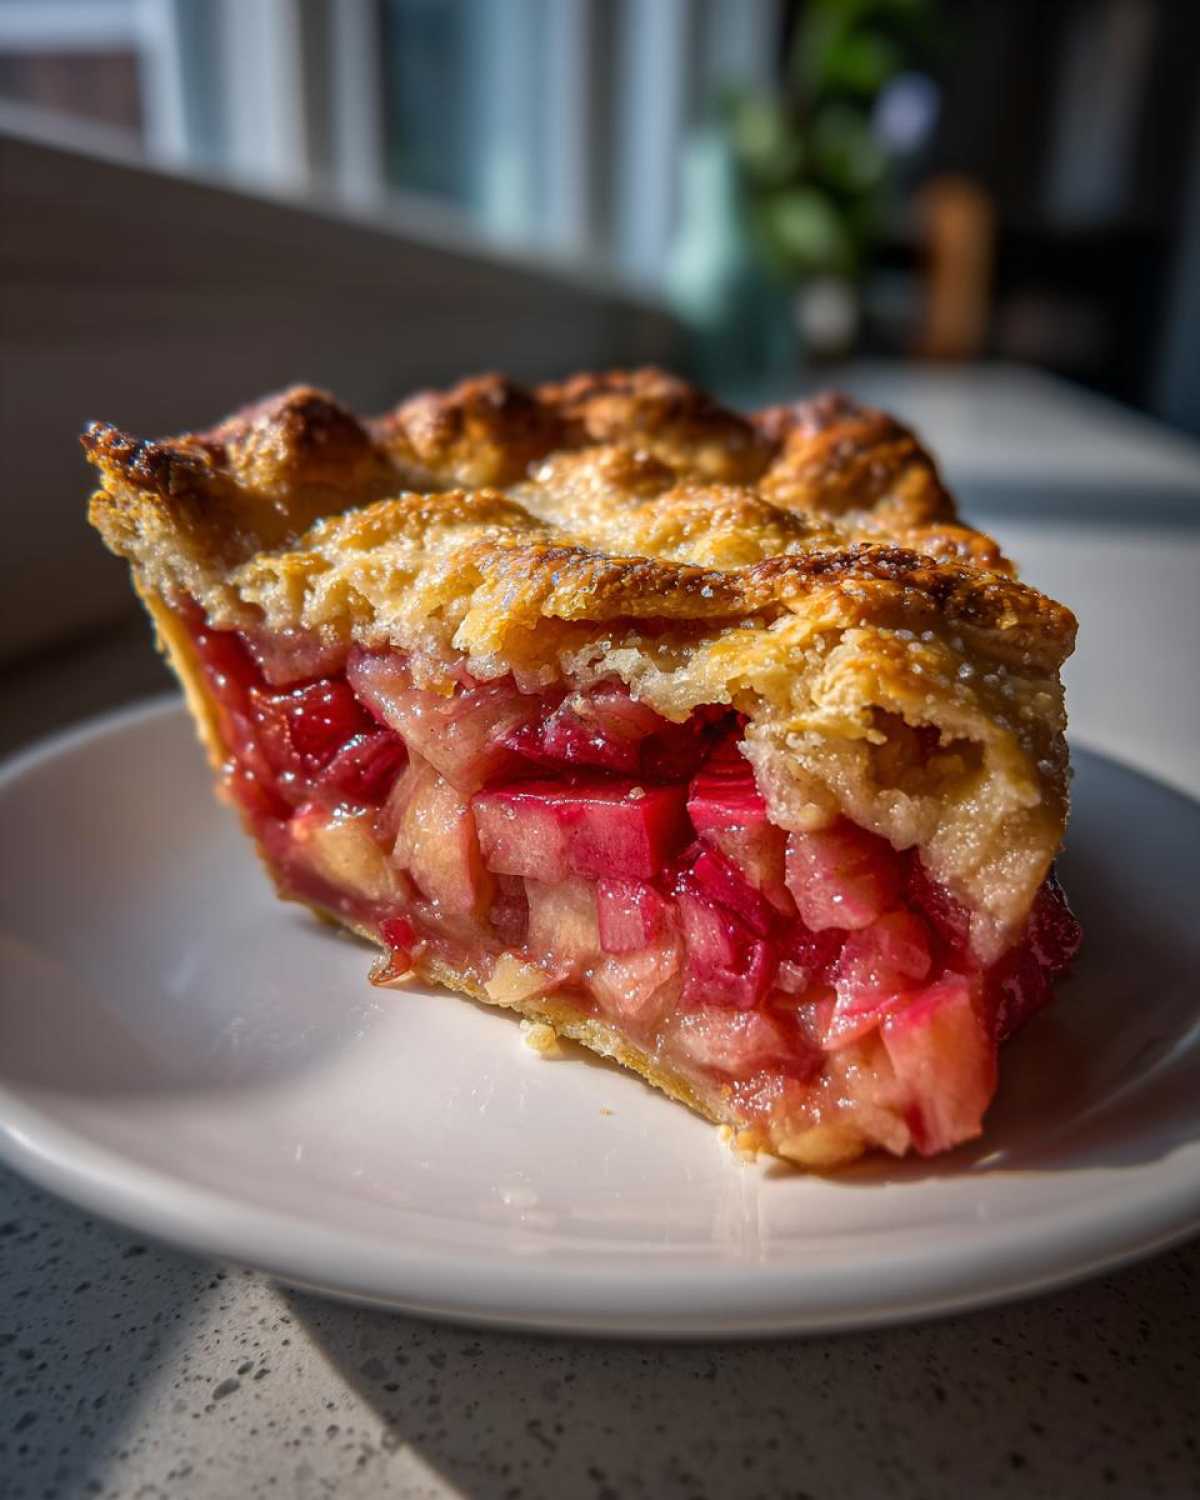
- Unbeatable Flakiness: Seriously, the lard makes the crust legendary. We’re talking layers that separate right off the fork.
- Perfect Balance: The tartness of the rhubarb—especially if you use those really sour stalks—is perfectly tempered by the sugar and that hint of vanilla. It’s the definition of a classic spring fruit pie.
- Deep, Rich Flavor: It tastes like tradition. Every bite reminds me of walking into her kitchen when the weather just started turning warm.
Achieving the Ultimate Flaky Texture with Lard
The secret to the best flaky lard pie crust isn’t just using lard; it’s keeping it utterly freezing cold! Lard heats up faster than butter, and we need those little chunks of fat to stay solid until they hit the hot oven. When they finally melt, they create natural steam that pushes the flour layers apart.
Don’t try to rush this part. If your dough feels warm at all, you need to wrap it up and stick it back in the fridge. This attention to temperature is exactly what gives you that incredible texture you can’t get any other way. If you want to see another fruit recipe that uses a great crust, check out my strawberry rhubarb crisp recipe, though the pie crust wins every time for me!
Gathering Ingredients for Grandma’s Rhubarb Pie with Lard Crust
Alright, before we get our hands dirty mixing anything, we have to make sure we have the goodies ready. Grandma always laid everything out, and I mean *everything*, so there were no sudden sprints to the pantry halfway through the process. Pay close attention to the state of the lard and the water—this is crucial stuff!
For this homemade rhubarb pie from scratch, we’re splitting the ingredients into two groups. You’ll need the stuff for the incredible pastry, and then the tangy filling components.
For the Traditional Rhubarb Pie Crust:
- 2 1/2 cups all-purpose flour
- 1 teaspoon salt
- 1 cup (8 ounces) cold lard, cut into small pieces
- 1/2 cup ice water, plus 1-2 tablespoons more if needed
Remember what I said about cold? Make sure that lard is straight from the fridge, and use water that’s practically slushy! This is the backbone of our traditional rhubarb pie crust.
For the Authentic Rhubarb Filling:
- 6 cups chopped fresh rhubarb (cut them right into about 1-inch pieces!)
- 2 cups granulated sugar (and maybe a little more or less, depending on your rhubarb—we’ll taste test later!)
- 1/4 cup all-purpose flour or cornstarch for thickening
- 1 teaspoon vanilla extract
- 1 large egg, beaten (this is just for brushing the top, the egg wash!)
That’s everything! When you look at that list—especially the amount of rhubarb—you realize this pie is all about showing off that beautiful spring harvest. Get these items ready, and we can move on to the best part: making the dough.
The Traditional Rhubarb Pie Crust Instructions: Making the Best Flaky Lard Pie Crust
This is where we earn that perfect, crumbly, melt-in-your-mouth texture that defines a great pie. Don’t rush this section; the success of your tender lard pastry dough hinges entirely on how cold you keep things and how gently you treat the flour. I know it’s tempting to just dump it all in a machine, but Grandma always did this by hand, and honestly, it gives you better control over the process.
We’re aiming for the ultimate traditional rhubarb pie crust here, so follow these steps closely, and you’ll see why lard beats everything else when it comes to serious flakiness!
Mixing the Tender Lard Pastry Dough
First thing: get that flour and salt whisked together in your biggest bowl. Now, toss in those little chunks of ice-cold lard. You have to cut that fat in, either with a pastry blender or just your fingertips. Think fast, like you’re trying to avoid getting your fingers greasy! We stop mixing when the largest bits of lard are about the size of small peas. That’s your target!
Once the lard is cut in, we drizzle in that ice water, just a tablespoon at a time. You only add enough water for the dough to barely start clinging together when you squeeze a handful. Stop immediately if you see water pooling in the bottom of the bowl. Trust me, over-hydrated dough means tough pastry, and we want the opposite of tough!
Chilling Time for the Traditional Rhubarb Pie Crust
Now, you’ll gently bring the shaggy dough together—no kneading! Just press it into two separate, flat disks. The flatter they are now, the easier they are to roll out later. Wrap each one up tight in plastic wrap. This rest period is non-negotiable; it lets the gluten relax so your dough doesn’t snap back while rolling.
Pop those disks into the refrigerator. You need at least one full hour, but if you’re like me and planning this ahead, two hours is even better. If you skip this chilling step, you won’t get the clean cuts on the edges, and the layers won’t separate nicely when baking. We want structure, not sad, flat dough!
To see a beautiful way to use dough edges, I highly recommend checking out some ideas on lattice pie crust apple filling, even though we’re keeping this one classic!
Crafting the Authentic Rhubarb Filling for Your Grandma’s Rhubarb Pie with Lard Crust
While the crust is the star showing off its flaky dominance, the filling has to sing the right tune! An authentic rhubarb filling needs to be tangy, sweet, and juicy, but never, ever soupy. Grandma was really specific about the ratio of sugar to rhubarb, because let’s be honest, some years you get stalks that taste like sugar straight from the garden, and other years you get mouth-puckering sourness.
When I’m prepping the rhubarb—and make sure those pieces are chopped evenly, about an inch long—I toss it straight into a bowl with the 2 cups of sugar. I let it sit for about 15 minutes. See all that liquid that starts pooling? That’s where you taste-test! If the liquid tastes way too tart, add sugar by the tablespoon until it tastes slightly sweeter than you think you want the final pie to be. Keep in mind, the starches we add later will temper that sweetness a bit.
Next comes the vanilla extract. It’s a little trick that brightens up the earthy rhubarb flavor. Don’t skip it! For other fantastic fruit combinations, you might want to look at my thoughts on the strawberry rhubarb crisp recipe, but for this pie, simple is best.
Choosing the Best Rhubarb Pie Filling Thickening Agent
Now we address the soggy bottom panic zone! No one wants a crust floating in sugary soup, right? That’s why we need a solid binder. Grandma always used all-purpose flour in her day, but I find cornstarch gives a cleaner gloss to the filling. The recipe gives you the option for either—1/4 cup of flour or cornstarch.
This choice addresses the best rhubarb pie filling thickening problem perfectly. If you use flour, you get a slightly cloudier, softer set. If you use cornstarch, you get a clearer, slightly firmer jelly-like set when the pie cools down. Either way, make sure you toss the starch thoroughly with the sugar *before* adding it to the rhubarb, so you don’t end up with weird pockets of unmixed thickener. That’s the secret to keeping the filling contained!
Assembling and Baking Your Grandma’s Rhubarb Pie with Lard Crust
Okay, deep breaths! The dough is chilled, the filling is juicy, and now it’s time to bring this stunning Grandma’s Rhubarb Pie with Lard Crust together. This is where everything flows smoothly, provided you kept your hands cold earlier on. First, dust your counter lightly with flour—not too much, we don’t want to toughen the dough!
Take one disk of dough and start rolling it out from the center into a nice 12-inch circle. Be gentle! You want this wide enough to drape perfectly over your 9-inch pie plate. Once it’s tucked in, trim the edges so you have about an inch hanging over the rim. Fill that beautiful shell with all that gorgeous, tart rhubarb mixture. If you want to get fancy—and Grandma did this sometimes for extra richness—dot the top of the filling with a few tiny shavings of your leftover cold lard. Wow, is that good!
Now, roll out the second disk for the top. Lay it over the filling, trim the overhang, and then pinch the top and bottom edges together firmly to seal everything in. You have to crimp those edges—give them a good seal so none of that glorious juice escapes! Cut plenty of steam vents on top; this pie bubbles up something fierce. Finally, brush the whole top with that beaten egg wash. It’s what gives you that gorgeous, shiny golden finish. For amazing decorative ideas on sealing edges, you absolutely must check out the tips in my post on braided edge pumpkin pie crust.

Oven Temperature Adjustments for Perfect Browning
This part is crucial if you want that golden crust without burning the edges! You’re going to start high. Preheat your oven to 425 degrees Fahrenheit (that’s 220 Celsius). Bake the pie at that high heat for the first 15 minutes. This blast of heat sets the lard and starts the flaking process instantly. Don’t touch it!
After 15 minutes, you immediately drop the temperature down to 375 degrees Fahrenheit (190 Celsius). Then, you let it keep baking for another 35 to 45 minutes. You’ll know it’s done when the crust is deep golden brown and you can see the filling bubbling vigorously through those vents. Remember: resist slicing it right away! You must let it cool completely—at least three hours—so that filling sets up properly. Patience makes the perfect pie crust!
Tips for Success When Making Grandma’s Rhubarb Pie with Lard Crust
Even with the best instructions, sometimes baking throws us a curveball. But don’t panic! Grandma left me a few little scribbled notes on the back of her recipe card that cover all the common “Oops!” moments. Keeping these things in mind will turn a potentially good pie into a truly spectacular, textbook Grandma’s Rhubarb Pie with Lard Crust.
The biggest rule I learned early on relates directly back to the crust: temperature management is everything. You simply cannot mess around with warm fat. If your kitchen is super hot or you’re working slowly, just slide that dough back into the fridge for 15 minutes before you roll the top crust. It saves so much heartache later on!
Here are the specific guardrails Grandma insisted on:
- Keep Your Lard and Water Frigid: I can’t say this enough—the colder your lard and water are when you mix the dough, the flakier your pastry will be. Seriously, use water with ice cubes floating right in it, then scoop out the cubes before pouring the water in.
- Protecting Those Pretty Edges: You know how the edges always look a little darker than the center? That’s because they are thinner and get blasted by oven heat sooner. If you notice the crimped edges are getting too dark before the filling is bubbly—say, around the 30-minute mark—just take a thin strip of aluminum foil and gently wrap it around the rim of the pie plate. It shields the crust while the middle finishes cooking.
- Taste the Rhubarb First: Remember what I mentioned earlier about the sugar? Rhubarb varies wildly. Always mix your rhubarb, sugar, and thickener, let it sit for 10 minutes, and taste a small piece of the resulting syrup. If your rhubarb is extra tart this week, go ahead and add another tablespoon or two of sugar right then. Don’t wait until it’s already in the oven to discover it’s too sour!
Follow these little expert checks, and you’ll nail that beautiful presentation every single time you make this traditional rhubarb pie crust!
Storage and Reheating Instructions for Homemade Rhubarb Pie from Scratch
The hardest part about making a perfect homemade rhubarb pie from scratch is waiting long enough to actually eat it! I know the smell of that bubbling, tangy filling combined with that buttery, lard-crusted goodness is torturous, but trust me, slicing into it too early is the number one way to ruin the texture.
The cooling process isn’t just for letting it be safe to handle; it’s when the starches in your filling finish setting up. If you cut it while it’s still piping hot, you’ll end up with that runny mess we talked about—all that beautiful effort wasted!
Here’s the breakdown for keeping your stunning pie safe and delicious:
- The Mandatory Cooling Period: Once it comes out of the oven, let that pie sit completely untouched on a wire cooling rack for a minimum of three hours. I usually aim for closer to four, especially if it’s a humid day. The filling needs time to firm up into that perfect sliceable state.
- Room Temperature Storage: Once the pie is fully cool, you can keep it covered loosely at room temperature for about two days. Because we used a good amount of sugar anyway, it holds up well on the counter, assuming your kitchen isn’t scorching hot. Covering it loosely prevents the crust from getting soggy from trapped moisture.
- Fridge Life: If you need it to last longer (which, I often do!), wrap the fully cooled pie tightly in plastic wrap and then foil. It stays delicious in the refrigerator for up to five days.
When you’re ready to reheat a slice? I don’t usually reheat this pie, honestly, because the cold filling with the flaky crust is just divine. But if you insist, pop a slice on a sheet pan at about 350 degrees for just 5 to 8 minutes until it’s warm through. Watch that crust, though—you don’t want to dry out the amazing work we did with the lard!
Frequently Asked Questions About This Old Fashioned Rhubarb Pie Recipe
It seems like no matter how detailed I try to be when sharing one of these nostalgic grandma pie recipes, folks always have questions about swapping ingredients or getting the timing just right. That’s totally normal when dealing with a recipe that’s been passed down through generations! Don’t worry, I’ve got answers based on years of trial and error—usually involving a slightly runny pie!
Here are the main things people ask when they try to make this fantastic, flaky dessert.
Can I substitute butter for the lard in this traditional rhubarb pie crust?
Oh, this comes up all the time! Yes, you *can* substitute butter for the lard, but I have to warn you: it won’t be the same pie. Butter has water in it, and that water hits the heat and steams, which is great, but it doesn’t keep the fat chunks as stable or as large as lard does during mixing. If you use butter, you might get a slightly denser, less shattering crust. This recipe is specifically built around the structure that lard provides for that supreme flakiness. For a deep dive on working with animal fat, I highly recommend checking out my post on how to make pastry with lard!
How do I know if my rhubarb pie filling is set properly?
This is the million-dollar question for any fruit pie maker! When the pie is actively baking, the filling absolutely should be boiling thickly through those vents you cut in the top crust. If it looks watery or thin while it’s hot, don’t panic—that’s normal. The magic happens when it cools down.
The absolute final verdict comes after the long cool-down period. If you let that pie rest on the counter for three to four hours, the filling should be firm enough that when you cut a slice, the juices stay mostly contained, almost like a thick jam. If it runs everywhere, you either didn’t use enough thickener or you didn’t let it cool long enough. It’s almost always the cooling time!
Why does Grandma use lard instead of shortening? Isn’t shortening easier?
Shortening—the stuff in the tub—is much softer than properly chilled lard chunks are. Because lard has a higher melting point and a different fat structure, it holds its shape better during the mixing process, meaning you get those lovely, distinct layers of fat sandwiched between flour. Shortening tends to blend more uniformly, resulting in a pastry that’s very tender, yes, but it often lacks that incredible, crisp, shattering *flake* that true lard provides. For an authentic, old-fashioned experience, lard is the king of pie crusts!
Serving Suggestions for Your Grandma’s Rhubarb Pie with Lard Crust
Now that you’ve navigated the tricky lard crust and waited patiently for that filling to set—you deserve the best presentation! This Grandma’s Rhubarb Pie with Lard Crust is robust enough to stand up to anything you throw at it, but I always love a good cooling contrast.
Forget those fancy flaky toppings right now; this pie sings best when it’s served simply. A generous scoop of high-quality vanilla bean ice cream is non-negotiable. The cold creaminess melts right into those warm, tart pockets of rhubarb, and honestly, it’s heavenly. If you’re feeling ambitious, a dollop of homemade whipped cream is perfect too. You can find my go-to recipe for a basic but amazing frosting over at my post about vanilla buttercream frosting recipe easy piping—just use a dollop instead of spreading it!
Sometimes, though, if I’m only having a small sliver in the afternoon, I just grate a tiny bit of lemon zest over the top to highlight that tartness. That’s it! No fuss, just pure, flaky, traditional goodness.
Print
Grandma’s Rhubarb Pie with Lard Crust
- Total Time: 105 min
- Yield: 8 servings
- Diet: Vegetarian
Description
A traditional recipe for a classic rhubarb pie featuring a rich, flaky crust made with lard.
Ingredients
- 2 1/2 cups all-purpose flour
- 1 teaspoon salt
- 1 cup (8 ounces) cold lard, cut into small pieces
- 1/2 cup ice water, plus 1-2 tablespoons more if needed
- 6 cups chopped fresh rhubarb (about 1 inch pieces)
- 2 cups granulated sugar (adjust to taste)
- 1/4 cup all-purpose flour or cornstarch for thickening
- 1 teaspoon vanilla extract
- 1 large egg, beaten (for egg wash)
Instructions
- Prepare the crust: In a large bowl, whisk together the flour and salt. Cut in the cold lard using a pastry blender or your fingers until the mixture resembles coarse crumbs with some pea-sized pieces of lard remaining.
- Gradually add the ice water, one tablespoon at a time, mixing until the dough just comes together. Do not overmix.
- Divide the dough in half, form each half into a disk, wrap in plastic wrap, and chill for at least 1 hour.
- Prepare the filling: In a separate bowl, gently toss the chopped rhubarb with the sugar and the 1/4 cup flour or cornstarch until the rhubarb is evenly coated. Stir in the vanilla extract.
- Preheat your oven to 425 degrees Fahrenheit (220 degrees Celsius).
- On a lightly floured surface, roll out one disk of dough into a 12-inch circle. Carefully transfer it to a 9-inch pie plate. Trim the edges, leaving a 1-inch overhang.
- Pour the rhubarb filling into the bottom crust. Dot the top of the filling with a few small pieces of leftover lard if desired for extra richness.
- Roll out the second disk of dough for the top crust. Place it over the filling. Trim the edges, crimp the top and bottom crusts together to seal, and cut several slits in the top crust to allow steam to escape.
- Brush the top crust lightly with the beaten egg wash.
- Bake for 15 minutes at 425 degrees Fahrenheit. Then, reduce the oven temperature to 375 degrees Fahrenheit (190 degrees Celsius) and continue baking for 35 to 45 minutes, or until the crust is golden brown and the filling is bubbly.
- Cool the pie completely on a wire rack for at least 3 hours before slicing to allow the filling to set.
Notes
- Keep your lard and water as cold as possible when making the crust; this is key to a flaky texture.
- If the edges of the crust start to brown too quickly during baking, cover them loosely with aluminum foil strips.
- Taste your rhubarb before adding sugar; if it is very tart, you may need slightly more sugar.
- Prep Time: 45 min
- Cook Time: 60 min
- Category: Dessert
- Method: Baking
- Cuisine: American
Nutrition
- Serving Size: 1 slice
- Calories: 450
- Sugar: 35g
- Sodium: 250mg
- Fat: 25g
- Saturated Fat: 10g
- Unsaturated Fat: 15g
- Trans Fat: 0g
- Carbohydrates: 55g
- Fiber: 3g
- Protein: 5g
- Cholesterol: 30mg

Comments are closed.