

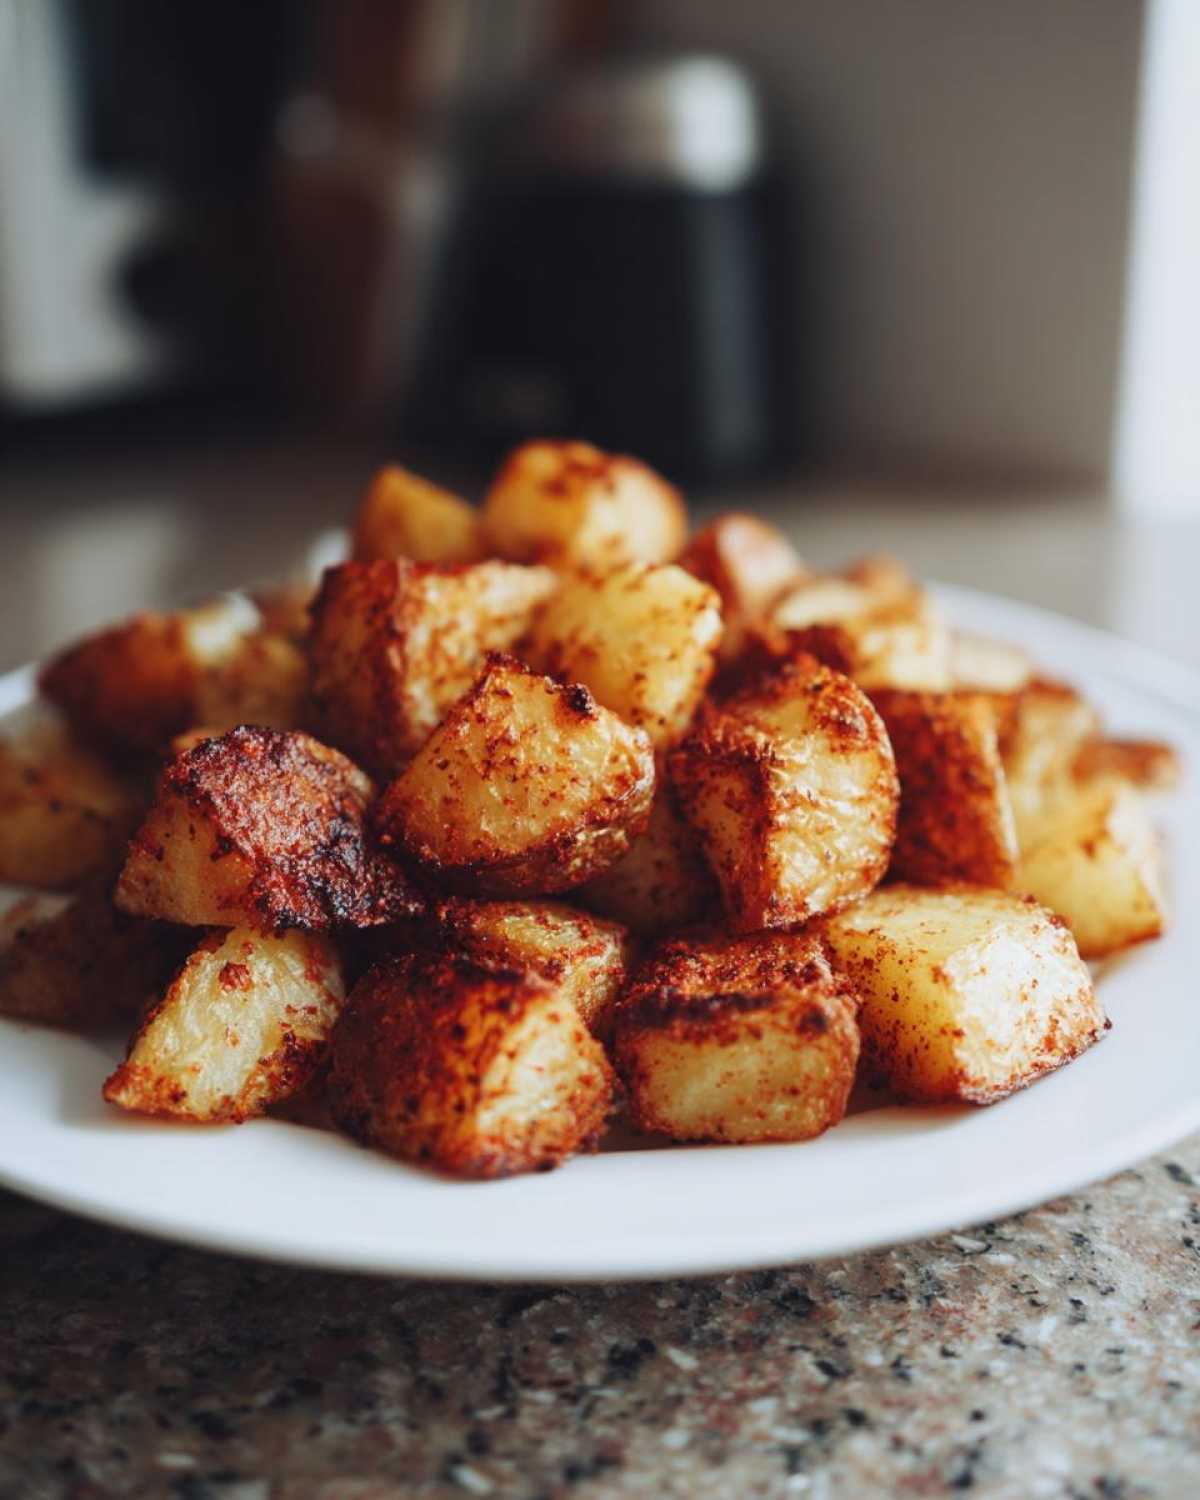
Oh, friend, listen to me: I have been there. I have stood over the stove, watched my beautiful diced potatoes steam sadly in the skillet, and ended up with mushy, bland disappointment instead of the crunchy glory I deserved for breakfast. It’s a tragedy, honestly! But I’m here to tell you—stop the madness! I finally cracked the code on making the best breakfast potatoes that come out golden brown and shatteringly crisp every single time. We’re talking about perfectly crispy oven roasted breakfast potatoes, and the entire secret hinges on one very easy, non-negotiable step. I used to skip it, thinking it was too much hassle, but after serving sad, oily potatoes at my sister’s graduation brunch one year, I vowed never again. Now? They are perfect, every single time.
Why These Are the Best Crispy breakfast potatoes You Will Ever Make
I promise you, these are the best breakfast potato recipe you will ever try, assuming you follow my number one rule—which we’ll get to in a second! Forget those sad, soggy skillet attempts. These crispy breakfast potatoes deliver that deep, satisfying crunch without needing a million pots and pans. Baking them in the oven means you can set it and forget it for about 20 minutes, giving you time to actually get dressed before brunch. We’re using a very simple seasoning blend here because the texture is the real star, but the flavor is certainly not lacking! If you want to read more about the basic science behind a great potato crust, check out my notes on how to make crispy potatoes.
The Secret to Truly Golden Brown potatoes
The difference between a good potato and a showstopper is starch removal, plain and simple. If you skip soaking your diced potatoes in cold water for at least 30 minutes, you are begging for sogginess. After soaking, you must dry them thoroughly—and I mean *thoroughly*—with a clean towel. That starchy residue turns into steam in the oven, and steam is the enemy of crunchiness.
Gathering Ingredients for Flavorful morning potatoes
When shopping for these, remember we’re building flavor from simple, accessible stuff! You need about two pounds of Russet potatoes—don’t even think about waxy ones for this job; we need that starch. You’ll need 3 tablespoons of olive oil to coat everything nicely. For seasoning, grab 1 teaspoon of salt, 1/2 teaspoon pepper, 1 teaspoon paprika for color, and a half teaspoon each of garlic powder and onion powder. That’s the base! Because we aren’t using any flour or wheat products to coat these, they are naturally Gluten Free, making them perfect for everyone at the brunch table. The fresh rosemary is optional, but wow, does it smell incredible when it hits the hot potatoes!
Ingredient Notes and Substitutions
I really push Russet potatoes here because their high starch content is what allows them to get fluffy inside while the outside crisps up like crazy. Seriously, if you skip that 30-minute cold water soak, you’re missing the whole point of achieving maximum crunch in your breakfast potatoes. If you don’t have an oven free, you can absolutely adapt this for the stovetop. Just use a heavy-bottomed skillet over medium-high heat, but you *must* cook in small batches. Cramming too many potatoes into the skillet just makes them steam, and steamed potatoes are just sad potatoes!
Step-by-Step Instructions for Oven Roasted breakfast potatoes
Okay, deep breaths! This is where the magic happens, and trust me, it’s easier than it sounds. First things first: crank that oven up to 425 degrees Fahrenheit. We want serious heat to get that crispy exterior. Once the oven is heating, make sure your diced potatoes (about 1/2 inch cubes is perfect) are sitting happily in that cold water for the required 30 minutes. After that soak, it’s time for the real work—drying them out! Once they look pretty dry, give them one final toss in the oil and all those yummy seasonings we talked about. Make sure every piece is shiny and coated before spreading them all out on your baking sheet. Pop them in the oven for a solid 20 minutes to get things started. If you want to know I use for my fluffy oatmeal pancakes, I use a similar technique for whipping air into the batter!
The Crucial Drying Step for Crispy breakfast potatoes
I cannot stress this enough: moisture is the enemy of crispiness! After you drain those potatoes post-soak, lay them out on a towel and seriously pat them down. I mean, press into them firmly with your hands or another towel. If you leave even a tiny bit of dampness, the heat will turn that water into steam first, and your potatoes will bake instead of roast. We want roast, people, roast!
Achieving Perfect Golden Brown potatoes on the Pan
When you go to spread those seasoned spuds out, you need space! If they are overlapping or piled up, they just steam against each other. Use two baking sheets if you have to, but make sure every single piece is sitting alone in a single layer. For an advanced move that really kicks the crispiness up? Pop your sheet pan into the preheating oven for about five minutes *before* you put the potatoes on it. That initial blast of hot metal helps them crisp right away!
After that initial 20 minutes, carefully pull the tray out. Give everything a good flip with a spatula—you should see some nice color already—and send them back in for another 15 to 20 minutes until they are deep golden brown. Serve them fast!
Tips for Success: Making the Ultimate breakfast potatoes
Okay, we’ve nailed the water soak and the drying process, which is 90% of the battle for perfect breakfast potatoes! Now for the little extra things that just make them restaurant-quality. First, let’s talk equipment. You absolutely need a big baking sheet—the largest one you own. If you try to squeeze these onto a smaller surface, they’ll touch, steam, and you’re back to square one. Don’t try to save dishes! I also highly recommend that preheating tip I mentioned earlier—getting that metal scorching hot before the oiled potatoes touch it really encourages that beautiful crust to form immediately.
Regarding the seasoning, always save soft fresh herbs, like rosemary, until the very end. If you throw rosemary in during the initial oil coating, it tends to burn before the potatoes are fully cooked, leaving a bitter taste. Once they come out perfectly golden brown, toss them right there on the hot pan with the fresh rosemary and a tiny drizzle of good olive oil if they look dry. It wakes up the fragrance beautifully! For more ideas on keeping things moist yet flavorful, you might like checking out this recipe for easy moist fresh plum cake—I use similar tricks to balance moisture and texture in baking, too!
Variations for Your breakfast potatoes
So, once you nail the texture, you can really start having fun with these breakfast potatoes! If you want something a little smoky, definitely swap out some of the regular paprika for smoked paprika. It creates amazing flavorful morning potatoes that taste like they came off a campfire grill! Another great idea, especially if you’re making these for a weekend brunch, is to toss in a finely diced yellow onion and half a thinly sliced red bell pepper right along with the potatoes before roasting. They caramelize beautifully alongside the spuds and add a nice sweetness.
If you’re looking for something heartier, I’ve heard people mix in some crumbled, cooked sausage or bacon pieces right before the last 10 minutes of roasting. Those little bits crisp up and stick to the potatoes—total game changer. For a completely different take that still keeps the crisping technique, you could try turning these into a great side by tossing them with garlic butter once they come out, just like my recipe for garlic butter rice, but use potatoes instead of rice!
Making Skillet breakfast potatoes
Now, if you are short on oven space or just really prefer the hands-on feel of skillet cooking, you can tweak this recipe for the stovetop. The key here is ensuring you don’t crowd the pan! Use medium-high heat, and only put a single layer of potatoes in the pan at a time. You’ll need to stir them every few minutes—maybe every 5 minutes—to ensure all sides get contact with the hot metal. They’ll take a little longer than the oven method, but if you keep them moving and let them sit long enough between stirs to form that crust, you’ll get wonderfully crispy breakfast potatoes right on the stovetop.
Serving Suggestions for Your breakfast potatoes
These breakfast potatoes are truly the supporting actor that steals the show! Since they are so delightfully crispy, they pair perfectly with anything soft or creamy. I always pile mine next to fluffy scrambled eggs or alongside crispy bacon strips. They make any simple weekday breakfast feel like a celebration. For a real showstopper, use these as the base for your next big weekend brunch spread, loading them up with sour cream, chives, and maybe even a dollop of my favorite avocado egg salad on top.
Storage and Reheating Instructions for leftover breakfast potatoes
I know these are best eaten fresh—who isn’t eating them all up?—but if you manage to snag leftovers, don’t just throw them in the microwave! Microwaving turns these gorgeous, crispy treasures instantly soggy. Ugh! The absolute best way to reheat these is in the oven at about 375 degrees for about 10 minutes until they warm through and re-crisp. If you have an air fryer, even better! A quick blast in there will bring back that glorious crunch we worked so hard for. If you’re meal prepping, make sure to cool them completely before storing them in an airtight container, similar to how I store my tuna pasta salad.
Frequently Asked Questions About breakfast potatoes
How do I prevent my breakfast potatoes from getting soggy?
This is the million-dollar question, isn’t it? The number one way to prevent sogginess in your homemade breakfast potatoes is to manage the starch and the moisture! Remember the two non-negotiables: soak those diced potatoes in cold water for at least 30 minutes, and then pat them until they are bone dry before oiling and seasoning. Water turns to steam, and steam equals mush! Also, make sure you never overcrowd your baking sheet, as that traps steam underneath them.
Can I use sweet potatoes instead of Russets?
You certainly can, but the texture will be completely different! Russet potatoes are high starch, which gives you that fantastic fluffy interior and super-crispy exterior we’re aiming for. Sweet potatoes have more sugar and less starch, so they tend to caramelize and become softer rather than achieving that deep, shattering crunch. If you use them, they might cook a touch faster, so keep an eye on them, but they make for wonderful, slightly sweeter flavorful morning potatoes!
Can I make these ahead of time?
This is a great question, especially if you’re planning weekend brunch potatoes for a crowd! You can definitely prep ahead! You can chop the potatoes and let them soak in the water in the fridge for up to 24 hours. Just change the water once if it gets cloudy. Crucially, though, you *must* drain and dry them right before you plan to bake them. Don’t coat them in oil until you are ready for the oven, as letting the oil sit too long can sometimes encourage sogginess. For full meal prep, bake them completely, cool them fully, and then reheat them in the oven later, never the microwave!
What’s the best cooking method if I don’t want to roast them?
If you’re in a rush and only have a skillet handy, you can make terrific easy breakfast potatoes right on the stovetop! The main difference is you must cook them in batches over medium-high heat. Don’t put too many in the pan at once, or they won’t brown properly. Let them sit undisturbed for about 5 to 7 minutes to form that bottom crust before stirring. It takes a little more elbow grease, but you can absolutely get them golden brown and delicious, just like my creamy white chicken chili—lots of hands-on care yields the best results!
Can I add garlic clove or fresh onion to the roasting pan?
You absolutely can add aromatics, but you need to be smart about it! If you toss fresh minced garlic in with the oil at the beginning, it will absolutely burn before the potatoes are done, giving you a bitter taste. If you want that garlic flavor, use garlic powder in the initial coating. If you want fresh garlic or onion chunks, toss them onto the sheet pan only for the last 15 minutes of roasting. That way, they soften and brown without turning black, which is a mistake I once made while making some lovely pistachio muffins and accidentally burnt the sugar topping early!
Estimated Nutritional Data for breakfast potatoes
Since every kitchen uses slightly different amounts of oil or types of potatoes, please remember these numbers are just an estimate based on the standard recipe measurements provided above for one serving size (about 1 cup). This data reflects the oven roasted potatoes breakfast method using olive oil and Russets.
- Serving Size: 1 cup
- Calories: 250
- Fat: 12g
- Saturated Fat: 1.5g
- Carbohydrates: 34g
- Fiber: 4g
- Protein: 4g
- Sodium: 450mg
- Sugar: 1g

Perfectly Crispy Oven Roasted Breakfast Potatoes
- Total Time: 50 min
- Yield: 4 servings
- Diet: Gluten Free
Description
Follow this simple method to make golden brown, crispy breakfast potatoes using the oven. This recipe focuses on technique to achieve maximum crunch.
Ingredients
- 2 lbs Russet potatoes, peeled and diced into 1/2 inch cubes
- 3 tablespoons olive oil
- 1 teaspoon salt
- 1/2 teaspoon black pepper
- 1 teaspoon paprika
- 1/2 teaspoon garlic powder
- 1/4 teaspoon onion powder
- 1 tablespoon fresh rosemary, chopped (optional)
Instructions
- Preheat your oven to 425 degrees Fahrenheit (220 degrees Celsius).
- Place the diced potatoes in a large bowl and cover them completely with cold water. Let them soak for at least 30 minutes. This removes excess starch, which helps them crisp up.
- Drain the potatoes completely and then spread them out on a clean kitchen towel or several layers of paper towels. Pat them very dry. Moisture prevents crisping.
- In the bowl, toss the dry potatoes with olive oil, salt, pepper, paprika, garlic powder, and onion powder until evenly coated.
- Spread the seasoned potatoes in a single layer on a large baking sheet. Do not overcrowd the pan; use two sheets if necessary.
- Roast for 20 minutes.
- Remove the pan from the oven and carefully flip the potatoes using a spatula.
- Return to the oven and roast for another 15 to 20 minutes, or until they are deep golden brown and crispy on the outside.
- Toss with fresh rosemary, if using, before serving immediately.
Notes
- For extra crispiness, use a baking sheet that has been preheated in the oven for 5 minutes before adding the potatoes.
- If you prefer a skillet method, use medium-high heat and cook in batches, ensuring the potatoes have space to brown, not steam.
- Russet potatoes work best for crisping due to their high starch content.
- Prep Time: 10 min
- Cook Time: 40 min
- Category: Breakfast
- Method: Oven Roasting
- Cuisine: American
Nutrition
- Serving Size: 1 cup
- Calories: 250
- Sugar: 1
- Sodium: 450
- Fat: 12
- Saturated Fat: 1.5
- Unsaturated Fat: 10.5
- Trans Fat: 0
- Carbohydrates: 34
- Fiber: 4
- Protein: 4
- Cholesterol: 0


Comments are closed.