

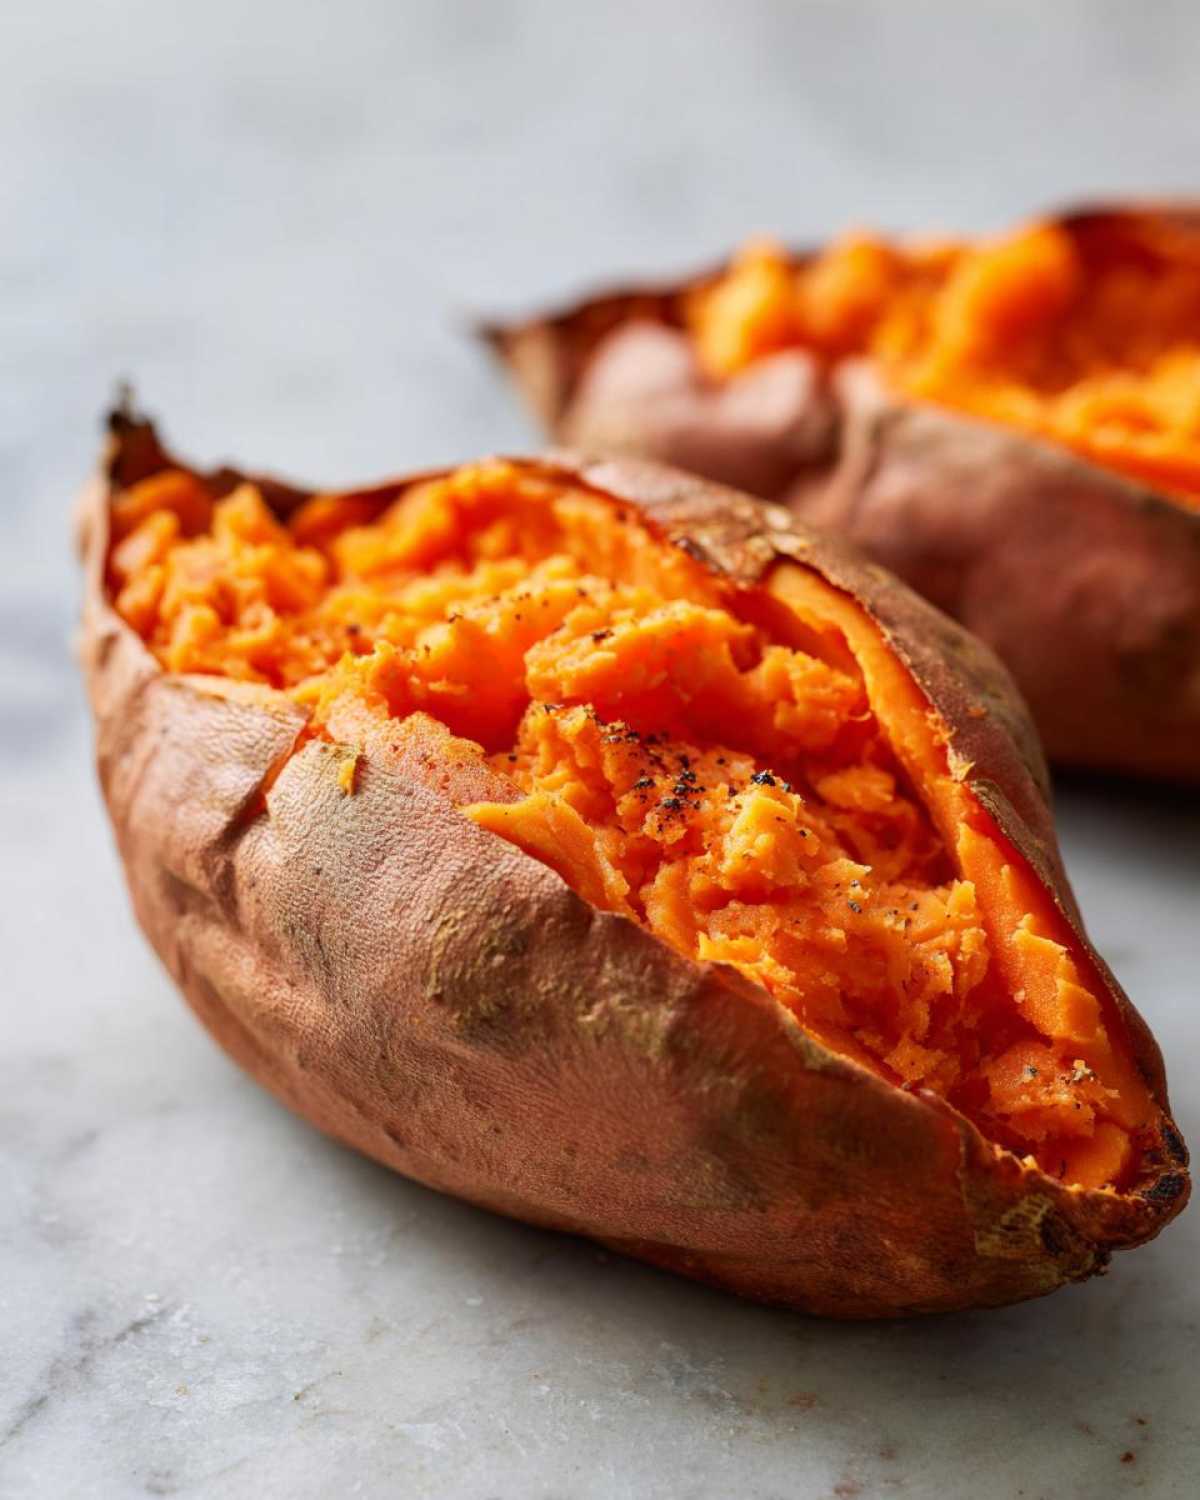
Oh, you are going to LOVE this. There is nothing—and I mean *nothing*—better than cutting into a perfectly baked sweet potato. That moment when the knife slides right through and you see that steam rush out, revealing an interior that’s impossibly fluffy, almost cloud-like? Seriously, it’s pure comfort food magic on a plate. For years, I struggled with potatoes that were either too hard or strangely soggy on the bottom. I tried wrapping them in foil, thinking I was helping them steam, but that just locks in the moisture where you don’t want it.
That’s why I’m sharing my no-fuss, absolutely foolproof technique that guarantees you get the best **baked sweet potatoes** every single time. We are ditching the foil entirely, folks! This simple method lets the oven do all the hard work, creating that lovely, slightly wrinkled, caramelized skin, while keeping the inside tender as can be. Honestly, mastering this technique changed my weeknight cooking game forever.

Why This Simple Method Creates Perfect baked sweet potatoes (Fluffy Sweet Potato Recipe)
If you want that textbook fluffy sweet potato interior, you have to let the potato breathe while it cooks. That’s the real secret behind this **Fluffy Sweet Potato Recipe**! When you skip the foil, you allow that internal steam to escape right through the tiny holes we poke with the fork.
Think about it: foil traps every drop of that moisture. It basically boils the potato inside its own tent, leading to mushy flesh and damp skin. Trust me, I’ve been there—it’s a tragedy.
By placing the potatoes directly on the oven rack, we create high heat contact all around. This promotes rapid evaporation where it needs to happen, turning the skin slightly crisp and caramelized, while the direct, surrounding heat cooks the starches inside perfectly. This simple technique is often called the foil free baked sweet potato method because it works! It results in potatoes that look fantastic and have that wonderful textural contrast.
Ingredients Needed for Easy baked sweet potatoes
The beauty of making **baked sweet potatoes** this way is that we keep the ingredient list super tight. We aren’t masking that gorgeous natural sweetness with a million things—just letting the oven do the heavy lifting! You really only need four things to start, plus whatever you want to put on top later.
Here’s what you need for four servings:
- 4 medium sweet potatoes, scrubbed clean and dried really well. Don’t skip the scrubbing!
- 1 tablespoon olive oil (good quality, but don’t stress over fancy brands).
- 1 teaspoon coarse salt. The bigger flakes make a difference on the skin, trust me.
- 1/2 teaspoon black pepper, freshly cracked is always best.
That’s it for the prep seasoning! It sounds simple, but it’s the foundation for a truly delicious, **simple sweet potato method**.
How to Prepare baked sweet potatoes Perfectly: Step-by-Step Instructions
Okay, now for the actual magic! This process is so straightforward, but those little initial steps are what separate a bland, tough potato from a show-stopping, fluffy **oven baked sweet potato**. You need about an hour, but only five minutes of actual hands-on work. Set your timer, grab a fork, and let’s get these guys ready for their oven spa treatment.
- First things first, get that oven hot! You want it at 400 degrees Fahrenheit (that’s 200 Celsius). Give it a good 10 to 15 minutes to really settle in at temperature before the potatoes go anywhere near it.
- Next, tackle the scrubbing. This is critical! Wash them well under running water and use your hands—or a veggie brush if you have one—to get any dirt off those beautiful skins. The dryer they are after washing, the better your skin will crisp up later! Pat them completely bone-dry with paper towels. Seriously, no drips allowed for this step.
- Grab that fork. You need to prick each potato several times all over—top, bottom, sides—maybe 6 to 8 good pokes. This lets the steam escape; otherwise, the potato can build up pressure and burst. We want tender, not explosive!
- Now for the thin coat of flavor. Lightly rub the entire exterior of each potato with that olive oil. Then, sprinkle them evenly with the coarse salt and your fresh black pepper. Don’t be shy with the salt on the outside; it helps draw out surface moisture and enhances the skin flavor.
- Finally, the big move for **crispy skin sweet potatoes**: Place them directly onto the middle oven rack. Yes, directly on the grate! We are absolutely not using foil! If you ever want to try a different quick method, check out my air fryer baked potato recipe next!
- Pop them in and let them bake for 45 to 60 minutes. The time depends entirely on how big your potatoes are, so keep an eye on them starting around the 45-minute mark.
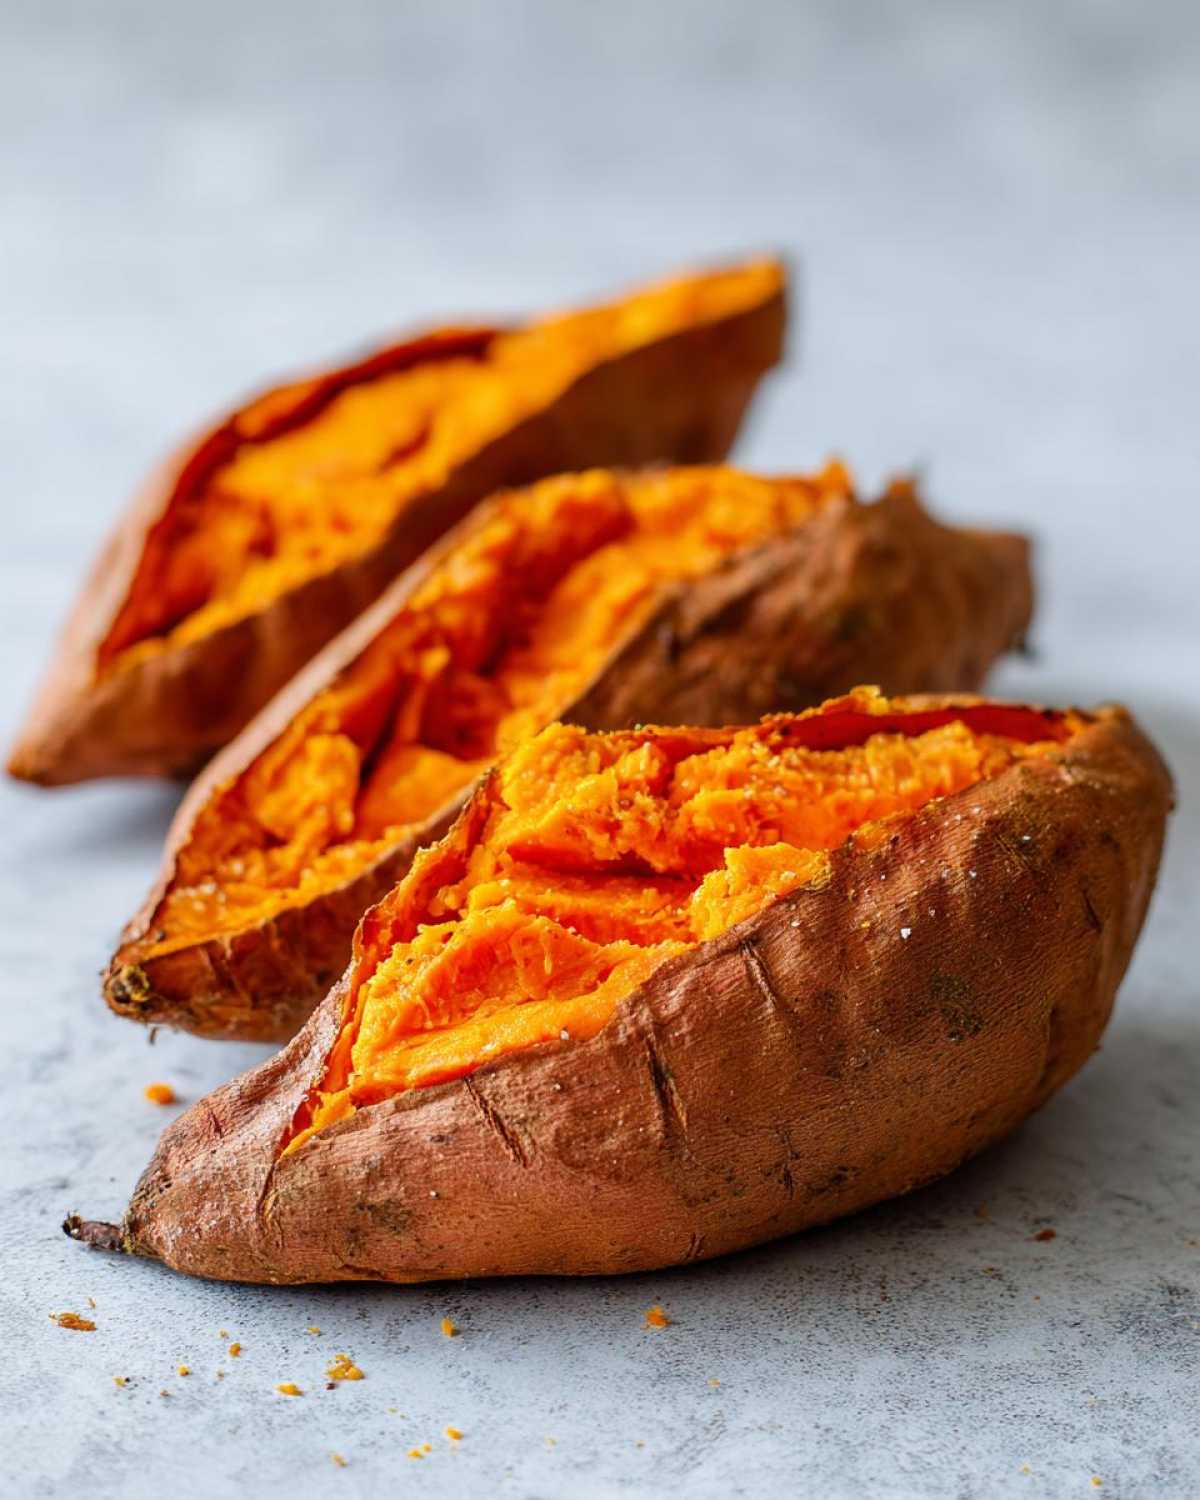
- You’ll know they’re done when the skin looks a little wrinkled and slightly browned, and when you squeeze one gently (wear an oven mitt!), it gives way easily.
- Pull them out carefully and let them rest on the counter for about five minutes. They cool just enough so you don’t burn your fingers, but they stay piping hot inside. Then, slice them open lengthwise and get ready to serve!
Preheating and Potato Prep for Crispy Skin Sweet Potatoes
Don’t rush the heat! If you put your potatoes into a lukewarm oven, they start steaming before they bake, and that’s how you end up with that less-than-ideal texture inside. Make sure that oven hits 400°F and stays there. The drying step is equally non-negotiable if you want truly **crispy skin sweet potatoes**. Water is the enemy of crispiness, whether you’re baking potatoes or frying chicken. Pat, pat, pat them dry!
Baking Time and Testing for Perfectly Cooked baked sweet potatoes
I usually estimate about 50 minutes for medium-sized potatoes, but always test! Don’t just pull them out because the timer went off. The best way to test is by using a fork or even a thin skewer. It should slide into the absolute center without *any* resistance—like stabbing soft butter. If you feel any hardness in the middle, pop them back in for another 5 to 10 minutes. Remember, we are committed to that **foil free baked sweet potato** method, so keep them naked on the rack!
Pro Tip: If you want maximum crispiness, here’s my little secret you can steal! Instead of putting them directly on the rack, place them on a rimmed baking sheet that you preheated inside the oven for ten minutes first. That intense heat radiating up from the sheet gives the bottom skin an amazing texture boost!
Tips for Success When Making Oven Baked Sweet Potatoes
Finding the right potato at the store can honestly be half the battle when you’re shooting for that perfect bake. For these **Oven Baked Sweet Potatoes**, I always try my best to pick out potatoes that are roughly the same size and shape. If you have one tiny one and one giant club-shaped one, the little guy is going to be shriveled up and dry by the time the big one is cooked through. Consistency is key for even results!
And remember that little tip I mentioned earlier about the baking sheet? If you’re serious about getting that bottom surface just as crisp as the top, you absolutely must preheat a metal baking sheet inside the oven while your potatoes are prepping. Once they are oiled and salted, slide them onto that screaming hot metal tray instead of the bare rack. The intense conducted heat gives the skin a true roast, making them spectacular.
Honestly, once you get the temperature and the ‘no foil’ rule down, these are impossible to mess up!
Storage and Reheating: Making baked sweet potatoes for Meal Prep
This is where these potatoes transition from just a tasty side dish to a true weeknight hero! I personally love making a huge batch of these **baked sweet potatoes** on Sunday because they hold up so incredibly well in the fridge. We’re talking up to four days, easily. They keep their texture surprisingly well, which is rare for pre-cooked starches.
The key to successful **Meal Prep Sweet Potatoes** is to let them cool down completely *before* you put them away. Never seal up a warm potato in plastic, or you’ll get condensation, which leads straight back to sogginess. Store them whole in an airtight container.
When it comes time to reheat, you have options depending on how much time you have. Zapping them in the microwave is fastest, usually about 60 to 90 seconds, but that will soften the skin completely. If you want to recapture some of that original magic, toss them on a sheet pan at 350°F for about 10 minutes. That little blast of dry heat wakes them right back up!
If you’re new to prepping lunches, I highly recommend checking out my absolute favorite recipe for making ahead: egg muffin cups. They are just as easy to batch cook!
The Best Baked Sweet Potato Toppings for Your baked sweet potatoes
Now, the moment every cook anticipates: what are we slathering on top of this perfect, fluffy canvas?
Since the potato itself is naturally so sweet, you don’t need much, but everyone has their own idea of heaven. The absolute classic, which I always default to for a **simple baked potato side dish**, is just a nice pat of real butter melting down into the center, accented with a pinch more coarse salt and that fresh black pepper. It’s simple, elegant, and lets the sweet potato shine.

But if you’re looking to elevate this into something special, here are some of my favorite variations that make my list of the **Best Baked Sweet Potato Toppings**.
For a cozy twist, especially when it gets chilly out, melt a little butter, swirl in just a dash of cinnamon and nutmeg, and drizzle that over the top. If you want something sweeter, a tiny drizzle of pure maple syrup takes the flavor profile right into dessert territory! Sometimes I swap the butter for a dollop of Greek yogurt or crème fraîche if I’m serving it alongside something savory, like chili.
If you are feeling fancy, a quick garlic-herb butter is amazing, similar to what I use on my soft bread—you can check out how I make that garlic naan bread sometime! Honestly, there’s no wrong way to finish it, but mastering the base bake means the toppings are just the cherry on top!
Serving baked sweet potatoes as an Easy Baked Potato Side Dish
Seriously, this recipe just keeps giving! Once you have these perfect potatoes ready to go, they become your new best friend for any dinner spread you’re planning. Forget standing over the stove making complicated vegetable medleys; these are the ultimate **Easy Baked Potato Side Dish** you can rely on.
Because they are so naturally sweet and beautifully textured, they pair well with almost anything. Think about serving them alongside a simple roasted chicken or maybe a hearty black bean burger. They provide that perfect warm, starchy counter-balance without feeling heavy.
I often make them when I need a quick **Weeknight Side Dish Idea** that feels wholesome. They are great on their own, but if you want a simple light green to go with them, I’ve been obsessed lately with this easy crunchy cabbage salad. It adds the perfect fresh crunch next to the soft, warm potato. It just works, every time!
Understanding Cooking Differences: Roasting Sweet Potatoes vs Baking
People often confuse baking a whole sweet potato with roasting them, but they lead to slightly different results, which is worth talking about to build trust in this method! When we talk about roasting, we usually mean cutting the sweet potatoes into chunks or wedges first, right? That cutting exposes way more surface area to the high heat.
Exposing that surface area means you get way more crispy, caramelized edges, which is fantastic if you’re looking for that crunchy texture, like in my ultimate crispy roasted sweet potatoes recipe.
But with this recipe, since we are baking them whole and **foil free baked sweet potato** style, all the magic stays locked inside until the very last minute. This means the high heat cooks the center slowly and evenly, resulting in that glorious, almost creamy fluffiness we are aiming for. So, **Roasting Sweet Potatoes vs Baking** whole definitely comes down to the texture you want when you slice them open!
Nutritional Snapshot of a Healthy Baked Sweet Potato
Okay, I know some of you are tracking macros or just generally curious about what you’re eating, and that’s totally fair! The great thing about keeping our **baked sweet potatoes** method so simple—just oil and seasoning—is that we aren’t adding a ton of scary extras.
Please remember that this is just an estimate based on the base potato and a tiny bit of oil, not accounting for whatever delicious butter or topping you load on later! If you use half a stick of butter, your fat count goes way up, just saying! But for the core, **Healthy Baked Sweet Potato**, here’s what we’re looking at per medium potato:
- Serving Size: 1 medium potato (unloaded)
- Calories: Around 180
- Carbohydrates: 41g
- Fiber: 7g (Hello, digestive health!)
- Protein: 4g
- Fat: About 0.5g (Mostly unsaturated!)
- Sugar: 13g (Totally natural sweetness!)
- Cholesterol: Zero, since it’s a veggie!
It’s a fantastic choice when you’re looking for a naturally sweet and filling option that’s way better than reaching for chips or crackers. This really shows how great a **simple vegetable side dish** can be when treated right!
Share Your Perfectly Cooked baked sweet potatoes Results
That’s honestly everything you need to know to get that perfect, light, fluffy interior and slightly textured skin! I hope you feel super confident now tackling these beautiful vegetables without relying on foil ever again.
I’m dying to know how they turned out for you! Did you stick to the basics with just salt and pepper, or did you go wild with one of those maple walnut or garlic butter toppings we talked about? Drop a rating down below—did this work better for you than any other method you’ve tried?
Please leave a comment and tell me all about your success using the **Simple Sweet Potato Method**. And if you snapped a picture of that gorgeous, steamy interior, share it on social media and tag me! Happy baking, friends—you earned that delicious, **perfectly cooked sweet potato**!
Print
Perfect Oven Baked Sweet Potatoes
- Total Time: 55 min
- Yield: 4 servings
- Diet: Vegetarian
Description
Learn the simple method for baking sweet potatoes in the oven to achieve a fluffy interior and slightly crisp skin.
Ingredients
- 4 medium sweet potatoes
- 1 tablespoon olive oil
- 1 teaspoon coarse salt
- 1/2 teaspoon black pepper
Instructions
- Preheat your oven to 400 degrees Fahrenheit (200 degrees Celsius).
- Wash the sweet potatoes thoroughly under running water. Scrub the skin well to remove any dirt. Pat them completely dry with a paper towel.
- Prick each sweet potato several times all over using a fork. This allows steam to escape during baking.
- Rub the exterior of each potato lightly with olive oil. Sprinkle evenly with coarse salt and black pepper.
- Place the prepared sweet potatoes directly onto the oven rack. Do not use foil.
- Bake for 45 to 60 minutes, depending on the size of the potatoes, until the skin is slightly wrinkled and a fork easily pierces the center.
- Remove from the oven and let them cool for 5 minutes before slicing open lengthwise.
- Serve immediately with your preferred toppings.
Notes
- For extra crispy skin, you can bake them directly on a baking sheet instead of the rack.
- If you plan to use these for meal prep, store the baked potatoes whole in the refrigerator for up to four days. Reheat in the oven or microwave.
- Try topping with a pat of butter, a sprinkle of cinnamon, or a drizzle of maple syrup for a sweet variation.
- Prep Time: 5 min
- Cook Time: 50 min
- Category: Side Dish
- Method: Baking
- Cuisine: American
Nutrition
- Serving Size: 1 medium potato
- Calories: 180
- Sugar: 13
- Sodium: 250
- Fat: 0.5
- Saturated Fat: 0.1
- Unsaturated Fat: 0.4
- Trans Fat: 0.0
- Carbohydrates: 41
- Fiber: 7
- Protein: 4
- Cholesterol: 0


Comments are closed.