

I spent years messing up sweet potatoes. Seriously! They were either rock hard in the middle or totally mushy, like baby food had taken over the entire skin. I swear, everyone tries to make them complex, wrapping them in foil like little presents, but that just steams them, right? We don’t want steamed potatoes; we want magic!
This method, though? This is the one. It’s the secret weapon for the ultimate **baked sweet potato**: fluffy, sweet inside, and that beautifully crackly, slightly caramelized skin on the outside. I used to dread making them for holiday side dishes, but now, setting the oven to 400 degrees and walking away is all it takes. Trust me, once you see how simple achieving that perfect sweet potato texture can be, you’ll never go back to the microwave again.
Why This is the Best Way to Make a Baked Sweet Potato
The main reason I skip all the fan-dangled tricks is really simple: we want that great skin texture! When you skip the tin foil and place the potato straight onto the oven rack, you expose it to direct heat. That olive oil and salt mixture works magic when it gets hammered by oven air, giving you that wonderful, slightly crispy skin sweet potato experience.
Microwaving is fast, sure, but it steams the insides. We are aiming for the perfect sweet potato texture—light, airy, and tender, not dense and wet. Baking slowly at 400 degrees pulls out the natural sugars, concentrating the flavor, which is something you just can’t replicate quickly.
Gathering Ingredients for Your Perfect Baked Sweet Potato
Honestly, the ingredient list is laughably short, which is exactly how I like my easy sweet potato recipe! We’re just using four medium potatoes, a splash of good olive oil, and some coarse salt. That’s it for the base. Ingredient quality really does matter here, though. A good, solid potato makes all the difference, especially when you’re aiming for that tender baked potato result.
Ingredient Notes and Substitutions
When you’re picking them out, try to grab potatoes that are roughly the same size. If you mix a tiny one with a giant one, the little guy is going to burn before the big one is even halfway done cooking. That olive oil and coarse salt combo is what helps create that amazing outer crust we talked about. If you want something extra nice, go ahead and sprinkle a tiny bit of brown sugar over the oil before they go in—it really encourages that caramelized sweet potato recipe feel!
Essential Equipment for a Fluffy Baked Sweet Potato
You don’t need any fancy gadgets for this project, which is why I love it for a busy weeknight! We rely on simple tools that are probably already in your drawer. Think basic, reliable kitchen workhorses here.
First, you absolutely need your oven, obviously, but what you set it on matters. Grab a sturdy metal baking sheet. This isn’t just to keep your oven clean; placing the sheet underneath the direct heat helps the bottom of the potato cook evenly too. Don’t use glass for high heat cooking like this if you can avoid it!
And finally, for testing—you need something sharp! I use either a sturdy dinner fork or, my personal favorite, a thin wooden skewer. You need a good tool to pierce those potatoes deeply before they go in, and you need something reliable to test for tenderness later on. That’s it: oven, sheet, and a sharp sticking device!
Step-by-Step Instructions: How to Bake Sweet Potatoes in the Oven
Okay, this is where the real cooking magic happens! If you follow how to bake sweet potatoes this way, I promise you’ll land that perfect texture every single time. Remember, we are setting the stage for a healthy baked side dish that tastes like a holiday treat, even on a Tuesday night.
First thing: get that oven ready! We need it hanging out at 400 degrees Fahrenheit. While it’s warming up, let’s handle the prep work. You can check out how others do things in the air fryer if you’re curious, but for the ultimate baked guy, the regular oven is my go-to.
Prepping and Piercing the Baked Sweet Potato
Give those sweet potatoes a serious scrub under hot water. I use a vegetable brush to get off every last bit of dirt. Then, here’s a non-negotiable step: dry them completely! If they are damp, they steam. Once they are bone dry, you need your fork or skewer and you have to pierce them deeply, maybe six to eight times all over. This lets the steam escape so they don’t explode on you—which, believe me, is a mess nobody wants!
Oiling and Salting for the Best Baked Sweet Potato Skin
Take your olive oil and just lightly coat the outside of each potato. It doesn’t need to be drowning, just slick enough to help the salt stick. Then, hit them generously with coarse salt. This is crucial for that desired crispy skin sweet potato finish. It draws a little moisture out of the skin while baking, leading to that slightly brittle, lovely texture.
Baking Time and Checking for a Tender Baked Potato
Place them directly on the middle oven rack. Yes, directly! No foil, no dish—just the potato and the rack! Put that drip pan underneath just in case. Now, you wait. The general sweet potato cooking time runs between 45 to 60 minutes depending on how big they are. You’ll know they are done when you can gently squeeze the sides and they give way easily, or when that skewer slides into the center without any struggle at all. Don’t rush this part; patience equals a perfectly tender baked potato!
Achieving the Ultimate Fluffy Baked Sweet Potato Texture
Okay, resisting the urge to dive in the second they come out of the oven is perhaps the hardest part of this entire process! You have to let them rest. I usually pull them out, put them on a wire rack or even just a cutting board, and let them sit for about five minutes. This resting period is vital because it lets the internal steam redistribute a bit. If you slice them immediately, all that beautiful moisture just runs right out onto your plate!
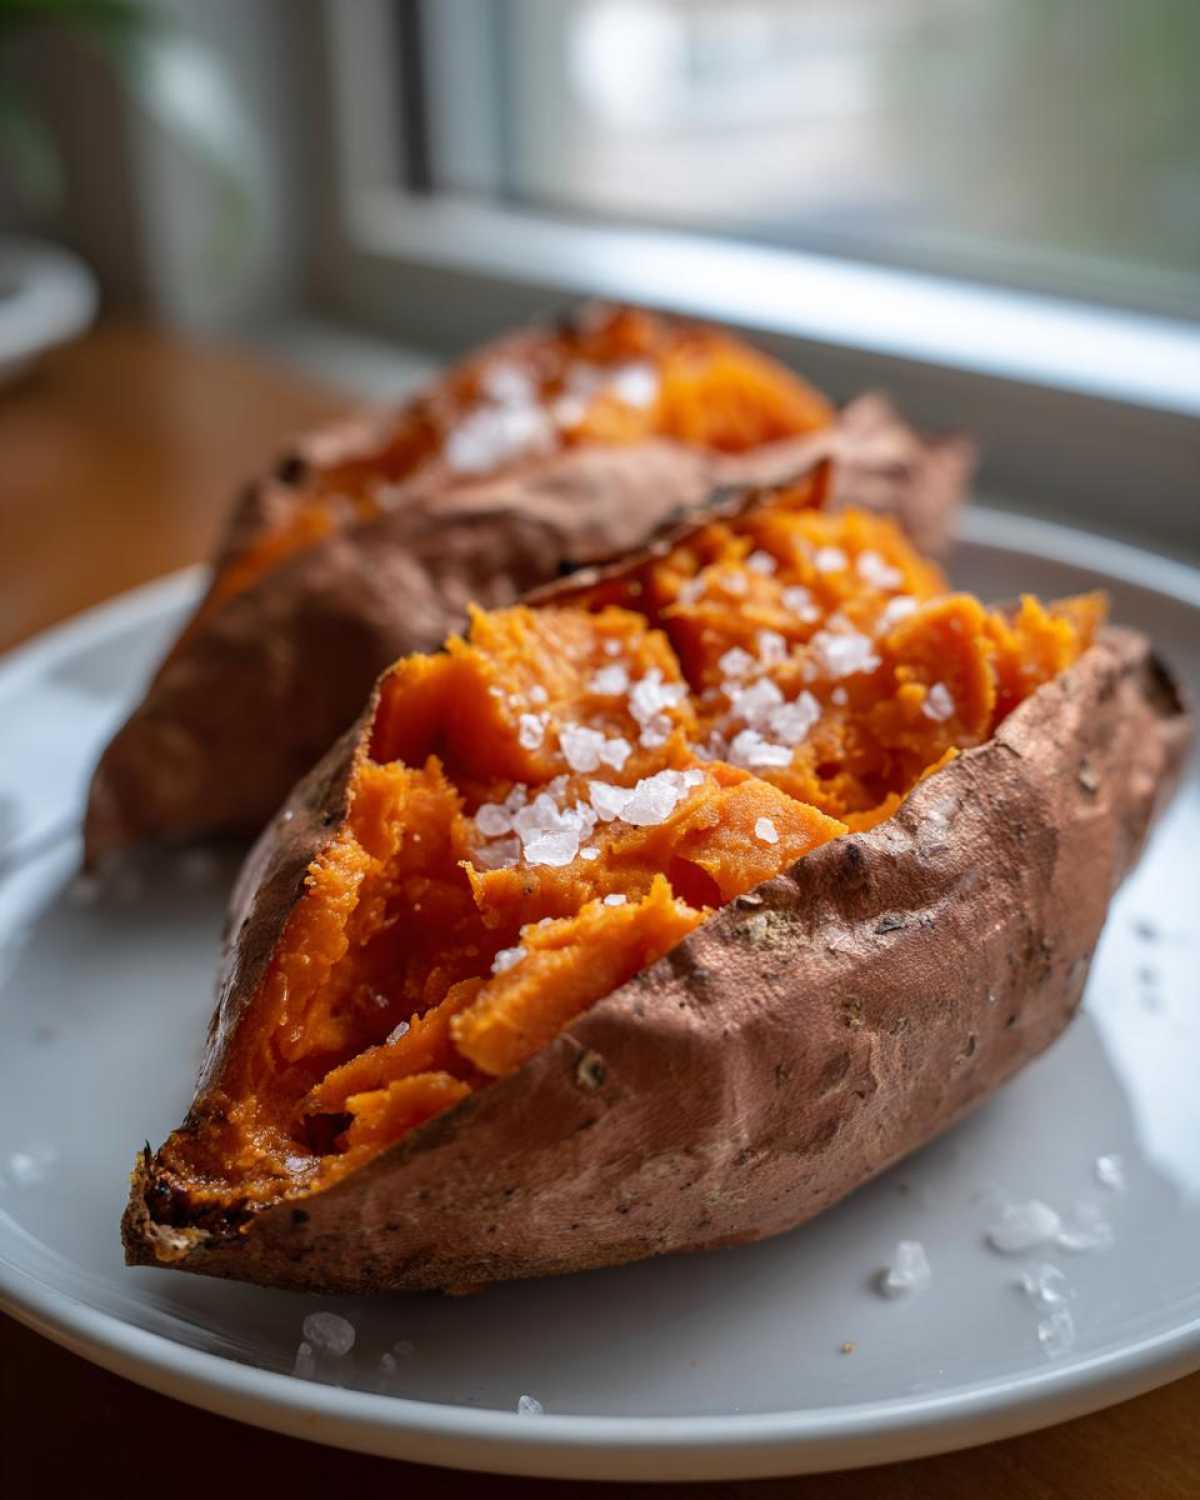
Once they’ve cooled just enough so you won’t burn yourself—a gentle five minutes is all it takes—it’s time for the grand reveal. Take a sharp knife and slice straight down the middle, lengthwise, stopping just before you hit the bottom, so you create a nice opening for the steam to escape further.
Here’s my secret tip for getting that incredibly airy, fluffy baked sweet potato flesh: forget the serving fork for a minute. I take a regular table fork and actually dig into the sides of the flesh, dragging it upward toward the center, folding the cooked insides over themselves. It’s like gently fluffing a pillow! This action introduces air right into the starches, making the inside almost cloud-like and unbelievably light. Sprinkle with a little salt and pepper while it’s piping hot, and honestly, you might not even need butter!
Serving Suggestions: Sweet Potato Topping Ideas
Now that you have this beautiful, fluffy base, we move onto the best part: deciding what to put on it! The natural sweetness of the potato means you can go in so many directions. You can enhance that inherent sugary flavor for a truly caramelized sweet potato recipe feel, or you can go totally savory.
Since this is such a flexible side, I always have a few go-to sweet potato topping ideas ready to go. If you want to take them up a notch for a big meal, maybe check out my recipe for sweet potato biscuits sometime—but for now, let’s stick to toppings!
Simple Savory Sweet Potato Options
If you don’t have a sweet tooth, don’t worry! You can turn this into a fantastic simple savory sweet potato by going the herb and spice route. I love mixing a little sour cream or plain Greek yogurt with chopped chives and a heavy sprinkle of smoked paprika. Seriously addictive.
Another winner is a tiny bit of butter mixed with chili powder and cumin. If you’re feeling especially decadent, top it with some sharp crumbled feta cheese or even a dollop of plain yogurt mixed with garlic powder. It makes a fantastic contrast to the hot, sweet interior!
Variations: Beyond the Basic Baked Sweet Potato
Once you master the base, you realize this simple baked sweet potato is like a blank canvas begging you to get creative! It’s wonderful for dinner, but it’s also the perfect starting point for heartier meals or even leftovers you want to dress up later. Showing off versatility, like offering ideas for stuffed sweet potatoes, really shows people you know your way around the kitchen, right?
We covered the basic fluffy side dish, but what if you need a whole meal? Or what if you have a couple leftover from last night’s dinner and you want to breathe new life into them? That’s where the power of variation comes in handy. Don’t just stop at topping them with butter; let’s make them stars!
Making Twice Baked Sweet Potatoes
This is my absolute favorite way to transform a leftover baked potato into a second, even better meal. Once your sweet potato is baked using our foolproof method—skin crisp, inside fluffy—you let it cool just enough so you can handle it. Carefully slice it open lengthwise, just like before, but this time, scoop out almost all that gorgeous orange flesh into a waiting bowl.
Now you mix! I usually add a splash of milk or cream, a little extra butter, some salt, pepper, maybe some cheese if I’m feeling wild, and whatever herbs look good that day. Then, spoon that wonderful mixture right back into the empty skins. Pop those filled skins back into that 400-degree oven for about 10 to 15 minutes, just until the tops look golden and heated through. It’s so cozy, and you get to see here other great ideas for stuffing them if you need inspiration!
Storage and Meal Prep Tips for Your Baked Sweet Potato
One of the greatest things about baking potatoes this way is that they are fantastic for planning ahead. These hold up so well, which makes them champions for sweet potato meal prep! You can bake a whole batch on Sunday afternoon, and you’ve got guaranteed, healthy sides ready for the whole week—no fuss required.
Once they are completely cooled down, I store the whole potato, skin and all, in an airtight container in the fridge. They last beautifully for up to four days. If you think you won’t get to them that fast, they freeze wonderfully too! Just wrap the cooled potatoes tightly in plastic wrap or foil, seal them in a freezer bag, and they should be good for about two months.
Reheating is super easy, thankfully. If you want to bring back that slight crispness on the skin, pop the whole potato in an oven set to 350 degrees for about 10 to 15 minutes. If you’re in a massive rush, don’t sweat it—the microwave works fine to just warm the inside up quickly. A quick blast for 60 to 90 seconds usually does the trick, though you lose a little texture that way. If you’re looking for faster options next time, you might want to check out my recipe for air fryer sweet potato fries!
Frequently Asked Questions About Oven Baked Sweet Potatoes
It’s funny how we can explain something so simply, but people still have little snags when they first try it. I get so many questions about timing and how to stop them from steaming! Don’t you worry about that; it’s all about those tiny details we covered in the main recipe. Think of this spot as the troubleshooting team for success. If you have questions about getting that perfect tender baked potato finish, chances are someone else does too!
Can I use foil when baking a sweet potato?
This is the number one question, and my answer is always a very firm, but loving, ‘No!’ Look, if you’re just trying to get a quick cook and don’t care about texture, go ahead and wrap them. But if you want that amazing, slightly flaky, crispy skin we worked so hard for, you need that direct heat exposure. Foil traps the steam, and you end up with a soft, lifeless skin instead of that lovely crust. We want simple oven vegetables that look impressive, not pale little steamed lumps!
How do I ensure I get a fluffy baked sweet potato every time?
It boils down to two things we talked about: prepping and timing. First, you MUST pierce them deeply and generously all over before they ever go near the oven. This is your safety valve for steam escape. Second, don’t over-bake them! If you test them and they are *almost* done, take them out. They will continue to cook for a few minutes once you pull them and let them rest outside the oven. Better slightly underdone than dried out! That little bit of carryover cooking is what guarantees that phenomenal, fluffy baked sweet potato flesh every time. If you want to see how I get crispy results on other things, check out my crispy chicken recipe!
Print
The Ultimate Foolproof Baked Sweet Potato
- Total Time: 60 min
- Yield: 4 servings
- Diet: Vegetarian
Description
Learn the simple, reliable method for baking sweet potatoes in the oven to achieve a fluffy interior and slightly crispy skin.
Ingredients
- 4 medium sweet potatoes
- 1 tablespoon olive oil
- 1 teaspoon coarse salt
Instructions
- Preheat your oven to 400 degrees Fahrenheit (200 degrees Celsius).
- Wash the sweet potatoes thoroughly under running water. Scrub the skin well to remove any dirt.
- Pat the potatoes completely dry with a paper towel. This step helps achieve a crispier skin.
- Pierce each sweet potato several times deeply with a fork or sharp knife. Do not wrap the potatoes in foil; direct heat exposure creates the best skin texture.
- Rub the entire surface of each potato with olive oil and sprinkle evenly with coarse salt.
- Place the prepared potatoes directly onto the middle oven rack. Place a baking sheet on the rack below to catch any drips.
- Bake for 45 to 60 minutes. The exact time depends on the size of your potatoes.
- Check for doneness by squeezing the sides gently; the potato should yield easily, or insert a thin skewer into the center; it should slide in with no resistance.
- Remove from the oven and let them cool for 5 minutes before slicing open lengthwise. Fluff the inside flesh with a fork.
Notes
- For a sweeter result, you can lightly sprinkle the skin with brown sugar before baking.
- If you prefer a softer skin, you may wrap individual potatoes loosely in parchment paper before placing them on the rack.
- To make twice baked sweet potatoes, scoop out the flesh after baking, mix with desired fillings, and return to the skins to bake for 10 more minutes.
- For quick cooking, use the microwave for 5-8 minutes until tender, then finish in a 400F oven for 10 minutes for texture.
- Prep Time: 5 min
- Cook Time: 55 min
- Category: Side Dish
- Method: Baking
- Cuisine: American
Nutrition
- Serving Size: 1 medium potato
- Calories: 180
- Sugar: 13
- Sodium: 150
- Fat: 0.3
- Saturated Fat: 0.0
- Unsaturated Fat: 0.3
- Trans Fat: 0.0
- Carbohydrates: 41
- Fiber: 7
- Protein: 4
- Cholesterol: 0


Comments are closed.