

Honestly, I don’t even know why people still buy the stuff in those plastic squeeze bottles anymore. It always tastes so… artificial, right? Like it’s got an ingredient list longer than my arm. I spent years trying to find a commercial brand that truly satisfied my chocolate cravings, especially for drizzling over my late-night ice cream cone, but it never worked.
Trust me when I say that this Ultimate Quick & Easy Homemade Chocolate Syrup recipe changed everything for me. Using just simple pantry staples, you can whip up rich, intensely flavorful chocolate syrup that knocks the socks off anything store-bought. The true magic here is the texture—it sets up perfectly silky, smooth, and glossy in under 15 minutes total. After messing around with ratios for what felt like ages, I finally nailed the perfect blend of sugar and cocoa powder that gives you that gourmet flavor without needing corn syrup or weird stabilizers. It’s my go-to pantry hack now!
Why This Homemade Chocolate Syrup Recipe Beats the Bottle
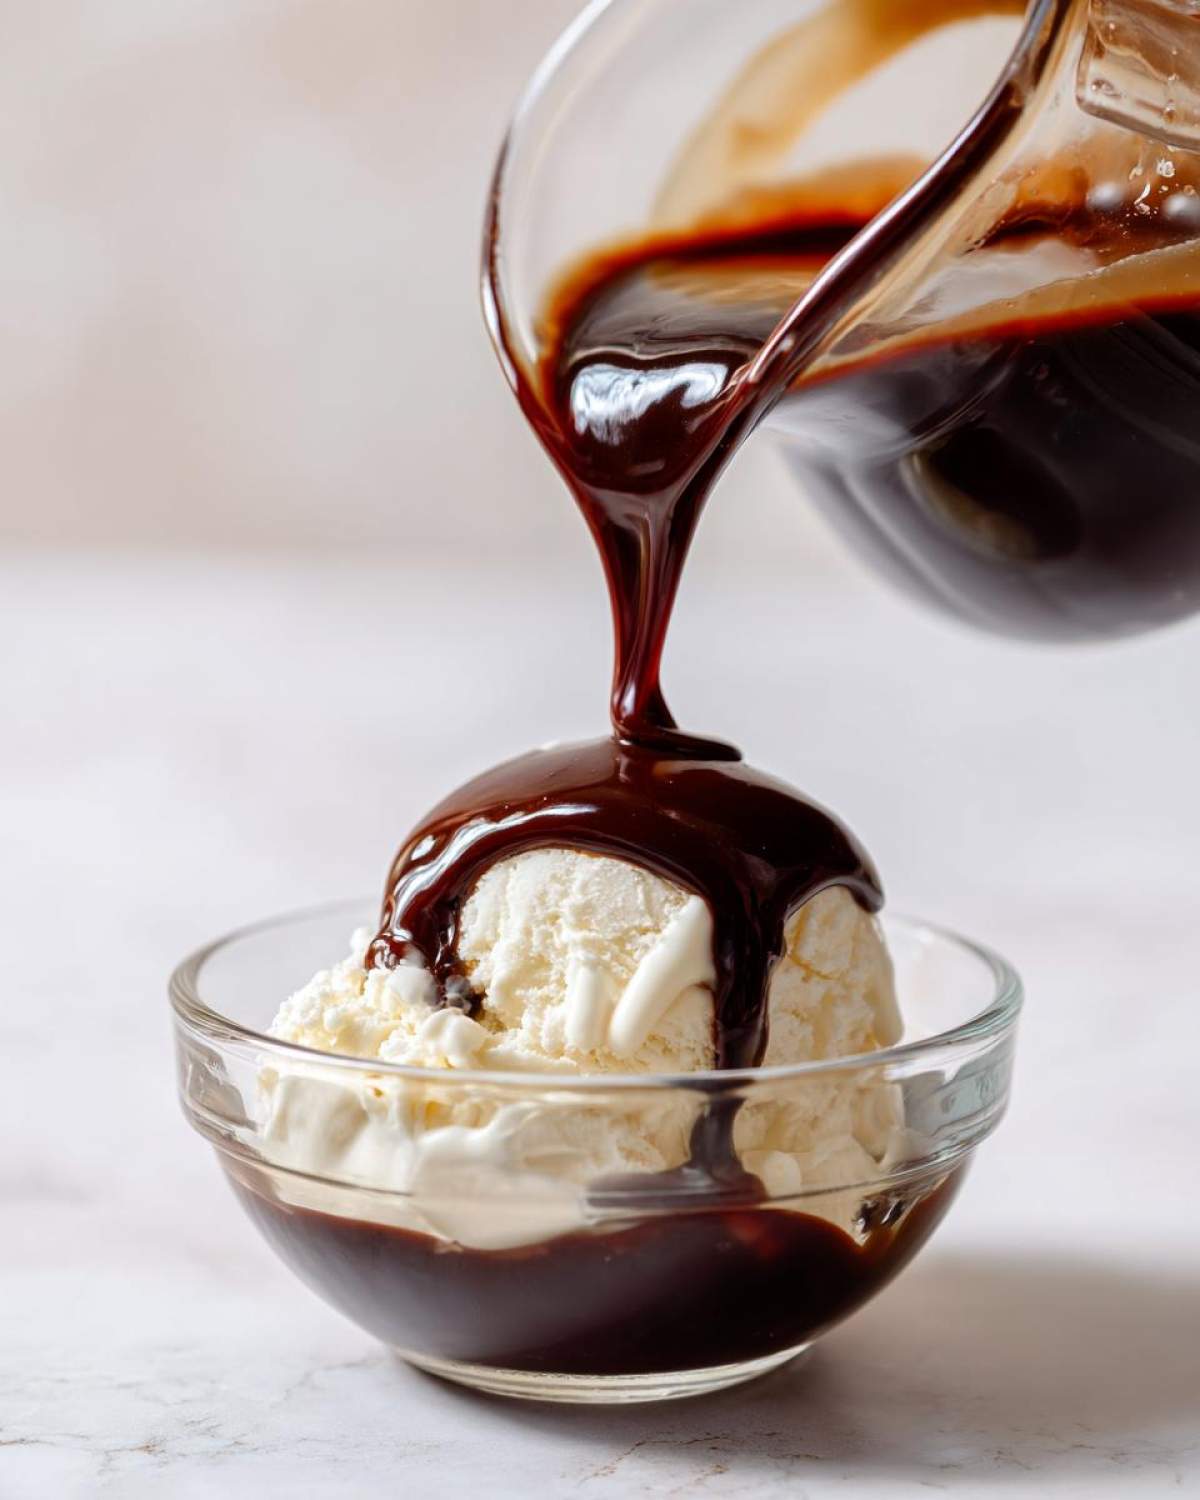
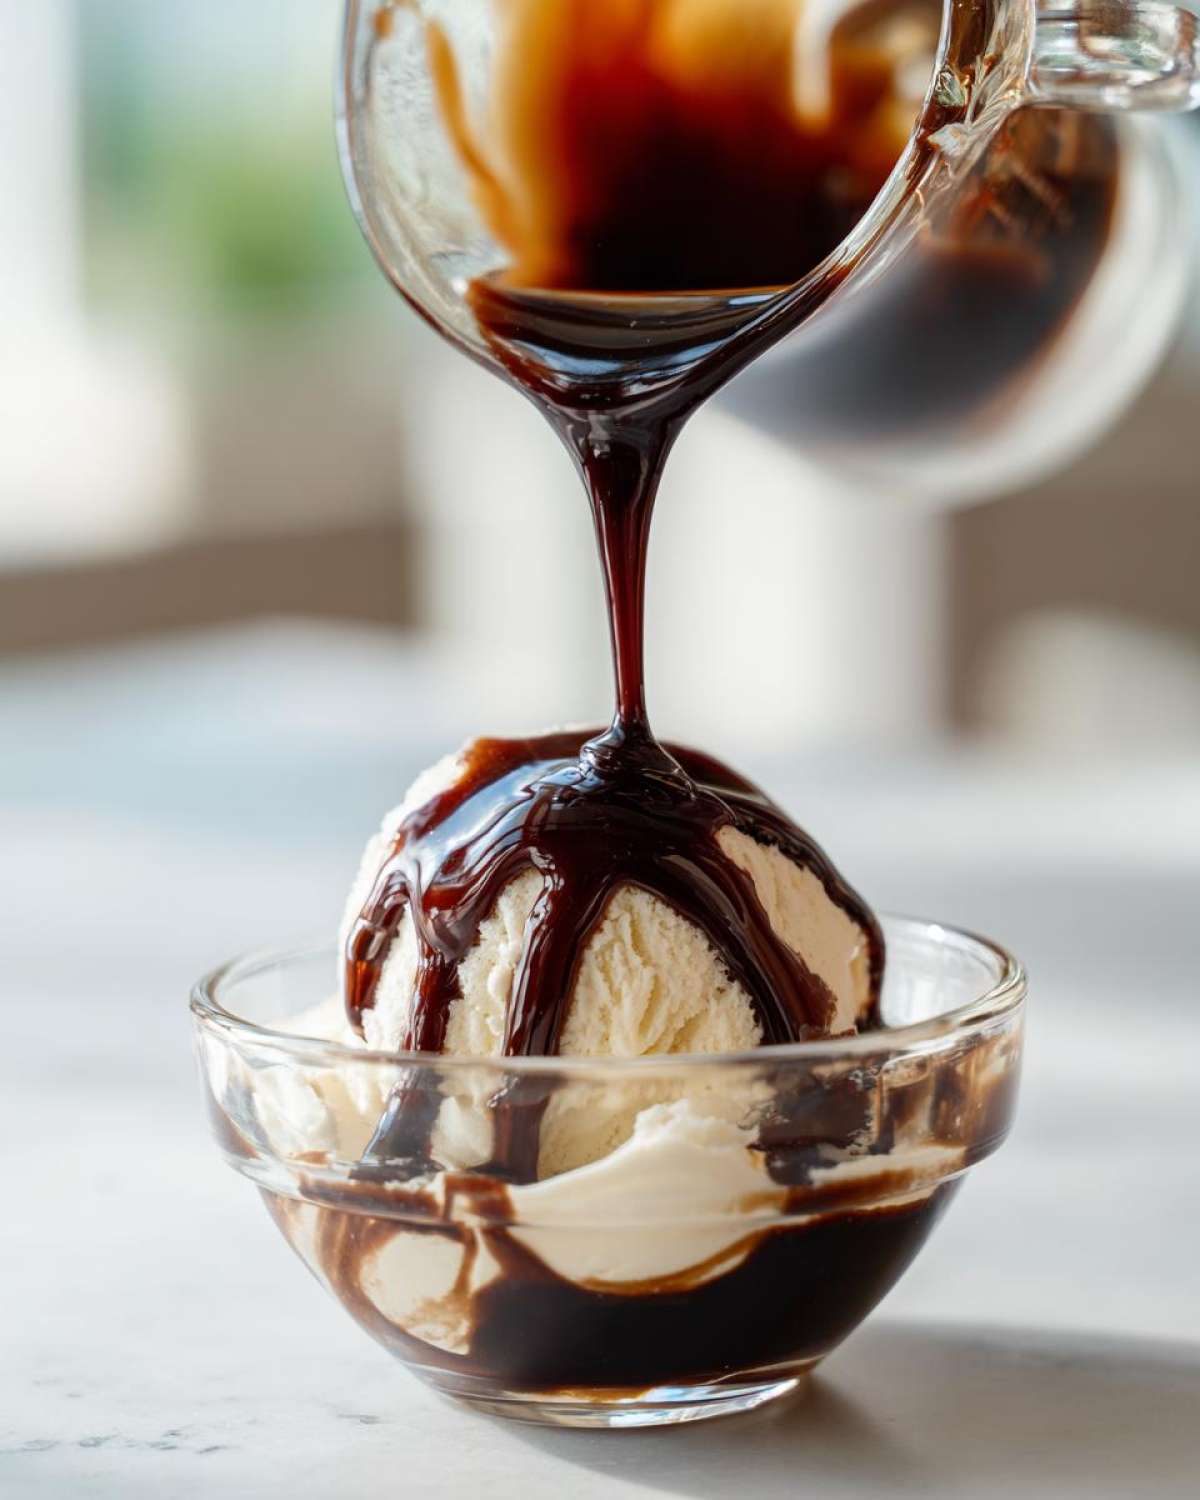
The difference between this jar of homemade perfection and the stuff you buy is night and day. Seriously, when I first poured this over a scoop of plain vanilla ice cream—thinking it would probably taste grainy or thin—I nearly dropped the spoon. It was deeply, intensely chocolatey, the way real cocoa should taste, not that faint brown sugar flavor you usually get. It was a total game-changer!
Why bother making it from scratch? Look, it just tastes better, first off. But there are other reasons I rely on this Homemade Chocolate Syrup now:
- The taste is pure, which means you need less of it for a big flavor impact.
- It’s unbelievably cost-effective; I always have the cocoa and sugar on hand!
- Zero artificial colors or preservatives—exactly what you want when drizzling over your kids’ Sunday pancakes.
This became my go-to, especially when I needed a Rich Chocolate Topping in a pinch. If you check out my ultimate chocolate chip cookies recipe, you’ll see I demand real flavor, and this syrup delivers that same punch.
Achieving That Perfect Silky Chocolate Syrup Texture
That glossy, smooth finish you’re looking for? It’s all about managing the heat and the whisking speed. If you dump the cocoa powder in without mixing it with the sugar first, you’re going to end up with little cocoa lumps that are impossible to get out later—nobody wants that!
The ratio of water to sugar versus cocoa is what builds the body. Once you hit that gentle simmer for just a minute or two, you are essentially creating a stable emulsion. This careful cooking process stops the syrup from crystallizing later on, which is how you lock in that beautiful, Silky Chocolate Syrup texture right up until the last drop.
Ingredients for the Ultimate Quick & Easy Homemade Chocolate Syrup
You know how sometimes you go to make something amazing, but you’re missing that one weird ingredient? Not here! That’s the beauty of this Basic Sauce Recipe—it relies entirely on things you probably have floating around your pantry right now. Remember, clarity is key here; measure these out precisely, as chocolate syrup is less forgiving than a cake batter!
Here is exactly what you need to gather before you even think about turning on that burner. Don’t forget the measuring cups!
- 1 cup granulated sugar (make sure it’s the regular white stuff)
- 3/4 cup unsweetened cocoa powder (Dutch process works great, but regular works too!)
- 1 cup water (just plain old tap water is perfect)
- 1 teaspoon vanilla extract (use the real stuff if you can!)
- Pinch of salt (this is vital to balance the sweetness)
That’s it! See? Five simple things. No need to run out to the specialty store for extracts or obscure thickeners. It’s pure, pantry-staple goodness that turns into spectacular chocolate syrup when mixed right.
Step-by-Step Instructions for Perfect Chocolate Syrup
Alright, friend, this is where the magic happens, and it happens fast. Seriously, set a timer because this whole process for this Basic Sauce Recipe takes about five minutes on the stove. The most important thing? Don’t walk away. Keep that whisk moving! Heat control is everything here.
First thing’s first: Grab a small saucepan—nothing too wide—and toss in the sugar, the cocoa powder, and the full cup of water. You need to get this mixture over medium heat gently. Now, start whisking immediately. You absolutely must whisk constantly until you see that gritty texture disappear and the sugar is completely dissolved. If you see any sugar clinging to the bottom, it’s going to crystallize later, and we don’t want that grainy texture!
Once it looks smooth and unified, let it come up until it just *starts* to simmer. This is the critical timing part! Once it simmers, drop the heat down low and let it bubble gently—just barely, mind you—for only one to two minutes. This short simmer is what maximizes the cocoa flavor. Pull it right off the heat. Then, stir in your vanilla and that tiny pinch of salt we talked about. That salt just wakes everything up!

Now for the patience part: You have to let it cool down completely. Don’t dip a spoon in yet! I know it’s hard, but it will be thin, watery even, straight off the stove. As it chills in the fridge or on the counter, you’ll see it transform into that thick, luxurious sauce. I usually transfer it to a clean jar once it’s lukewarm so it’s ready when I need that perfect rich topping later!
Pro Tip for Smooth Chocolate Syrup Every Time
If you want truly flawless chocolate syrup, try this trick: before you even put the pan on the heat, take about a quarter cup of the measured water and mix it with the cocoa powder in a separate small bowl until you have a very thick slurry, like brownie batter. Then, add that slurry along with the rest of the water and sugar to the pan. This pre-mixing step totally locks up the cocoa particles, meaning you whisk less on the stove and guarantee zero lumps. It’s my little secret for that unbeatable E-E-A-T factor!
How to Use Your Rich Chocolate Topping (chocolate syrup)
Okay, now that you have this gorgeous jar of homemade chocolate syrup cooling on the counter—what are you going to do with it first? This stuff is built for versatility! I swear, my kids only ask for breakfast now if I promise a layer of this chocolate syrup over their sourdough discard pancakes. It’s miles better than any plain pancake syrup we’ve ever tried.

But it’s not just for breakfast! Pour a generous amount into a mug, heat up your milk, and BOOM—you have an incredible homemade mocha or a hot chocolate that tastes deep and luxurious. Seriously, if you use this to kickstart a batch of my big-batch hot cocoa mix, you’ll never go back to the powdered stuff again. And of course, ice cream is mandatory. Just drizzle, devour, and try to keep some for tomorrow!
Making the Best Chocolate Milk Recipe Ingredient
If you are making chocolate milk, you need to be aggressive with how much syrup you use, especially with cold milk because it tends to get diluted visually. For a standard 8-ounce glass of cold milk, start with about two generous tablespoons of this homemade topping. Taste it! If it’s still not hitting that rich spot for you, add another half a tablespoon. Since this syrup is smoother and richer than the store brands, you actually need slightly less to get a perfect flavor saturation in your cold milk. It’s the ultimate treat for an afternoon snack!
Storage and Shelf Life for Homemade Chocolate Syrup
This is the best part about making your own chocolate syrup: the leftovers! Unlike the stuff you buy that sits on the shelf forever because it’s packed with preservatives, this homemade version needs a little love in the fridge. But honestly, who cares about three weeks of shelf life when it tastes this amazing? You’ll probably use it up much faster than that!
The rule here is simple: once it’s totally cooled down—and I mean room temperature, not even slightly warm—you absolutely must transfer it into an airtight container. A nice glass jar with a tight-fitting lid is perfect because you can see how much you have left. If you just leave it open on the counter, the texture is going to go wonky, and we want to keep it looking perfect.
Now, here’s a super important note on viscosity. Remember how I told you it thickens as it cools? That trend continues in the fridge! When you pull that jar out after a few hours in the cold, it will be dramatically thick—maybe too thick to really drizzle easily. DON’T panic and think you messed up the recipe! That’s just the sugar loving the cold.
If it gets too thick for pouring over your coffee or ice cream, just stir in a tiny splash of warm water or milk—seriously, a half-teaspoon at a time—while gently stirring until you get that perfect, pourable consistency back. It thins out instantly! Stored properly in the refrigerator, this chocolate sauce should stay fantastic for at least two to three weeks. If you see any mold or off smells, toss it, but if you made it right, pure sugar and cocoa hold up beautifully!
Variations: Vegan Chocolate Syrup and Sugar-Free Options
One of the things I love most about this basic recipe is how adaptable it is! Because we’re focusing on pantry staples, tweaking it for different dietary needs is simple. You shouldn’t have to miss out on rich chocolate topping just because of a preference or an allergy, right?
Let’s talk about making a Vegan Chocolate Syrup first. Great news for you, this specific recipe is already naturally vegan! Why? Because we use granulated sugar instead of honey. As long as you make sure the sugar you buy hasn’t been processed with bone char (which is easy to check these days), you are totally set. There are no eggs, no dairy, nothing hidden in here. It fits right into a vegan diet without changing a single measurement—isn’t that convenient?
Now, switching gears to sweeteners. If you’re trying to cut back on straight sugar, crafting a Sugar Free Chocolate Syrup is totally doable, but you have to choose your sweetener carefully because it affects the texture. Sugar isn’t just for sweetness; it’s a huge structural component in syrup! If you swap that cup of sugar for something like erythritol or monk fruit blends, you need to cook it longer, or you might need to add a tiny bit of cornstarch or xanthan gum to help it thicken up when it cools.
Since sugar alcohols behave differently than real sugar when heated, you really need to watch that saucepan closely if you go that route. I haven’t perfected the sugar-free ratio quite yet—I’m still testing—but if you want a great jumping-off point for baking without added sugar, you absolutely have to check out my sugar-free banana bread recipe for advice on handling those substitutes. But for this syrup, if you prefer zero sugar, just be prepared to experiment with a natural thickener!
Frequently Asked Questions About Making chocolate syrup
I get so many questions about this recipe once people start making their own Homemade Chocolate Syrup! It’s so much simpler than people think, but a few common concerns always pop up regarding texture and shelf life. Let’s clear up those last few hurdles so you can get back to drizzling this amazing stuff!
Q: Why is my chocolate syrup too thin right after cooking?
Oh, don’t worry for a second if it seems watery when you turn off the heat! That is completely normal. The key to this success is remembering that cooling is what finalizes the texture. The sugar needs the chilling time to lock into that thick, perfect consistency we expect from a world-class Ice Cream Topping Sauce. Just pour it in your jar and let it chill completely in the fridge—you’ll be amazed when you check on it an hour later. If it’s STILL too thin after chilling overnight, then you can bring it back to the stove just for an extra minute of gentle simmering.
Q: Can I use different types of sugar in my chocolate syrup?
That’s a great question! For this specific recipe, I insist on using granulated white sugar. It dissolves clearly, gives you that crisp, true chocolate flavor, and guarantees you hit that beautiful, Silky Chocolate Syrup texture because it melts so predictably. Brown sugar contains molasses, which will add a caramel note—and while that might be lovely, it changes the color and the final flavor profile significantly. If you want to experiment with that richer taste, fine, but stick to the white stuff for your first few batches so you nail the technique!
Q: How long can I really keep this chocolate syrup in the fridge?
Since this is a pure sugar and cocoa sauce without commercial stabilizers, we rely on refrigeration. If you keep it in a clean, airtight jar, I promise it stays fantastic for at least three weeks. Sometimes I find it lasts even longer, but I haven’t pushed past four weeks because we always use it up making chocolate milkshakes or topping my famous no-bake peanut butter pie before then!
Q: Is this recipe suitable for a Pancake Syrup Recipe without corn syrup?
Absolutely! In fact, this is exactly how you make an amazing Pancake Syrup Recipe without needing corn syrup. Store-bought syrups rely heavily on corn syrup for texture and body, but our method uses the correct ratio of granulated sugar cooked down just long enough to create that perfect viscosity upon cooling. It clings beautifully to pancakes and waffles without being sticky or overly gloppy. You get all the flavor, none of the unwanted additives!
Recipe Details and Yield for This Quick Chocolate Drizzle
I know when you’re looking at a recipe online, sometimes you just need the quick stats, right? You don’t want to hunt through paragraphs to know if you have enough time to whip this up before the kids get home wanting dessert. So, here is the executive summary for this amazing chocolate syrup. It’s incredibly fast, which is what I love most about it!
Grab your favorite jar, because this recipe makes a perfect amount for snacking throughout the week. It’s easy to double if you’re planning on making lots of chocolate milk or if you have a huge party coming up. But for a standard batch, here’s what you’re looking at:
- Prep Time: A speedy 5 minutes, honestly, that’s just gathering your ingredients.
- Cook Time: Barely 5 minutes on the stovetop—it goes fast once you start heating it!
- Total Time: We’re talking 10 minutes flat from start to finish before it chills.
- Yield: You get about 1.5 cups of gorgeous, rich topping out of one batch.
This is exactly why I call it my go-to Quick Chocolate Drizzle. It’s faster than driving to the store and buying the mediocre stuff!
Estimated Nutritional Information for Chocolate Syrup
I want to be super clear about this next bit because I’m just a home cook sharing tested recipes, not a certified nutritionist! The numbers below are my best estimate based on running the standard recipe ingredients through a few common online calculators. They rely on averages for things like the precise sugar content in cocoa powder, so take these with a grain of salt—or maybe a grain of sugar, in this case!
If you’re making this chocolate syrup for a crowd or tracking intense macros, obviously you should plug in your exact brand measurements, but for general awareness, here’s what you can expect from a standard serving size based on my recipe ratios. It’s surprisingly low in fat, even though it tastes so rich!
- Serving Size: 2 tablespoons, which should cover a big drizzle over a scoop of ice cream or flavor a good glass of milk.
- Calories: About 95 calories per serving.
- Sugar: Around 22 grams. This is why this sauce tastes so satisfying!
- Fat (Total): Less than 1 gram, which is amazing for a dessert sauce.
- Sodium: Just 2mg, thanks to that tiny pinch of salt we added.
- Protein: Less than 1 gram.
- Carbohydrates: Roughly 25 grams.
- Cholesterol: Zero—phew!
Remember, that sugar content is exactly what gives this Homemade Chocolate Syrup its body and helps it thicken up beautifully when it gets cold, so you can’t really skip it if you want that amazing texture we talked about earlier. This is a treat, and knowing these numbers helps keep me honest when I go back for a second drizzle!
Print
The Ultimate Quick & Easy Homemade Chocolate Syrup
- Total Time: 10 min
- Yield: About 1.5 cups
- Diet: Vegetarian
Description
Make rich, silky chocolate syrup from scratch in under 15 minutes using simple pantry ingredients. This recipe is superior to store-bought versions and works well for milk, coffee, and desserts.
Ingredients
- 1 cup granulated sugar
- 3/4 cup unsweetened cocoa powder
- 1 cup water
- 1 teaspoon vanilla extract
- Pinch of salt
Instructions
- Combine the sugar, cocoa powder, and water in a small saucepan.
- Place the saucepan over medium heat. Whisk constantly until the sugar dissolves completely and the mixture begins to simmer.
- Reduce the heat to low and let it simmer gently for 1 to 2 minutes, stirring occasionally. Do not boil rapidly.
- Remove the saucepan from the heat. Stir in the vanilla extract and salt.
- Allow the syrup to cool completely. It will thicken as it cools.
- Pour the cooled syrup into an airtight container for storage.
Notes
- For a thicker syrup, simmer for an extra minute or two, but remember it thickens significantly upon cooling.
- Store the syrup in the refrigerator for up to three weeks.
- Use this syrup to flavor hot chocolate, mix into cold milk, or drizzle over ice cream and pancakes.
- Prep Time: 5 min
- Cook Time: 5 min
- Category: Dessert Topping
- Method: Stovetop Cooking
- Cuisine: American
Nutrition
- Serving Size: 2 tablespoons
- Calories: 95
- Sugar: 22
- Sodium: 2
- Fat: 0.5
- Saturated Fat: 0.3
- Unsaturated Fat: 0.2
- Trans Fat: 0
- Carbohydrates: 25
- Fiber: 1
- Protein: 0.5
- Cholesterol: 0


Comments are closed.