

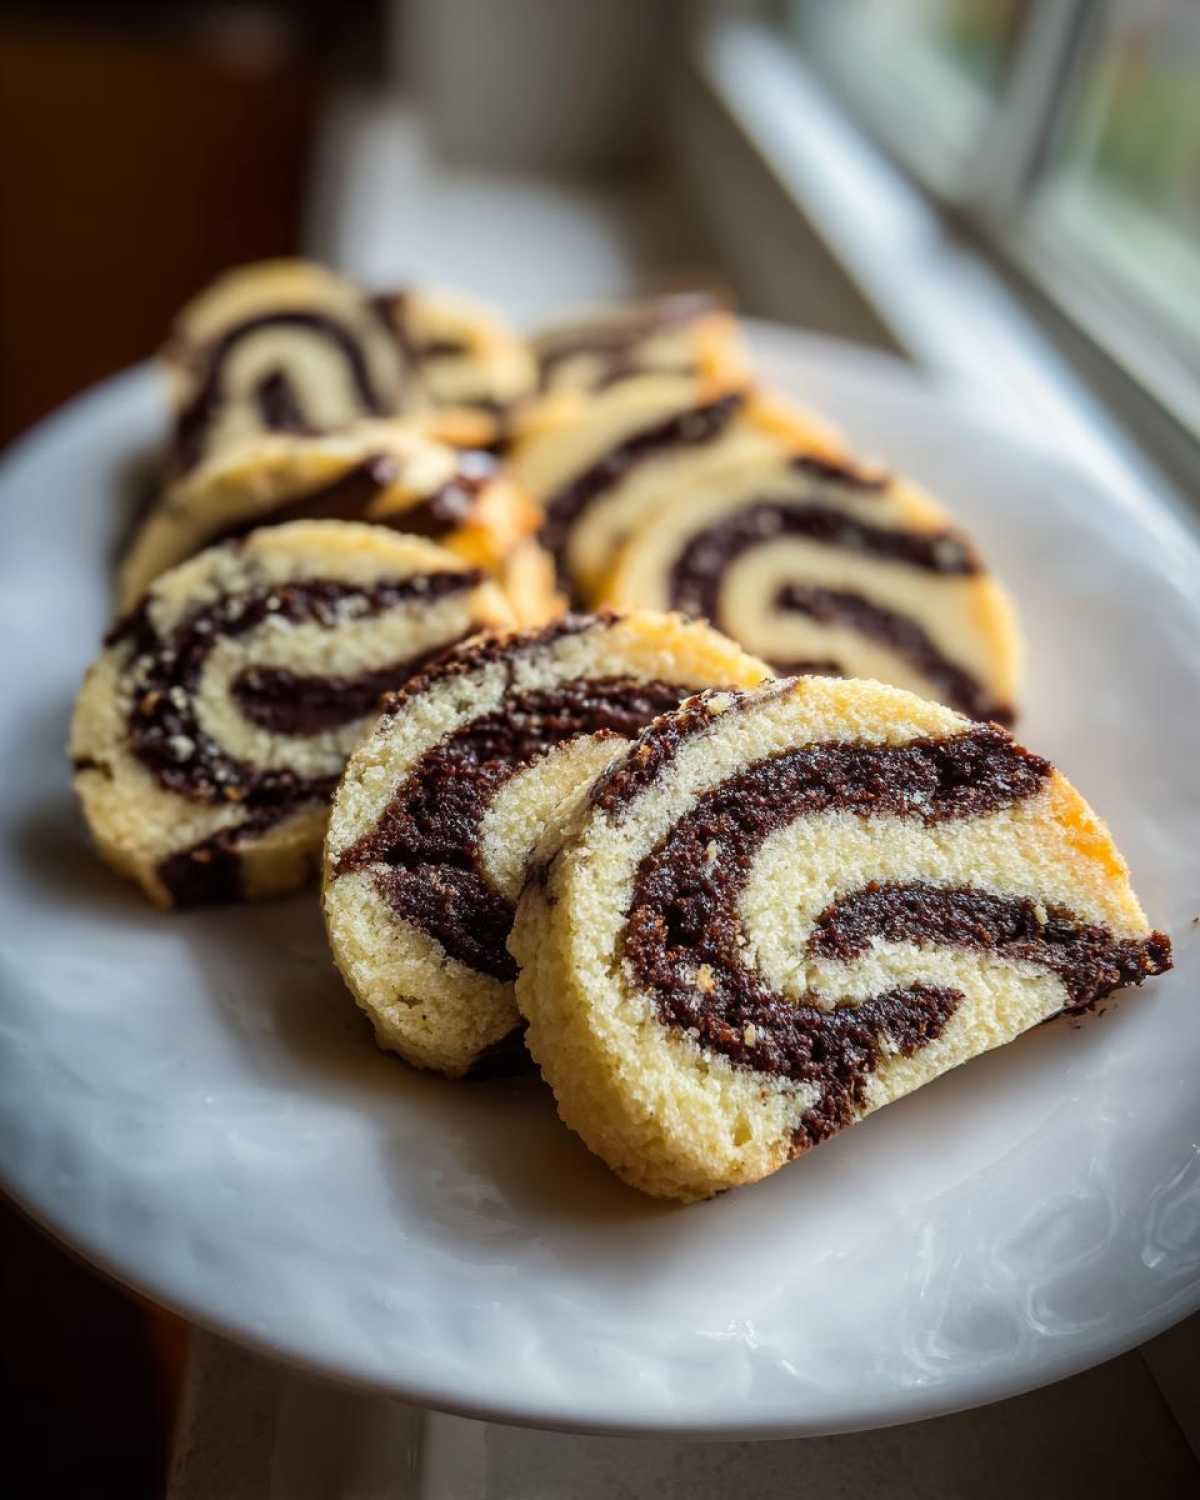
Oh, let me tell you about the cookies that absolutely charm everyone the second they hit the table! I’m talking about those perfect, nostalgic pinwheel cookies with the tight little swirls. When I pull these out during the holidays, people always think they took hours of fussy folding, but trust me, they are shockingly easy. This is my absolute go-to slice and bake cookies recipe because it skips the tricky chilling steps some recipes demand. The magic really comes from layering two simple, buttery doughs—one vanilla and one chocolate—and rolling them up tight. I love the contrast; it’s subtle, sweet, and looks like you spent all day fussing in the kitchen. It’s pure baking magic, and I promise this reliable dough will be your new favorite for cookie exchanges!

Why You Will Love These Classic Pinwheel Cookies
- They are genuine slice and bake cookies! You do the work once, wrap the dough, and bake whenever you want. Instant gratification later!
- It’s the easiest way to get that amazing, colorful swirl. I still get giddy seeing those perfect spirals when I slice the log.
- This is a fantastic, sturdy Best Sugar Cookie Base that doesn’t spread much while baking. They keep their perfect shape.
- The flavor payoff is huge for very little effort—classic, buttery, sweet vanilla mingling with rich cocoa.
- They freeze like a dream, making them perfect for last-minute Holiday Cookie Exchange Treats.
- The look! They are such showstoppers for cookie tins or party platters. Want to see how I make my Red Velvet Cake Mix Cookies look festive? These swirly ones are even easier!
Honestly, if you need a cookie that looks way more complicated than it is, this is your winner. They bake up beautifully golden around the edges, holding that tight spiral pattern we worked so hard to create.
Ingredients for Perfect Chocolate Vanilla Pinwheels
Since this is one dough split in half, everything needs to be the right temperature to make sure the flavor mixes perfectly and the swirl stays tight! You’ll notice some ingredients listed below are just as important as what’s *in* the list. For this dough, use 1 cup of unsalted butter that’s softened, but not melted—room temperature is key. Get 2 large eggs ready, also at room temperature; this helps them blend beautifully with the fats.
- 1 cup unsalted butter, softened to perfect room temperature
- 1 cup granulated sugar
- 2 large eggs, room temperature
- 1 teaspoon vanilla extract
- 3 cups all-purpose flour
- 1 teaspoon baking powder
- 1/2 teaspoon salt
- 2 tablespoons unsweetened cocoa powder (the good, reliable kind!)
- 1 tablespoon milk
Make sure your cocoa powder is unsweetened; we control the sugar in the dough, so the cocoa needs to be pure and rich to give us that deep chocolate color!
Equipment Needed for Slice and Bake Cookies
You don’t need a lot of fancy gadgets for these, thankfully! Since these are my go-to buttery spiral cookies, I like to streamline my setup so the dough mixing goes quickly. Having the right tools makes that initial layering process—getting those rectangles smooth and even—so much less stressful. If you’re looking for tips on using your mixer for other treats, check out my guide for the Ultimate Chocolate Chip Cookies Recipe; a lot of the setup is the same!
Here is the simple setup I use every time I make a batch of these classic beauties:
- Electric or Stand Mixer: This makes creaming the butter and sugar so much faster than a wooden spoon, especially when you’re building the base dough.
- Plastic Wrap: This is non-negotiable. You need good, sturdy plastic wrap to roll the log tightly and keep those layers from squishing out of shape.
- Rolling Pin: Essential for getting both the vanilla and chocolate layers flat and even before you stack them up.
- Two Mixing Bowls: One for the main vanilla dough and one small one for mixing the cocoa into the chocolate half.
- Baking Sheets: You’ll need at least two lined with parchment paper. They bake quickly, so having space ready keeps you moving!
- Sharp Knife: For slicing the chilled log into uniform rounds. Even thickness means even baking!
That’s really it! Prep the equipment while your main dough is chilling, and you’ll be ready to bake as soon as it firms up.
Step-by-Step Instructions for Making Pinwheel Cookies
This is where the fun begins, but you need to treat the dough nicely here! If you rush the mixing or the chilling, those gorgeous spirals we are aiming for will turn into a muddled, slightly tough cookie. Don’t worry; just follow these steps exactly, and you’ll have the most reliable results. Pay special attention to rolling those layers flat—that determines how tight your final swirl in the pinwheel cookies will be.
Mixing the Easy Cookie Dough Recipe
First up, we need to cream that softened butter and sugar. Get your mixer going and beat them until they look pale yellow and really fluffy—this technique is what traps air, making these buttery spiral cookies wonderful rather than rock hard. Once they are fluffy, add your eggs one at a time, making sure each one is fully incorporated before adding the next. Then, we gently mix in the vanilla.
In a separate dish, whisk your dry stuff—flour, baking powder, salt. Then, slowly on low speed, add the dry mix into the wet ingredients. Stop mixing the second you see the last bit of flour disappear. Seriously! Overmixing develops gluten, and we want tender pinwheel cookies, not tough hockey pucks!
Creating the Chocolate Vanilla Pinwheels Swirl
Now, take that perfect dough and split it exactly in half. One half stays vanilla; no changes needed there. In the other half, mix in that cocoa powder and the tablespoon of milk until the color is rich and uniform. Don’t overwork it while mixing the cocoa in, either!
This next part is key to getting that professional look! Lay out two long sheets of plastic wrap. Roll the vanilla dough into a thin rectangle—about a quarter-inch thick. Do the same with the chocolate dough. Carefully lay the chocolate rectangle directly on top of the vanilla one, pressing down lightly so they stick together. Starting at one long edge, roll the whole thing up super tight, like you’re making a jelly roll. Keep that plastic wrap snug around the log so it stays compact.

Chilling and Slicing the Cookie Log
If you try to slice warm dough, you end up with a flattened mess, so don’t cheat this step! Wrap that tight log securely and send it to the fridge for a minimum of two hours. I often leave mine overnight because firmer dough slices cleaner. If the dough is too soft, those beautiful layers just blend together when you cut them.
Once it’s firm to the touch—almost hard—unwrap it carefully. Use a sharp knife to slice the log into rounds that are about 1/4 inch thick. If you place these slices on a parchment-lined sheet, you’ll see your stunning spiral! For clean slices, try dipping your knife in hot water between cuts before you start slicing, just wiping it dry between dips.
Baking Your Buttery Spiral Cookies
Get your oven preheated to 375 degrees Fahrenheit (that’s 190 Celsius). Arrange those gorgeous sliced rounds on your baking sheets about two inches apart because they will spread just a tiny bit as these buttery spiral cookies bake. We’re looking for a quick bake time here!
Bake them for about 8 to 10 minutes. You are watching for the edges to just barely set and turn a beautiful light gold. If you leave them in too long, they lose that lovely soft center that makes them special. Pull them out when they set but before they brown too much. They’ll firm up even more as they cool on the sheet for 5 minutes before moving them to the rack. For more help with getting the perfect sugar cookie texture, check out my Fruit Pizza Sugar Cookie guide; the dough prep is surprisingly similar!

Tips for Success with Classic Pinwheel Cookies
Getting those perfect, tight spirals in your pinwheel cookies really boils down to temperature and consistency. My number one piece of advice, which I learned the hard way after making some very sad, flat cookies, is this: the dough *must* be firm when you slice it! If it’s even slightly soft, the vanilla and chocolate layers will basically merge into a brown blob instead of distinct spirals.
When you are rolling out those rectangles, aim for absolutely uniform thickness across both sheets. If one side is thin and the other thick, your log won’t roll up evenly, and your slices will look like warped pretzels. Use a ruler if you need to be precise—this is where the uniformity of the Best Sugar Cookie Base comes into play. You can find more about building a great base in my guide on Best Sugar Cookie Base.
Also, don’t be shy with the plastic wrap when you’re making the log. Squeeze out all the air and wrap it like you mean it. This compression keeps everything tight while it chills, which is the secret weapon for buttery spiral cookies that look professional. Remember, chilling is your friend; it is not optional!
Festive Variations for Your Pinwheel Cookies
These pinwheel cookies are such a fantastic canvas for switching things up depending on the season! Since the base cookie dough recipe is so wonderfully reliable, you can easily tailor the appearance and flavor to match any party or holiday theme. You really only need to focus your changes on the vanilla dough half before you laminate it with the chocolate layer.
For a beautiful Christmas vibe, instead of using plain vanilla extract in the light dough, swap it out for peppermint extract—you get that classic candy cane flavor pairing with the rich chocolate swirl! If you want the colors to really pop, divide the vanilla dough into two smaller bowls and mix in green food coloring into one and red coloring into the other. Then you can layer red, green, and brown for a super festive look! If you’re looking for other easy homemade gifts, my guide on the Hot Cocoa Mix Big Batch Recipe is perfect for gifting too!
When Valentine’s Day rolls around, ditch the green and go straight for pink! Add just a few drops of pink or red gel food coloring to the vanilla side. You get stunning Valentine Day Cookies Pink spirals that look so delicate, but they still have that satisfying chocolate punch in every bite.
For a truly unique fall spin, skip the chocolate altogether! Make two batches of vanilla dough, but flavor one with a tablespoon of ground cinnamon and a pinch of nutmeg. That way, you get a light-and-spiced swirl. Honestly, the possibilities for these colorful cookie designs are endless once you get comfortable with the rolling technique.
Make Ahead Holiday Baking: Storing Pinwheel Cookies
This is one of my absolute favorite features of these pinwheel cookies! Because they’re designed to be a slice and bake cookie, they are perfect for whenever life gets too busy, which is basically always around the holidays. I always try to get the dough logs ready a week or two ahead of time so I can just bake fresh batches whenever the craving hits or when unexpected company pops over.
The dough log handles chilling and freezing like a champ, provided you wrap it tightly. Seriously, wrap it like you’re sending it into space! Make sure the plastic wrap is super snug all the way around the log to prevent any freezer burn or weird dough smells from settling in. I like to wrap mine twice in plastic and then slide the whole thing into a freezer-safe zip-top bag just for added protection.
Freezing the Cookie Dough Log
If you’re getting ready for Make Ahead Holiday Baking, you can successfully freeze the dough log for up to three months. If you’re freezing it, I recommend labeling the outside of the bag with the date and that it’s the vanilla and chocolate swirl dough. When you’re ready to bake, pull it straight from the freezer and let it sit on the counter for about 20 to 30 minutes to soften just enough for slicing. You don’t want it totally soft, just workable.
If you only chilled the dough (say, overnight), you can easily bake it the next day without any temperature issues. Just remember, the colder the dough, the cleaner your slices! You can see more of my favorite ways to prep things early in my guide to Make Ahead Holiday Baking, which focuses on freezer strategies.
Storing the Finished Pinwheel Cookies
Once these buttery spiral cookies are completely cooled down—and I mean stone cold—you can store them in an airtight container at room temperature. They keep beautifully! If you stack them, use parchment paper or wax paper between the layers just in case any loose crumbs or residual moisture cause them to stick together. They stay wonderfully fresh for about a week this way.
If you need them to last longer, or if your kitchen gets super warm, storing the finished cookies in an airtight container in the refrigerator will definitely extend their life. Honestly though, these chocolate vanilla pinwheels are so good, I rarely have any leftovers past the first five days!
Frequently Asked Questions About Pinwheel Cookies
Why won’t my swirl stay tight when I bake these?
Oh, this is the most common issue! Usually, it means the dough wasn’t cold enough when you sliced it, or you didn’t roll that log tightly enough in the first place. If the dough is even a little soft, the pressure of the oven causes the layers to spread and merge before they set. You absolutely need that firm, chilled dough for those perfect little circles. I usually chill mine overnight if I can! If you want the tightest swirl possible, chill the assembled log for 30 minutes *after* rolling before you even think about slicing it.
Is skipping the chilling step totally acceptable for this easy cookie dough recipe?
No, I really wouldn’t risk it! While this is an easy cookie dough recipe in terms of mixing, the chilling process is non-negotiable. If you skip chilling the log, you end up with a sticky mess that’s impossible to slice, and the cookies will spread out into flat discs instead of keeping their gorgeous height for our buttery spiral cookies. Think of the chilling time as key to the “slice and bake” success. For more on dough prep, check out my tips for a general Easy Cookie Dough Recipe.
What makes this recipe the best sugar cookie base for pinwheels?
What makes this the best sugar cookie base is the ratio of butter to flour, which is carefully balanced to prevent over-spreading while still baking up tender and slightly crisp. A good sweet sugar cookie base needs enough fat for flavor but enough flour structure to hold that spiral shape. Since we are using a quick mix of cocoa powder in half the dough, this base recipe handles the slight changes in moisture and density between the vanilla and chocolate sides perfectly. It’s sturdy but melts in your mouth!
Can I make these cookies for a large Christmas cookie exchange?
Absolutely! These are fantastic Christmas swirl cookies. They look high-effort, which is great for cookie exchanges, but since they are slice-and-bake, you can make the dough weeks ahead, freeze it, and then slice and bake only what you need. They transport beautifully in airtight containers too, making them one of my favorite large-batch holiday treats.
How do I ensure I get uniform slices for consistent baking?
Uniform thickness is crucial so all your pinwheel cookies finish baking at the same time. The best way? Always use a ruler to check the thickness of the log before chilling, aiming for about an inch in diameter. When slicing, use a very sharp knife and wipe it clean between cuts. Dip your knife in hot water, dry it quickly, and then slice. The hot blade glides right through the cold dough without squishing it, giving you the cleanest edge for those perfect spirals!
Estimated Nutritional Data for Pinwheel Cookies
Okay, so these homemade pinwheel cookies are truly a treat, not a health food, right? I always say you should enjoy the sweet things in life, especially when they look and taste this good! I pulled together the estimated nutritional breakdown based on standard amounts of butter and sugar we used. Remember, this is just an estimate, and your actual counts could shift a little depending on the brand of butter or the exact size of your eggs.
We ended up with about 3 dozen cookies from this batch, so these numbers reflect a single cookie serving. They’re rich, wonderfully buttery, and definitely worth every little bit of sugar!
- Serving Size: 1 cookie
- Calories: 130
- Fat: 7g (Mostly saturated fat, because we used real butter!)
- Carbohydrates: 15g
- Sugar: 9g
- Protein: 2g
- Cholesterol: 25mg
- Sodium: 55mg
They aren’t too high in sodium, which is nice, but yes, they contain real butter and sugar—that’s what makes these chocolate vanilla pinwheels taste so incredible! Don’t even worry about the numbers too much; just bake a batch and share them!
Print
Classic Vanilla and Chocolate Swirl Pinwheel Cookies
- Total Time: 160 min
- Yield: 3 dozen
- Diet: Vegetarian
Description
Make easy slice-and-bake pinwheel cookies featuring contrasting vanilla and chocolate dough swirled together for a classic look.
Ingredients
- 1 cup unsalted butter, softened
- 1 cup granulated sugar
- 2 large eggs
- 1 teaspoon vanilla extract
- 3 cups all-purpose flour
- 1 teaspoon baking powder
- 1/2 teaspoon salt
- 2 tablespoons unsweetened cocoa powder
- 1 tablespoon milk
Instructions
- Beat the softened butter and sugar together until light and fluffy. Add the eggs one at a time, beating well after each addition. Stir in the vanilla extract.
- In a separate bowl, whisk together the flour, baking powder, and salt. Gradually add the dry ingredients to the wet ingredients, mixing until just combined to form a soft dough.
- Divide the dough in half. Leave one half plain (vanilla dough). To the second half, mix in the cocoa powder and milk until the chocolate color is uniform.
- Place each dough half between two sheets of plastic wrap. Roll each half into a rectangle approximately 1/4 inch thick.
- Place the vanilla rectangle directly on top of the chocolate rectangle. Gently press the two layers together.
- Starting from one long edge, roll the layered dough tightly into a log. Wrap the log tightly in plastic wrap and chill in the refrigerator for at least 2 hours, or until firm.
- Preheat your oven to 375 degrees Fahrenheit (190 degrees Celsius). Line baking sheets with parchment paper.
- Remove the dough log from the refrigerator and slice it into rounds about 1/4 inch thick. Place the slices about 2 inches apart on the prepared baking sheets.
- Bake for 8 to 10 minutes, or until the edges are lightly set. Do not overbake.
- Let the cookies cool on the baking sheet for 5 minutes before transferring them to a wire rack to cool completely.
Notes
- For a firmer dough that is easier to slice, chill the dough log for up to 24 hours.
- To make these cookies festive for holidays, add red or green food coloring to the vanilla dough before dividing, or substitute peppermint extract for vanilla in one half.
- If you want a very defined swirl, chill the assembled log for 30 minutes after rolling before slicing.
- Prep Time: 30 min
- Cook Time: 10 min
- Category: Dessert
- Method: Baking
- Cuisine: American
Nutrition
- Serving Size: 1 cookie
- Calories: 130
- Sugar: 9
- Sodium: 55
- Fat: 7
- Saturated Fat: 4
- Unsaturated Fat: 3
- Trans Fat: 0
- Carbohydrates: 15
- Fiber: 0
- Protein: 2
- Cholesterol: 25

Comments are closed.