

Okay, listen up, because I’m going to let you in on the *biggest* secret in Japanese cuisine: it’s not the fish, it’s the rice. Seriously! If your rice is mushy, bland, or falling apart before you even get to your fillings, your beautiful maki roll is doomed before it starts. I spent way too many years making dry, sad rice that tasted like plain white rice, not the slightly sweet, perfectly sticky foundation you get at your favorite sushi bar.
I’m telling you, learning to make restaurant-quality sushi rice at home is a total game-changer. This isn’t just another recipe; this is my ultimate, foolproof guide. We’re tackling the three essential parts: getting that crucial texture right, nailing the tangy seasoning mix, and I’m even showing you how to do it on the stovetop, in your rice cooker, or even that trusty Instant Pot you got last Christmas. Trust me, after years of practice, I can make this staple recipe perfectly every single time, and now you can too!
Why Perfect Sushi Rice is the Foundation of Great Rolls (Experience & Authority)
Look, you can buy the freshest bluefin tuna in the world, but if the foundation—the rice—is wrong, nobody cares. That specific texture, that slight tackiness that lets the rice cling to itself without turning into an actual paste? That’s the magic. You need grains that are tender yet distinct. And that tangy vinegar seasoning? It keeps the rice from getting heavy and actually wakes up the flavor of the toppings. Honestly, this is where most people mess up their sushi preparation basics.
If you use the wrong rice, forget about it. You might as well order takeout. Getting the feel for the proper rinse is just as important as cooking it right, too. Trust me on this part; I’ve learned the hard way about skipping those rinsing steps!
Selecting the Best Rice for Sushi Rice
You absolutely have to use short-grain Japanese rice, like Koshihikari. These little plump grains have the perfect amount of starch, which is what creates that desirable stickiness when cooked correctly. If you try using long-grain rice, like Basmati or Jasmine, you’re going to end up with something dry and fully separate—perfect for a curry, terrible for a maki roll! That starch needs to be present so the grains lightly glue together. That’s the key to making it all hold shape!
Ingredients for Authentic Sushi Rice Seasoning
Okay, now that we know what rice to use, let’s talk about the magic dust that makes it taste like it came from a Tokyo restaurant! You don’t need a million crazy things here; it’s all about the balance of three simple items. Remember, precision matters here. If you mess up the ratios, the rice won’t shine.
For two cups of dry short-grain rice, you’re going to need exactly the right amounts of vinegar, sugar, and salt. Don’t skimp on the quality of the rice vinegar, either; it makes a difference in the final tang!
The Crucial Rice Vinegar Mix for Sushi Rice
This seasoning mix is honestly the heart of the whole operation. It’s what transforms boring, cooked rice into proper sushi rice. I use a blend of half a cup of rice vinegar, three tablespoons of white sugar, and just one teaspoon of salt. That ratio seems simple, right? But the balancing act between the sweet and the sour is key!
My big tip here is to heat this mixture gently in a little saucepan—just low heat! You aren’t trying to make syrup; you just need to stir it until that sugar and salt completely vanish into the vinegar. If you don’t dissolve them fully, you get crunchy pockets of salt later, and nobody wants that surprise in their otherwise perfectly seasoned rice!
How to Prepare Sushi Rice Using Three Methods
Alright, folks, we’ve sourced the grain and mixed the seasoning. Now comes the part where we turn hard, dry little kernels into that glorious, fluffy base. This whole process hinges on getting the rinsing right first! I’m talking about rinsing until the water runs almost totally clear—I usually do mine six or seven times! Then, you have to drain it well, like for a solid 30 minutes in a fine sieve. That step controls how much water the rice absorbs, which is huge for texture.
Once the rice is rinsed and happy, you have options! I’m going to give you instructions for the stovetop because, honestly, I think that method gives you the best, most authentic texture, but if you’re feeling lazy (and who isn’t sometimes?), the electric methods work great too. Just remember, once it’s cooked, it needs that seasoning poured over immediately!
Mastering Stovetop Sushi Rice Technique
For the stovetop sushi rice, get your short-grain rice and two cups of cold water into a heavy pot with a lid that seals tight. Bring that baby up to a rolling boil over medium-high heat. As soon as you see it bubbling fiercely, kill the heat down to the absolute lowest setting and cover it up. This is the most important rule: DO NOT LIFT THE LID for 15 minutes! I repeat, don’t peek! Then, slide the whole pot off the heat and let it just stand there, still covered, for another 10 minutes. I swear by this low-and-slow dance when I’m making my favorite quick stovetop cheesy rice recipe base, and it totally transfers to this sushi rice!
Why do I love the stovetop so much? Because managing that low, slow heat lets the steam work its magic perfectly, giving you those individual, slightly chewy grains that are still beautifully tender. It’s a little more hands-on, but the payoff is worth the patience!

Easy Sushi Rice Instant Pot Instructions
If you’re using your electric pressure cooker, it’s super quick, which is why I rely on it for weeknight bowls. Throw your rinsed, drained rice and the two cups of water right into the liner—no soaking needed here. Seal it up and set it for High Pressure for exactly 5 minutes. As soon as that’s done, let the pressure come down naturally for 10 minutes (that’s the Natural Pressure Release, or NPR). After 10 minutes, you can quick-release any remaining steam.
You still need to let it sit, covered, off the heat for that final 10-minute rest just like the stovetop method. This ensures it finishes steaming evenly before you season it!
Using a Rice Cooker for Perfect Sushi Rice
If you’ve got a dedicated rice cooker, life is simple! You basically just follow the rinsing rules, add the water, and press the start button. Most modern cookers have a specific ‘Sushi Rice’ setting, which is calibrated for the lower water ratio these grains need. If yours doesn’t have that specific button, just use the standard ‘White Rice’ setting, and you should still get fantastic results for your sushi staple recipe.
The Critical Mixing Stage for Restaurant Quality Sushi Rice
Okay, the rice is cooked, and you’ve spooned that glorious, sweet-tangy vinegar mixture right over the top. Don’t panic! This next part is where you can ruin all that hard work if you’re not careful. You absolutely must transfer the hot rice into a large, *non-metallic* bowl. I use a big wooden sushi oke if I have one, but glass or plastic works fine, too. Metal bowls can react badly with the vinegar—you don’t want weird off-flavors in your authentic Japanese rice!
Now, forget everything you know about stirring mashed potatoes or folding cake batter. For restaurant quality sushi rice, you need to adopt a slicing or cutting motion with a wooden paddle or flat spoon. Think about gently slicing the seasoning into the rice grains rather than stirring them around. Stirring just mashes them, and we need that beautiful, slightly sticky-but-separate texture. I use quick, firm slices down the middle, turning the bowl slightly with each pass. It takes patience, but this is key to that signature consistency you’re craving. This precise handling is what separates a good crispy rice salad recipe base from a mushy mess!

Cooling and Fanning Your Seasoned Sushi Rice
As you are gently cutting in that seasoning, you absolutely have to be fanning—yes, literally fanning! You need to cool that rice down as quickly as possible, ideally aiming for body temperature. This rapid cooling does two things: it helps the starch set up just right, and it gives the rice that amazing glossy sheen!
If you let it sit in a hot pile, the steam trapped underneath will turn the bottom layer into glue. Grab a piece of cardboard, a hand fan, or even just an open cookbook and wave it over the rice while you slice. It feels silly, I know, but this finishing touch solidifies your status as a master making sushi rice!

Tips for Success When Making Sushi Rice at Home
I’ve made every mistake in the book when it comes to sushi rice, so here are my top three non-negotiable tips to save you the cleanup and the disappointment. First, as I banged on about before, ditch any idea of refrigerating the cooked rice! Seriously, putting seasoned rice in the fridge turns it rock hard almost instantly. Nobody wants cold, stiff rice for their sushi preparation basics. You’ve worked too hard for that, so keep it covered with a slightly damp cloth at room temperature until you use it.
Second, don’t be afraid to taste your seasoning mix before you pour it on! Yes, it should taste a little aggressively flavored when it’s warm—a bit sharp and salty. Remember, it’s being diluted by all that plain rice. If it tastes perfect on its own, it’ll taste flat once it hits the grains. Adjust the sugar or salt slightly if your vinegar is extra harsh, but keep that balance tight.
Finally, when you mix, be patient with the cooling! The fanning is not optional! I’m talking about needing that rice to get down to roughly body temperature before you even think about rolling anything. This helps the rice handle beautifully and gives you that professional, glossy finish. Nail these three things, and you’re halfway to sushi chef status!
Storage and Reheating Instructions for Leftover Sushi Rice
Listen, the absolute best way to eat this amazing sushi rice is fresh, right after you’ve fanned it to body temperature. But let’s be real; sometimes you make too much! If you have leftovers, you have to be very careful how you treat them, or they turn into little inedible rocks. The number one rule? Never, ever put seasoned rice in the refrigerator. That cold air shocks the starch, and you’ll end up with cement.
Just cover the bowl tightly with a slightly damp kitchen towel and leave it on the counter for up to 12 hours. If it starts getting a little stiff the next day, don’t toss it! Just take what you need, put it in a microwave-safe bowl, add maybe a teaspoon of plain water over the top, cover it loosely with a damp paper towel, and hit the microwave for 15 seconds.
That little bit of steam revives the texture beautifully, making it pliable enough for a quick dinner bowl or maybe some avocado rolls the next day. It’s super easy to bring your homemade sushi rice guide leftovers back to life!
Troubleshooting Common Sushi Rice Issues
If you followed everything perfectly, you should have gorgeous rice, but let’s be real—sometimes cooking throws us a curveball! Don’t panic if your first batch isn’t textbook perfect. The most common disaster is mushy rice, and that usually happens from over-rising or not draining the rice long enough before you cook it. If this happens, you can sometimes save it by spreading it super thinly on a baking sheet and letting it air dry a bit while gently fluffing.
On the flip side, if your sushi rice is too hard or dry, it usually means you didn’t let it rest long enough after cooking, or maybe your lid wasn’t tight enough on the stovetop. The fix is easy: sprinkle a tablespoon of plain water over the top, cover it again, and let it sit for another 15 minutes off the heat. It’ll absorb that moisture!
And if the seasoning just tastes *off*? It usually means your initial mix wasn’t balanced, which is totally normal when you first try to perfect that rice vinegar mix for sushi. If it tastes too sharp, stir in just a tiny half-teaspoon of sugar. If it’s too dull, sprinkle in a pinch more salt until it pops!
Frequently Asked Questions About Making Sushi Rice
I know you must have questions swirling around after going through all those techniques, especially if this is your first time trying to make restaurant quality sushi rice at home. It’s totally fine; we all started somewhere! I’ve gathered the questions I get asked most often about achieving these easy sushi rice instructions so you can feel totally confident.
Can I substitute short-grain rice in this perfect sushi rice recipe?
Oh, I wish you could, but please don’t! I know it seems annoying, but the whole point of this perfect sushi rice recipe is leveraging the super high starch content found only in true short-grain Japanese rice. Long-grain varieties don’t release starch the same way, so instead of sticky, glossy rice, you end up with hard, separate grains that just fall apart when you try to roll them. Stick to the specific short-grain or true sushi rice labels for authenticity!
How long does homemade sushi rice last?
This is the trickiest part, because the absolute best temperature for this rice is body temperature, which means it fades fast! As I mentioned, you want to store it at room temperature, covered with a damp cloth, for about half a day—say, 6 to 8 hours max. If you put it in the fridge, it’s basically ruined for sushi because the texture gets stiff and dry way too fast. If you absolutely *must* store unused rice longer, aim to revive it gently the next day using a 15-second zap in the microwave with a tiny splash of water. It’s always best to cook just what you need for the day you plan on eating your sushi bowls or rolls. Mastering that precise cooking is what makes this process worth it, and for the best results, you want it fresh! Make sure you check out my guide on sushi preparation basics for more foundation tips!

Next Steps for Your Homemade Sushi Creations
So there you have it! You’ve rinsed, cooked, seasoned, and fanned your way to absolutely perfect sushi rice. Now for the fun part—eating it! Seriously, don’t let this gorgeous, glossy rice sit around waiting for tomorrow; it loves to be used immediately while it’s still at that perfect body temperature. It’s ready to hold dynamite fillings for your favorite maki rolls, or make the base of an incredible chirashi bowl.
I’m so excited for you to try this out! I really want to know what you decide to make first! Are you rolling classic California rolls, or are you getting ambitious with some crispy fried shrimp? Maybe you’re just making a simple bowl topped with some perfectly seared tuna? You can check out my recipe for seared ahi tuna recipe quick Asian dinner to pair with your rice!
Once you’ve made your roll or built your bowl, come back here and drop a rating! Tell me which cooking method you chose—stovetop warriors, where you at? Let me know how your texture came out. Happy rolling, everyone!
Print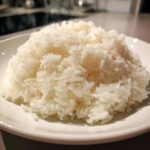
The Foolproof Guide to Perfect Sushi Rice: Stovetop, Instant Pot, and Seasoning Secrets
- Total Time: 65 min
- Yield: About 4 cups cooked rice (4-6 servings)
- Diet: Vegetarian
Description
Learn how to make restaurant-quality sushi rice at home using short-grain rice, achieving the perfect sticky texture and proper seasoning balance.
Ingredients
- 2 cups short-grain Japanese rice (sushi rice)
- 2 cups cold water (for cooking)
- 1/2 cup rice vinegar
- 3 tablespoons white sugar
- 1 teaspoon salt
Instructions
- Rinse the rice: Place the rice in a bowl and cover it with cold water. Swirl the rice gently with your hand. Drain the cloudy water and repeat this rinsing process 5 to 7 times until the water runs mostly clear. Drain the rice completely in a fine-mesh sieve for 30 minutes.
- Cook the rice (Stovetop Method): Combine the rinsed, drained rice and 2 cups of cold water in a heavy-bottomed pot with a tight-fitting lid. Bring the water to a boil over medium-high heat. Once boiling, immediately reduce the heat to the lowest setting, cover the pot, and simmer for 15 minutes without lifting the lid.
- Rest the rice (Stovetop Method): Remove the pot from the heat and let it stand, covered, for another 10 minutes. Do not lift the lid during this resting period.
- Cook the rice (Rice Cooker/Instant Pot Method): Combine the rinsed rice and 2 cups of water in your appliance. Use the ‘White Rice’ or ‘Sushi Rice’ setting. If using an Instant Pot, cook on High Pressure for 5 minutes, followed by a 10-minute natural pressure release, then quick release any remaining pressure. Let stand for 10 minutes.
- Prepare the seasoning mix: While the rice cooks, gently heat the rice vinegar, sugar, and salt in a small saucepan over low heat. Stir until the sugar and salt are completely dissolved. Do not boil the mixture. Let it cool slightly.
- Season the rice: Transfer the hot, cooked rice to a large, non-metallic bowl (wood or glass is best). Pour the seasoning mixture evenly over the rice.
- Mix and cool: Use a cutting motion with a rice paddle or wooden spoon to gently fold the seasoning into the rice. Avoid stirring or mashing the grains. Fan the rice while mixing to help it cool quickly to body temperature. This process gives the rice its characteristic glossy finish and sticky texture.
- Use the rice: Cover the seasoned rice with a damp cloth until you are ready to use it for sushi rolls or bowls.
Notes
- Use only short-grain Japanese rice for the correct sticky texture required for sushi. Long-grain rice will not work.
- The ratio of vinegar, sugar, and salt is crucial; adjust slightly based on your preference, but maintain the balance.
- Always use a non-metallic bowl when mixing the seasoning into the rice to prevent discoloration or flavor changes.
- Prep Time: 30 min (includes rinsing and draining)
- Cook Time: 25 min
- Category: Side Dish
- Method: Stovetop/Rice Cooker/Pressure Cooking
- Cuisine: Japanese
Nutrition
- Serving Size: 1 cup cooked
- Calories: 300
- Sugar: 10
- Sodium: 350
- Fat: 0.5
- Saturated Fat: 0.1
- Unsaturated Fat: 0.4
- Trans Fat: 0
- Carbohydrates: 67
- Fiber: 1
- Protein: 6
- Cholesterol: 0


Comments are closed.