

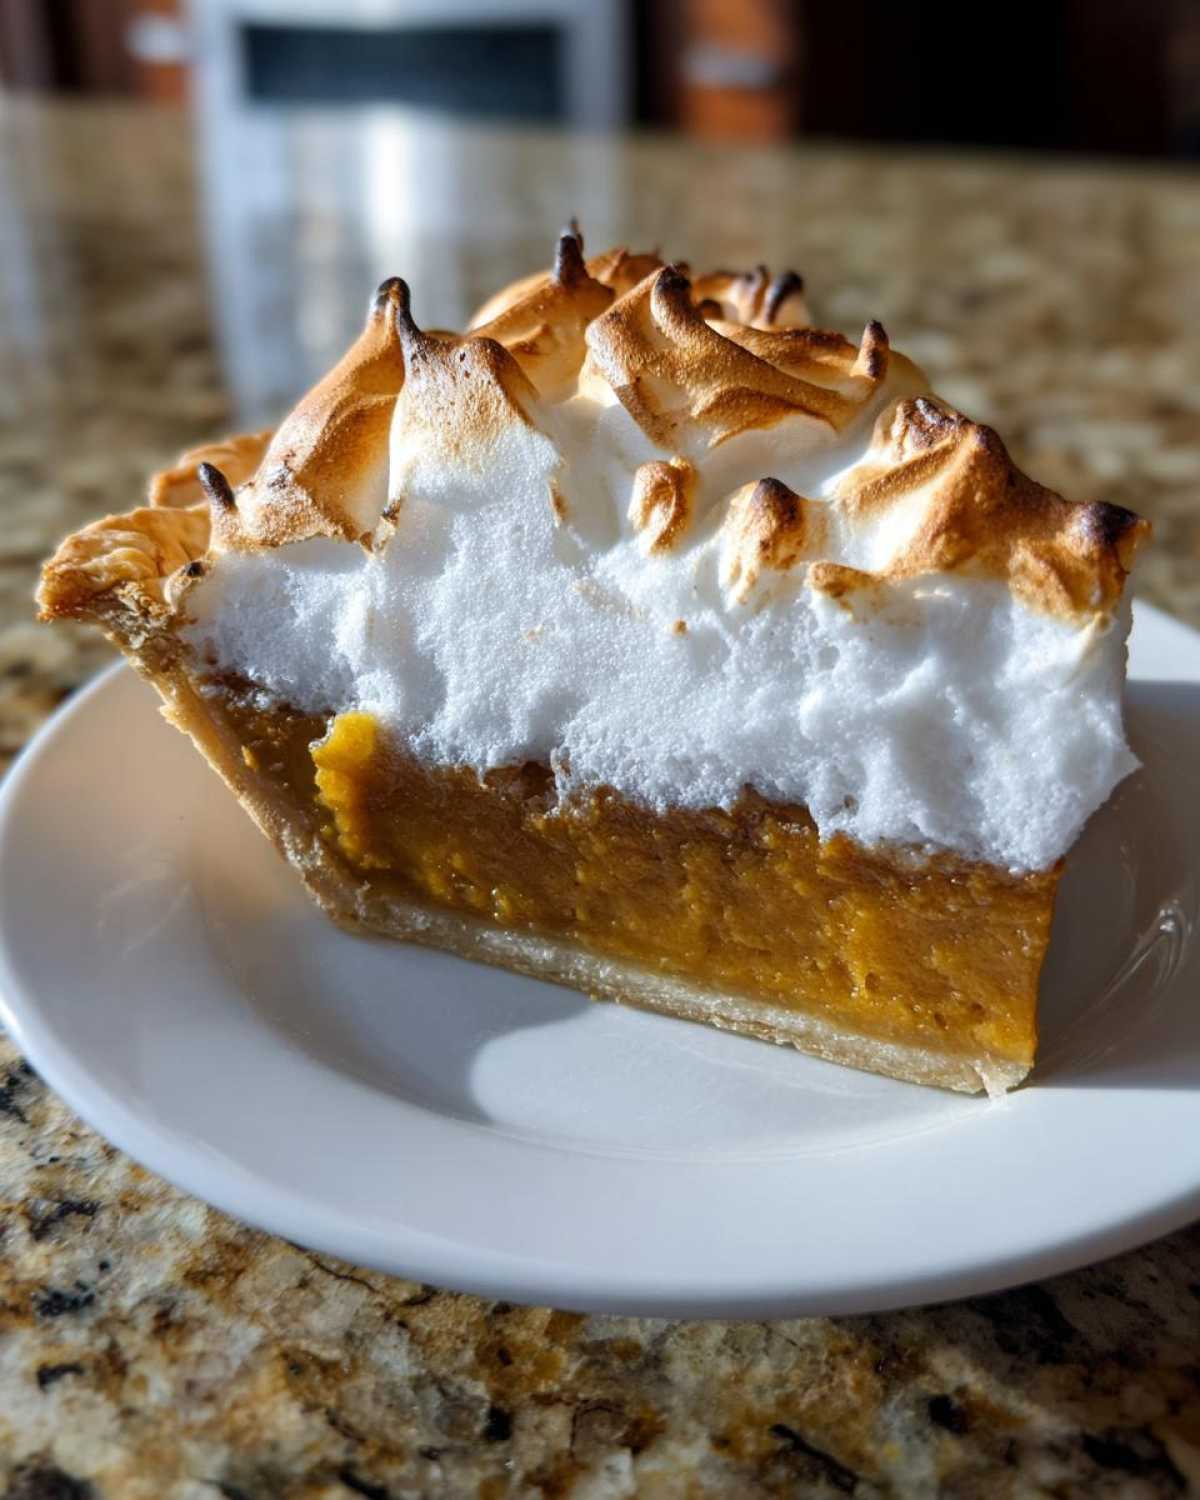
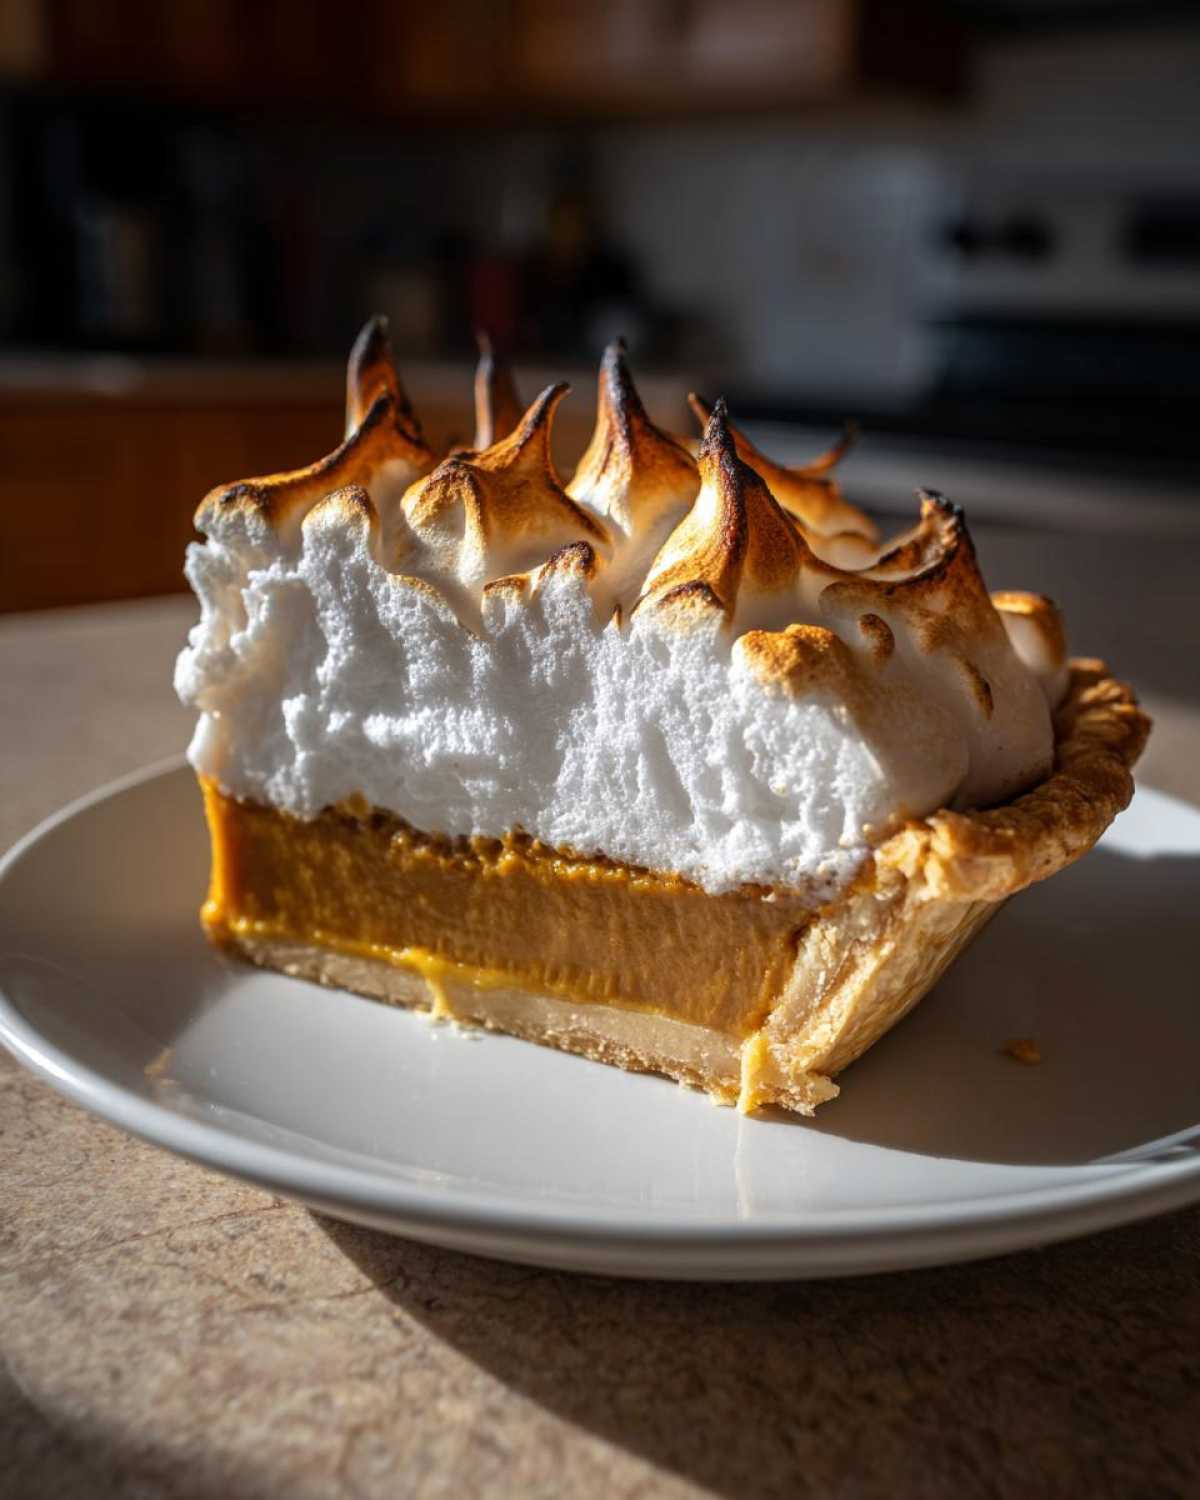
Oh, listen, there is just something about a really old-fashioned dessert, isn’t there? Those flavors burrow right into your memory, and when you taste them again, you’re instantly transported back! For me, that’s this incredible **butterscotch pie**. Forget those flimsy, slightly sweet puddings you grab out of a box; we are making the real deal here. This is the Classic Creamy Butterscotch Pie Recipe, made completely from scratch, featuring a melt-in-your-mouth homemade filling and, of course, that towering, perfect meringue topping.
This recipe reminds me so much of my grandmother’s kitchen on a chilly afternoon—that amazing smell of brown sugar caramelizing just fills the whole house. Trust me when I say that once you taste this rich, decadent flavor combination, you’ll never go back to the quick versions. It’s honestly the Best Creamy Butterscotch Pie you’ll ever make!
Why This Classic Butterscotch Pie Recipe is the Best Creamy Butterscotch Pie
If you’re only going to make one pie from scratch this year, make it this one. There’s a reason people cling to these Old Fashioned Dessert Pies—they offer a depth of flavor you just can’t replicate with shortcuts. When I look at what makes this dessert stand out, it comes down to a few things:
- The homemade filling is unbelievably rich because we use real brown sugar and whole milk, not just pudding powder. It sets up perfectly thick and dense.
- We nail that perfect balance between sweet caramel notes and that little salty edge that makes you go back for another bite.
- The presentation with the fluffy meringue topping just screams ‘special occasion.’ It looks exactly like the pies we grew up admiring!
Honestly, pulling out the cornstarch and an extra egg yolk is worth it. You end up with something truly memorable, unlike the standard assembly-required desserts. If you’re looking for an amazing creamy pie experience, this is it.

Ingredients for a Homemade Butterscotch Filling Recipe and Meringue Topped Butterscotch Pie
Getting the right ingredients lined up is half the battle when you’re making something this classic. I always put everything in little bowls first—it keeps me sane when things start moving fast on the stove! We are going to separate the ingredients for the filling and the topping because those steps are totally different beasts.
Don’t eyeball the sugar or the cornstarch here; precision matters when you’re relying on science to make it gel perfectly. Also, make sure you have your crust ready to go! I always use a pre-baked, fully cooled crust for this one.
For the Rich Butterscotch Filling
- 1 (9 inch) unbaked pie crust (already baked and cooled!)
- 1 cup packed light brown sugar—packing it makes a difference for that deep flavor!
- 1/4 cup cornstarch
- 1/4 teaspoon salt
- 1 1/2 cups whole milk—I can’t stress this enough, whole milk gives you the Best Creamy Butterscotch Pie filling, no fooling around with skim here.
- 3 large egg yolks, lightly beaten—beating them slightly before tempering helps them incorporate smoothly.
- 2 tablespoons unsalted butter
- 1 teaspoon vanilla extract
For the Fluffy Meringue Topping
The meringue has to be perfect to stand up on this rich filling, so follow these little rules! The temperature of the egg whites is super important for volume.
- 3 large egg whites, room temperature—this is key for maximizing volume when whipping!
- 1/4 teaspoon cream of tartar—this stabilizes those whites beautifully.
- 6 tablespoons granulated sugar
How to Prepare the Old Fashioned Dessert Pies: Step-by-Step Butterscotch Pie Instructions
Okay, now for the fun part—watching this gorgeous butterscotch pie come together! Since the pie crust needs to be cooled completely, make sure you take care of that first. We’re using the 350 degrees F temperature for both the crust baking and the final meringue bake, which simplifies things a bit, thank goodness.
A word of caution right now: keep that stove heat moving! If you walk away for even a minute while cooking the filling, you risk scorching that beautiful brown sugar. We want silky smooth, not sticky scorched sugar at the bottom of the pan!
Preparing the Crust and Cooking the Homemade Butterscotch Filling Recipe
First things first, get that crust baked until it’s just lightly golden and set it aside to cool down while you work on the stovetop magic. In a saucepan, whisk your brown sugar, cornstarch, and salt together really well—you want zero lumps before the milk even thinks about joining the party.
Gradually whisk in the milk until everything is uniform. Bring this mix up to a steady boil over medium heat, stirring constantly the whole time. Let it roll for a full minute while boiling and stirring; this is where the cornstarch activates. Take it off the heat.
Now, the tricky part: tempering the yolks. You need to gently introduce the hot sugar mixture to your beaten egg yolks so they don’t scramble! Whisk about half a cup of that hot sugar mixture right into the yolks slowly. Once that’s smooth, pour the yolk mixture back into the main saucepan. Simmer this gently, stirring constantly, until it thickens again—but stop *before* it boils once the yolks are in!
Finally, yank it off the heat and stir in that butter and vanilla until it vanishes. Pour that steaming Homemade Butterscotch Filling Recipe right into your cooled, prebaked crust immediately.
Making and Baking the Meringue Topped Butterscotch Pie
While the filling is still hot, let’s whip up the meringue. Use room-temperature egg whites and cream of tartar. Beat them until you get those nice soft peaks—you know, when you lift the whisk and the tip flops over just a little bit. Then, slowly stream in the granulated sugar while continuing to beat until you have stiff, glossy peaks. You should be able to hold the bowl upside down now (don’t test that unless you’re ready to clean it up!).
Spread that entire cloud of meringue right over the hot filling. This is important: make sure that meringue seals tightly against the edges of the crust all the way around. This prevents that annoying shrinking or weeping we sometimes get on custard pies. Pop the whole miracle into the 350°F oven for about 10 to 15 minutes. You’re just looking for those beautiful kiss marks of golden brown on top. After that, you have to let it cool completely—at least three hours—before slicing into this classic custard pie!
Tips for Success with Your Creamy Butterscotch Pie
Even though this is a classic recipe, it still has a few moods that you need to get to know. If you follow the steps, it’s super reliable, but if you rush the cooling, you’ll be disappointed! My main goal when writing this recipe down was making sure you avoid those little pitfalls that drive home bakers crazy.
The filling lumps and the weeping meringue are the two main villains in the butterscotch pie world. Tackling those things first means you’re halfway to dessert heaven. I’ve learned these tricks over the years, often through trial and error—mostly error when I was rushing!
Preventing Weeping in Your Meringue
That dreadful sugary liquid that seeps out from under the meringue? Ugh. It’s called weeping, and it happens when the meringue isn’t properly sealed to the hot custard underneath. Remember when I told you to spread the meringue so it touches the crust edges all the way around? That’s step one!
Step two is making sure you whip your egg whites correctly. You want them stiff and glossy, not just soft peaks, so they hold their structure when they hit the heat. Also, don’t open the oven door while that meringue is baking! Let the heat work its magic undisturbed. If you’re worried about the sugar weeping later when it chills, sometimes beating a teaspoon of cornstarch into your granulated sugar helps keep things stable.
Achieving That Silky Smooth Filling
Lumps are the enemy of a Rich Caramel Dessert Pie! If your filling turns out looking like cottage cheese instead of silk, you probably didn’t temper those egg yolks slowly enough, or you let that starch mixture boil too vigorously without stirring.
Always whisk the dry ingredients—sugar, cornstarch, salt—together FIRST before adding any liquid. This coats the starch particles and prevents them from clumping when the milk hits. Then, once it thickens on the stove, the tempering process is non-negotiable. Think of it like introducing two grumpy friends: you have to bring them together slowly and gently, or they’ll fight!
The Importance of Cooling Time
I know, I know—it smells amazing, and you want to cut a slice right now. But you absolutely must let this pie cool for at least three hours, preferably four, on the counter before even thinking about chilling it. The filling needs that time to set up properly as it cools down from boiling.
If you try to slice it warm, you’ll have a glorious puddle of sweet butterscotch goo; great for eating with a spoon, I guess, but terrible for presentation! Once it’s cooled down a bit on the rack, pop it into the fridge. Cold custard slices beautifully. Speaking of flavors, I always use a really good quality pure vanilla extract, maybe even one of those fancy ones I found on this baking blog, because that little bit of depth really elevates the butterscotch notes.

Ingredient Notes and Substitutions for Butterscotch Pie
When you’re dealing with a recipe this old-school, the quality of your base ingredients really shines through in the final flavor profile, especially in a butterscotch pie where the flavor is so reliant on just a few stars.
Let’s talk dairy first, because this is where creamy texture lives! I strongly recommend using whole milk for the filling, hands down. If you try to sneak in 1% or skim milk, you’ll notice right away that the setting process is weirder, and the resulting pie feels thin, almost watery, instead of that rich, decadent texture we are aiming for. Fat equals body, and body equals that perfect, spoonable custard consistency.
If you’re terrified of making meringue—and honestly, I don’t blame you if you’ve had weeping disasters before—don’t stress! This recipe adapts beautifully to a simpler finish. You can absolutely skip the egg whites and just use a nice, fluffy topping of real whipped cream instead. It changes the overall vibe from a traditional Old Fashioned Dessert Pie to something a little lighter, but it still tastes wonderful and solves the problem!
For those of you who love that rich, almost burnt sugar flavor, you might think about using dark brown sugar instead of light brown sugar. But be warned! Dark brown sugar has more molasses, and that extra moisture can mess with the cornstarch’s ability to thicken properly, leading to a runny pie. Stick to the light brown sugar we called for in the main list if you want that reliable set.
Storage and Reheating Instructions for Your Butterscotch Pie
You made it! The pie is perfect, golden brown on top, and beautifully set—now, how do we keep it that way? Storing this butterscotch pie is easy, but you have to treat it right because it has two very different textures: the super-rich custard filling and that delicate meringue roof.
The absolute most important rule for storing any pie with a custard or egg-based filling is to get it into the refrigerator. Do not leave this pie sitting out on the counter, even if you covered it with plastic wrap. It really needs that chill to keep that filling firm and safe. I cover mine loosely with plastic wrap—very loosely, because if the plastic touches that meringue roof, you’ll dent it, and frankly, I can’t handle that emotional distress!
A properly covered pie will stay fantastic in the fridge for about three to four days. If you made it for a holiday gathering, it’s a great make-ahead since we need that 3 to 4 hour chill time anyway. If you are planning for travel or storage way ahead of time, I have a great post on make-ahead freezer tips that might help with components, but this specific pie is best made fresh.
What About Reheating This Pie?
Now, I need to be honest with you, my friend: reheating this beautiful Meringue Topped Butterscotch Pie is generally a bad idea. Most people want to warm up custard pies, but this one just doesn’t fare well with being warmed up after it’s been chilled.
The structure of the meringue is very sensitive to temperature changes. When you heat it up again, that moisture between the meringue and the filling—even if you didn’t have weeping before—will start to release dramatically. You’ll end up with a soggy bottom crust and a watery, deflated meringue, which is just a tragedy after all that hard work!
So, my advice? Pull it out of the fridge about 20 minutes before you plan to serve it, let it take the edge off the coldness, and enjoy it served perfectly chilled. The filling remains incredibly creamy when cold, and the texture is just miles better than trying to microwave it back to life. It’s designed to be a refreshing, cool dessert!
Frequently Asked Questions About This Classic Butterscotch Pie Recipe
I know when you’re diving into a new recipe, especially an Old Fashioned Dessert Pie, you always have a few lingering questions. It’s smart to ask! Addressing a couple of things that always pop up for folks trying to master that perfect slice of butterscotch pie can save you a lot of stress later on.
Can I make this a No Bake Butterscotch Pie?
That’s a great question, especially when summer rolls around! While this specific recipe is built around that stovetop cooking process to activate the cornstarch and temper the yolks—which is what guarantees that creamy, non-runny filling—you *can* adapt it to be no-bake, though the texture will change slightly. To do it no-bake, you’d need to cook the filling much longer to ensure the cornstarch grabs every little bit of moisture, and then you’d omit the final meringue bake step entirely, perhaps topping it with stabilized whipped cream instead. If you want a truly dedicated no-bake version, you might be happier searching for a recipe specifically designed around gelatin or heavy reliance on instant pudding, but for this rich custard, the heat is our friend!
How do I prevent the filling from being runny?
Dealing with a runny filling is the absolute biggest disappointment, right? It means you missed a crucial step in developing the structure of your Homemade Butterscotch Filling Recipe. First check: did you let the mixture come to a full boil for one minute *before* you added the tempered egg yolks back in? That initial boil ensures the cornstarch is fully activated. Second check: after the yolks go back in, did you allow it to heat up again until it *just* began to bubble? You don’t want a rolling boil once the yolks are in, but you do need enough heat to thicken that mixture up properly.
Also, don’t forget how vital that cooling time is! If you cut the pie early, it looks runny because it hasn’t finished setting up. Give it those full four hours in the fridge after it cools on the rack. This is key to achieving that perfect sliceable texture.
Can I use box pudding instead of making the Homemade Butterscotch Filling Recipe?
Oh, you certainly *could*, but then it wouldn’t be *this* pie, would it? While box pudding mix is super convenient, it’s designed to be a very simple, sweet dessert experience. This recipe is aiming for something deeper, something that tastes like true, cooked brown sugar and butter—what I call a Grandma’s Favorite Pie Recipe experience.
Box mixes rely on different thickeners and artificial flavorings to get their set. By making the filling completely from scratch with egg yolks, cornstarch, and real butter, you nail the rich, slightly complex flavor profile that makes this the Best Creamy Butterscotch Pie available. It’s just a world away in terms of taste and texture, so I really urge you to try the homemade version first!
Estimated Nutritional Information for Rich Caramel Dessert Pie
I have to say up front that listing nutrition facts for things made with this much love and butter is always a bit of an estimation game, but I want to give you a general idea of what’s in a slice of this amazing butterscotch pie! When you’re making an Old Fashioned Dessert Pie featuring a real meringue topping, you know there are going to be some indulgent numbers, but trust me, every calorie is worth the richness!
These numbers are based on dividing the whole recipe into 8 standard slices, assuming the ingredients listed here were used exactly and that you’ve followed the instructions perfectly—especially making sure that meringue seals right! Keep in mind that using lower-fat milk or swapping the meringue for something lighter would absolutely shift these figures.
This is certainly a decadent treat, perfect for a holiday table when you want something a little different than the usual pumpkin or pecan offerings. It’s definitely a slice of comfort!
- Calories: Approximately 380 per slice
- Total Fat: Around 18 grams
- Saturated Fat: About 10 grams (Yep, butter and egg yolks add up!)
- Carbohydrates: Roughly 52 grams
- Total Sugar: About 45 grams (Mostly from the glorious brown sugar!)
- Protein: Around 7 grams
- Cholesterol: About 110 mg
Remember, these estimations don’t account for variations in crust thickness or any extra sugar you might dust on top before serving your Best Creamy Butterscotch Pie. Enjoy responsibly!
Share Your Experience Making This Decadent Butterscotch Dessert
Making this Classic Butterscotch Pie Recipe is one thing, but seeing it grace your family table is the real success story! I truly poured my heart into making this guide for you, covering everything from tempering the yolks to sealing the meringue so it doesn’t weep. Now that you’ve tackled this Decadent Butterscotch Dessert, I absolutely need to hear about it!
Did the smell of the brown sugar filling remind you of your own childhood kitchens? Did you brave the full meringue, or did you opt for the simple whipped cream topping found in my notes? I’m dying to know how my version of this Rich Caramel Dessert Pie turned out for you.
Please take a moment to leave a star rating right here on the recipe card so other bakers know how reliable this recipe is. And if you snapped a picture of that towering meringue or that perfectly smooth slice, I would be thrilled if you shared it on social media! Tag me in your posts—it makes my entire week to see your beautiful work.
Baking connects us, and sharing those successes—especially with something as nostalgic as this pie—is the best part of the whole process. If you loved this pie, you might also adore checking out the tips I put together for the ultimate chocolate chip cookies; sometimes you just need a chewy, simple treat after mastering a complex pie!
Happy baking, and thank you for trying out a true family favorite!
Print
Classic Creamy Butterscotch Pie with Meringue Topping
- Total Time: 4 hours 45 min
- Yield: 8 servings
- Diet: Vegetarian
Description
Make this old-fashioned butterscotch pie featuring a rich, homemade filling and a light, fluffy meringue topping.
Ingredients
- 1 (9 inch) unbaked pie crust
- 1 cup packed light brown sugar
- 1/4 cup cornstarch
- 1/4 teaspoon salt
- 1 1/2 cups milk
- 3 large egg yolks, lightly beaten
- 2 tablespoons unsalted butter
- 1 teaspoon vanilla extract
- For the Meringue:
- 3 large egg whites, room temperature
- 1/4 teaspoon cream of tartar
- 6 tablespoons granulated sugar
Instructions
- Preheat your oven to 350 degrees F. Bake the pie crust according to package directions until lightly golden. Cool completely on a wire rack.
- In a medium saucepan, whisk together the brown sugar, cornstarch, and salt.
- Gradually whisk in the milk until smooth.
- Cook over medium heat, stirring constantly, until the mixture thickens significantly and comes to a boil. Boil for one minute, stirring constantly. Remove from heat.
- In a small bowl, whisk the egg yolks. Slowly temper the yolks by whisking about 1/2 cup of the hot sugar mixture into the yolks.
- Pour the tempered yolk mixture back into the saucepan with the remaining hot mixture. Cook over medium-low heat, stirring constantly, until the filling thickens again and just begins to bubble. Do not boil after adding the yolks.
- Remove from heat. Stir in the butter and vanilla extract until the butter melts completely.
- Pour the hot filling immediately into the cooled, prebaked pie crust.
- To make the meringue, beat the egg whites and cream of tartar with an electric mixer until soft peaks form. Gradually add the granulated sugar, beating until stiff, glossy peaks form.
- Spread the meringue over the hot filling, making sure the meringue touches the edges of the crust all around to prevent shrinking.
- Bake at 350 degrees F for 10 to 15 minutes, or until the meringue is lightly golden brown.
- Cool the pie completely on a wire rack for at least 3 hours before slicing.
Notes
- Chill the pie for at least 4 hours before serving for the best texture.
- If you prefer a simpler topping, you can use whipped cream instead of meringue.
- Use whole milk for the creamiest filling consistency.
- Prep Time: 20 min
- Cook Time: 25 min
- Category: Dessert
- Method: Baking
- Cuisine: American
Nutrition
- Serving Size: 1 slice
- Calories: 380
- Sugar: 45
- Sodium: 180
- Fat: 18
- Saturated Fat: 10
- Unsaturated Fat: 8
- Trans Fat: 0.5
- Carbohydrates: 52
- Fiber: 1
- Protein: 7
- Cholesterol: 110


Comments are closed.