

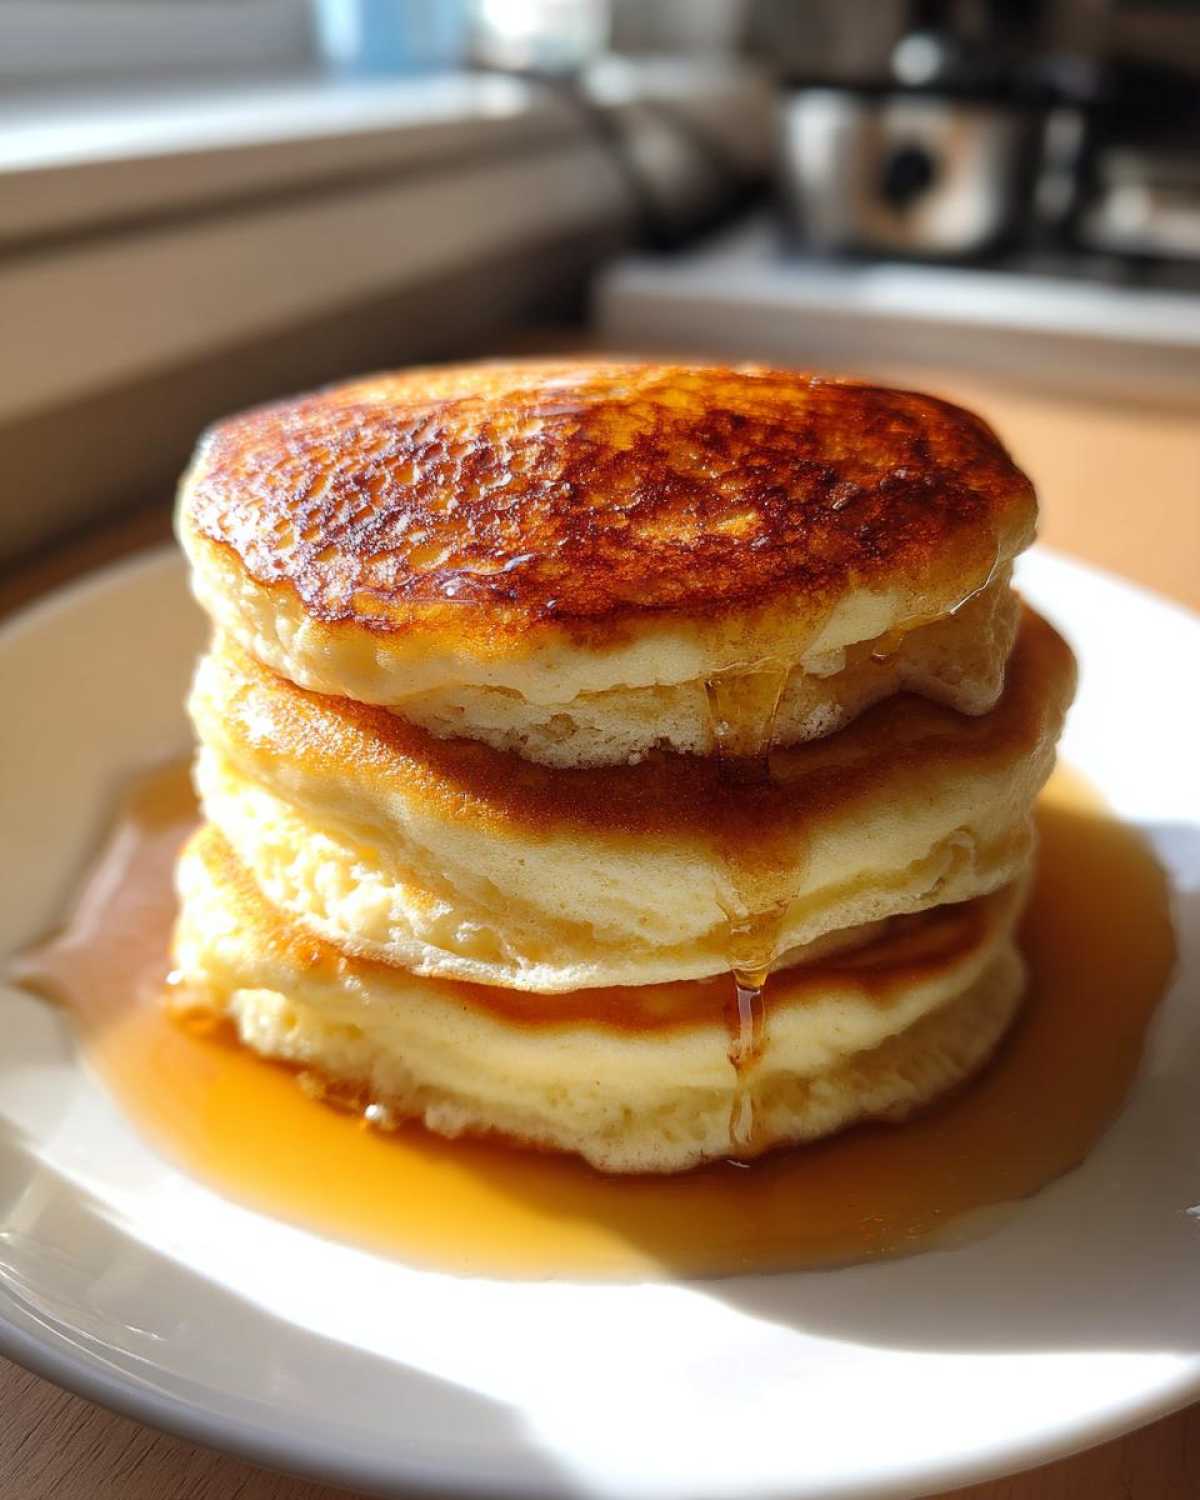
Oh, the weekend morning ritual! There is nothing—and I mean absolutely *nothing*—that beats the smell of melting butter on a hot griddle when you’re finally relaxing. Forget those sad, flat little discs you get from a mix; we are making real, beautiful, towering stacks of pancakes today. This recipe isn’t just another list of instructions; this is the keeper. I spent years chasing that perfect, airy height, that slightly tangy flavor, and believe me, I found it right here in this fluffy old-fashioned buttermilk creation. Once you try this technique, you’ll never go back. Seriously, toss those old boxed mixes!
Why This is Your New Favorite Pancakes Recipe (Easy Homemade Pancakes Recipe)
I know, I know—everyone claims to have the “best” recipe, but hear me out. This recipe is rock-solid reliable, which is what we all need when we’re trying to get a delicious, thick-and-fluffy breakfast on the table without any kitchen drama. This batch of buttermilk pancakes practically makes itself, and I promise, they come out perfectly every single time. They truly are my go-to for any sweet breakfast treat! You can even see how well this method works for oatmeal pancakes too!
Here’s why you should put down whatever you were planning and try this batch of easy homemade pancakes right now:
- They use simple pantry staples you probably already have. No weird trips to the store required!
- The rise is spectacular. We’re talking genuinely thick and fluffy breakfast heaven.
- It’s a foolproof recipe. If you follow the mixing rule (which I’ll go over in detail!), you cannot mess these up.
Quick Prep Time for Weekend Brunch Recipes
The best part about these? They are lightning fast. Prep time is honestly about 10 minutes—that’s just enough time to pull out the mixing bowls. Cooking only takes about 15 minutes total, which means you can have a massive stack of these beautiful classic American pancakes ready before the coffee even finishes brewing. This makes them excellent for any last-minute weekend brunch recipes, even on a weekday if you get crazy!
Guaranteed Thick and Fluffy Breakfast Texture
The secret sauce here is the buttermilk reacting with that tiny bit of baking soda we add. It creates millions of little air bubbles in the batter almost instantly. If you want that light and airy pancakes result, you *must* let the batter rest for those five minutes after mixing. Trust me on this one; that short wait time is what separates a good pancake from a truly legendary one. You want that perfect, satisfying, airy lift!
Ingredients for Perfect Buttermilk Pancakes
When it comes to making truly spectacular from scratch pancakes, the ingredients list is short, but their quality really shines through. I always lay everything out on the counter first—it’s my little system for success before I even start whisking! You want to make sure you treat these ingredients right, especially the buttermilk. If you see something that gets a happy mention over on my banana oat pancake post, you know it’s important!
Here is exactly what you need for about 12 perfect pancakes:
- 2 cups all-purpose flour (Make sure it’s scooped lightly, not packed!)
- 2 tablespoons granulated sugar (Just the regular white stuff works great here.)
- 2 teaspoons baking powder (This helps with that immediate lift!)
- 1 teaspoon baking soda (This is what gives us the tang when mixed with the buttermilk.)
- 1 teaspoon salt (Don’t skip this! It balances the sweetness.)
- 2 cups buttermilk (The star ingredient—see below for my emergency trick if your fridge is empty.)
- 2 large eggs (Try to use room temperature eggs if you remember, but it’s usually fine if they aren’t.)
- 4 tablespoons unsalted butter, melted, plus more for the griddle (Melted, but let it cool down just a touch before adding it in!)
See? Nothing complicated, just solid, honest ingredients needed for this classic American pancakes recipe. Measure carefully, and we can move on to keeping this batter lump-free!
Ingredient Notes and Substitutions for Your Pancakes
Okay, let’s talk about the superstars in this recipe. When dealing with something as foundational as these buttermilk pancakes, mastering ingredient prep makes all the difference between a mediocre breakfast and a towering success. These little secrets are things I learned the hard way, and I don’t want you to suffer through flat pancakes because of a missing ingredient!
First off, the buttermilk. It’s non-negotiable if you want that classic zing and that amazing reaction with the baking soda, but let’s face it, sometimes we run out. Don’t panic! You can make your own perfect stand-in in about five minutes. Just take 2 cups of regular milk—whole milk works best, but 2% is fine—and whisk in 2 tablespoons of white vinegar or, my personal favorite, lemon juice. Give it a quick stir and then just let it sit on the counter for about 5 minutes. It will start to curdle slightly, and boom, you have DIY buttermilk! It works nearly perfectly, so you’re never stuck.
Another small thing that makes a difference, though this recipe is forgiving: eggs! If you can remember ahead of time, let your eggs sit on the counter while you gather the dry ingredients. Room temperature eggs blend into the batter much more evenly than cold ones right out of the fridge. When they mix in smoothly, they create a more unified emulsion, which helps keep that beautiful, airy structure we’re going for. It might seem fussy, but when you’re aiming for the best, these small touches count.
Also, when you melt your butter, make sure you let it cool down slightly before you pour it in. If scorching hot melted butter hits the cold buttermilk and eggs, it can actually start to cook them prematurely, which messes with the reaction we want later. Just let it sit for a minute or two until it’s warm, not piping hot. These little habits are what separate the casual pancake flipper from the true master of the easy homemade pancakes recipe. You can peek at how I’ve tweaked things for other recipes—it just proves good technique translates everywhere!
How to Make the Best Fluffy Old-Fashioned Pancakes
Alright, this is where the magic happens, so grab your bowls! Getting these old fashioned pancakes right is about respecting the ingredients, not rushing the process. The steps are super straightforward, but we have to be gentle. Think soft whispers, not aggressive dumping! If you’re curious about making a huge batch at once, check out my tips for sheet pan pancakes, but for today, we’re sticking to the classic griddle method.
Combining Dry Ingredients for Smooth Pancakes
First things first, we tackle the dry stuff. Get your flour, sugar, baking powder, baking soda, and salt into a big bowl. Don’t just let them sit there; you need to whisk them together really well. I mean really get in there and mix it until everything looks perfectly uniform. Why bother? Because if the baking soda and powder aren’t evenly distributed, you’ll end up with one pancake that explodes upwards and another one that stays totally flat. We want evenness in our lift!
Mixing Simple Pancake Batter: The Lumps Rule
Now we move to the wet ingredients—the buttermilk and eggs whisked together, plus that slightly cooled melted butter. Pour all the wet goop into the dry mixture. Here is where I need you to take a deep breath and slow down. Grab a whisk or a rubber spatula, and I want you to gently whisk until they are *just* combined. I am talking about maybe 8 to 10 gentle stirs. If you see lumps? Good! I mean it! Lumps are your friends!
Lumps mean you haven’t overmixed. The absolute nemesis of fluffy pancakes is developing gluten. When you beat the flour too much, the gluten firms up, and that’s what gives you rubbery, flat breakfast discs. We want soft, tender results. So, if you see a bit of dry flour streaks peeking through, just stop! Then, let that lovely batter rest right there on the counter for a solid 5 minutes. This resting time is crucial; it lets the leaveners activate and the flour hydrate perfectly. This secret step separates the amateurs from the pros when making simple pancake batter.
Griddle Preparation and Cooking Pancakes
While the batter rests, get your griddle or skillet heating up over medium heat. Not medium-high—medium! If it’s too hot, the outside burns before the inside cooks, and we’ll just have sad, raw centers. I always test the heat by splashing a tiny drop of water on the surface; if it sizzles and evaporates immediately, you are good to go. Lightly grease it with a nub of butter—don’t let the butter pool, just a light film is all you need.
Now, gently ladle about 1/4 cup of batter for each pancake. Don’t squish them together on the pan; give them room to breathe! Watch closely. You are waiting for two things to happen: the edges of the pancake should just start to look dry and set, and you’ll see little bubbles pop up across the surface and stay open. That’s your cue! Slide your spatula underneath and flip with confidence. The second side cooks much faster, usually only 1 or 2 minutes, until golden brown. Once they are done, transfer them immediately to a baking sheet in a 200°F oven so they stay warm and fluffy while you batch-cook the rest of your amazing stack!
Pancake Cooking Secrets for Foolproof Pancake Recipe Success
I feel like this next part is the difference between just making batter and actually mastering your griddle. Listen, if you messed up your batter by overmixing it, don’t fret! There are still ways to salvage it and ensure you get those beautiful, golden edges without your breakfast turning into rubber. Building that authority in the kitchen comes from knowing how to fix issues *after* they happen. We aren’t talking about the basic recipe here; these are the little habits that turn a good cook into a great one when making breakfast!
The Science Behind Achieving Light and Airy Pancakes
So, why are these always so much fluffier than the packet stuff? It really boils down to chemistry, my friend! We use both baking powder AND baking soda. The baking soda is a base, and it immediately starts reacting when it hits the acidic buttermilk, creating that first quick burst of carbon dioxide—that’s what gives you that instant lift and keeps your old fashioned pancakes tender. The baking powder is double-acting, meaning it gives you a second, slower lift while the batter is resting and when it hits the heat on the griddle.
This balance is key! Too much soda and you get a soapy taste, too little and you get flat disks. Because we use buttermilk, we only need a small amount of soda to get that necessary reaction. It’s all about building those beautiful air pockets we talked about earlier. If you want to see how that lift works in other baked goods? Check out my notes on getting my bakery-style blueberry muffins so airy—same science, different shape!
Temperature Control: The Key to Golden Brown Pancakes
This is perhaps the number one reason people end up with pale, soggy flapjacks or burnt hockey pucks. You must use medium heat! It sounds boring, but it’s the truth. If your griddle is too cold, the batter spreads too much before the baking soda gets a chance to react, and all that moisture just steams out, resulting in a pale, flat pancake that steams instead of cooks. That’s not what we want!
On the flip side, if you crank the heat up to medium-high or high, the outside skin will set and brown instantly—maybe even burn—before the heat has traveled all the way to the center of that thick batter. You end up flipping a pancake that is raw inside. That’s why we wait for those bubbles! The bubbles mean the heat has penetrated the center enough to start setting the structure. It takes about 2 to 3 minutes for the first side to cook just right on medium heat. Don’t be tempted to rush it by turning the heat higher; patience results in a perfectly golden exterior.
Serving Suggestions for Your Fluffy Old-Fashioned Pancakes
Okay, the stack is built. It’s golden, it’s towering, it’s everything you dreamed of in a quick breakfast idea. Now comes the fun part: the decorations! These buttermilk pancakes are so flavorful from the tangy buttermilk that they don’t really *need* a mountain of sugar piled on top, but hey, it’s the weekend, so we go big!
If you like to keep things traditional—and who doesn’t love a classic? A slab of cold, real butter melting slowly down the side, followed by a heavy drizzle of pure maple syrup. That sticky, sweet warmth soaking into every nook and cranny? Perfection.
But if you’re feeling a little fancier for your weekend brunch recipes, here are a few ways I like to dress mine up:
- A dusting of powdered sugar, just like they do at the fancy diners.
- Fresh berries mixed with a dollop of Greek yogurt for a little tang that cuts the sweetness.
- If I’m feeling extra decadent, I’ll whip up a quick brown sugar cinnamon butter—it tastes heavenly and makes these feel like a real treat. You know, similar flavors to what I use in my sweet potato biscuits!
- Lemon zest added right into the syrup pitcher makes everything bright!
Honestly, the goal here is flavor and fun. Whatever you put on them, just enjoy digging into that beautiful, airy texture you worked so hard to achieve!
Make Ahead Pancakes and Storage Instructions
I get it—sometimes you just want a giant stack of these easy homemade pancakes now, and other times you want the reward of knowing you have breakfast waiting for you tomorrow! I absolutely love making a double batch because who has time to cook fresh pancakes every morning, even if this recipe is fast? Knowing I have some of these waiting in the fridge makes Monday mornings so much more bearable. Storing them correctly is key to making sure they don’t turn into dense hockey pucks when you reheat them.
For refrigeration, here’s my advice: make sure your pancakes are completely cool before you wrap them up. Putting warm pancakes into a container traps steam, and that steam turns into gross mushy spots in the morning. Once totally cool, I layer them with squares of parchment paper—like little edible sheets to keep them from sticking together—and store them in an airtight container or a heavy-duty zip-top bag.
Best Way to Store Leftover Pancakes
In the fridge, these make ahead pancakes will stay perfectly good for about 3 days. If you know you won’t get through them by then, freezing is your next best bet! I use the same parchment paper layering technique for the freezer, but I make sure I use a freezer-safe bag and press out as much air as possible before sealing it up. They stay delicious for up to two months in the freezer, which is great insurance for a craving!
If you’re freezing a big stack, you can even put them onto a baking sheet with parchment between them and freeze them solid for about an hour before bagging them up. This stops them from sticking into one big icy block—nobody wants that! This method works for almost any sweet breakfast treat, even my plum cake!
Reheating Tips for Fluffy Texture Revival
Okay, how do we get that just-cooked, fluffy texture back? Microwaving them is fast, but it often makes them chewy and steamy, which we want to avoid if we can. The best method, hands down, is the toaster or the oven.
For just one or two pancakes, throw them right in the toaster for one round. It gives them the perfect crispy edge without drying out the middle. If you’re reheating a whole stack for the family dinner (yes, breakfast for dinner is required sometimes!), lay them out in a single layer on a clean baking sheet and pop them into a 350°F oven for about 5 to 8 minutes. They’ll warm completely through and regain that wonderful, slightly crisp exterior that makes these fluffy pancakes so addictive. Don’t even think about skipping the reheating step!
Frequently Asked Questions About Buttermilk Pancakes
I always get a ton of questions after I post this recipe because people are just as obsessed with getting that perfect height as I am! It’s easy to get confused between all the different tips out there, but I’ve narrowed down the most common things readers ask me about achieving truly stellar buttermilk pancakes.
Why are my pancakes flat and why did I mess up that simple pancake batter?
Oh, don’t you worry about this one! Flat pancakes are almost always caused by two things: overmixing or old leavening agents. As I mentioned earlier, stop mixing the batter once it looks *just* combined—those lumps are crucial for keeping things light and airy! If you mixed thoroughly and they still fell flat, check the date on your baking powder and baking soda. If they are expired, they won’t produce the gas needed for that beautiful rise. Try replacing them, and you’ll instantly see the difference in your next batch of classic American pancakes.
Can I use regular milk instead of buttermilk for these easy homemade pancakes?
Yes, you absolutely can, which is great for a quick breakfast emergency! Buttermilk is special because it’s acidic, which reacts perfectly with the baking soda. If you only have regular milk, here’s the trick: stir 2 tablespoons of white vinegar or lemon juice into 2 cups of milk. Let it sit on the counter for about five minutes until it looks slightly curdled. That’s your homemade buttermilk, and it works beautifully in this easy homemade pancakes recipe. You won’t get quite the same sharp tang, but you’ll still get a great lift!
Can I freeze the batter instead of freezing the cooked pancakes?
This is a great question for people who eat leftovers! While you technically *can* freeze the batter, I really, really advise against it for this specific recipe. The whole point of these thick and fluffy breakfast treats is the instant chemical reaction between the soda, powder, and buttermilk once they mix. If you chill the batter for too long—even an hour—that reaction starts to happen in the fridge, and by the time you cook it, all the rising power is gone, leaving you with flatter results. For best results, always cook the batter right away, or bake the finished pancakes and freeze those following my instructions above. If you’re looking for recipes designed to be prepped ahead, maybe check out my tips on making homemade naan bread, which freezes like a dream!
What temperature should my griddle be set to for the best result?
Medium heat! I cannot stress this enough. If you use high heat, you burn the outside before the inside cooks through, resulting in a raw center. Medium heat allows the batter to set just long enough for those bubbles to form, ensuring you get that lovely, even golden brown color on both sides while the inside stays perfectly cooked and tender. It’s the secret to transforming your batch into the best fluffy pancakes you’ve ever made.
Nutritional Estimates for These Classic American Pancakes
Now, I’m no nutritionist, and I certainly don’t count every bite when a huge stack of these babies is staring me down, but I know some of you like to keep track! Since we are using real butter, eggs, and buttermilk, these homemade pancakes pack a bit more substance than the stuff made from a powdered mix—and that’s why they taste so much better, right?
The estimates below are calculated based on the recipe serving 6 people (about 2 pancakes per serving), using the ingredients listed. Remember, these are just rough estimates, and topping choices—like that mountain of buttery syrup you might be thinking of—will change the final numbers drastically! If you’re whipping these up for your family, I always recommend using this as a guideline, not gospel. You can view my full baking notes over here if you’re interested in my other moist cake recipes!
- Serving Size: 2 pancakes
- Calories: 280
- Fat: 10g
- Saturated Fat: 6g
- Carbohydrates: 39g
- Sugar: 6g (Natural sugars from milk/buttermilk added to the 2 tbsp regular sugar)
- Protein: 10g
- Cholesterol: 85mg
See? A solid, satisfying breakfast to fuel you through the morning! So, weigh the deliciousness of these wonderful classic American pancakes against the numbers, and I think we all know who wins. Enjoy every bite!
Print
The Absolute Best Fluffy Old-Fashioned Buttermilk Pancakes
- Total Time: 25 min
- Yield: About 12 pancakes
- Diet: Vegetarian
Description
A simple recipe for thick, light, and airy homemade buttermilk pancakes perfect for a weekend breakfast.
Ingredients
- 2 cups all-purpose flour
- 2 tablespoons granulated sugar
- 2 teaspoons baking powder
- 1 teaspoon baking soda
- 1 teaspoon salt
- 2 cups buttermilk
- 2 large eggs
- 4 tablespoons unsalted butter, melted, plus more for the griddle
Instructions
- Combine the flour, sugar, baking powder, baking soda, and salt in a large bowl. Whisk these dry ingredients together well.
- In a separate medium bowl, whisk together the buttermilk and eggs until combined.
- Pour the wet ingredients into the dry ingredients. Gently whisk until just combined. Do not overmix; a few lumps are fine.
- Stir in the 4 tablespoons of melted butter until just incorporated. Let the batter rest for 5 minutes.
- Heat a griddle or large non-stick skillet over medium heat. Lightly grease the surface with butter or cooking spray.
- Pour 1/4 cup of batter onto the hot griddle for each pancake.
- Cook for 2 to 3 minutes per side, until bubbles appear on the surface and the edges look set. Flip and cook the second side until golden brown.
- Serve immediately with your favorite toppings.
Notes
- For extra fluffy pancakes, do not stir the batter after the initial mix. Overmixing develops gluten, resulting in flat pancakes.
- If you do not have buttermilk, mix 2 tablespoons of white vinegar or lemon juice into 2 cups of regular milk and let it sit for 5 minutes before using.
- Keep finished pancakes warm in a single layer on a baking sheet in a 200F oven while you cook the remaining batter.
- Prep Time: 10 min
- Cook Time: 15 min
- Category: Breakfast
- Method: Griddling
- Cuisine: American
Nutrition
- Serving Size: 2 pancakes
- Calories: 280
- Sugar: 6
- Sodium: 450
- Fat: 10
- Saturated Fat: 6
- Unsaturated Fat: 4
- Trans Fat: 0
- Carbohydrates: 39
- Fiber: 1
- Protein: 10
- Cholesterol: 85


Comments are closed.