

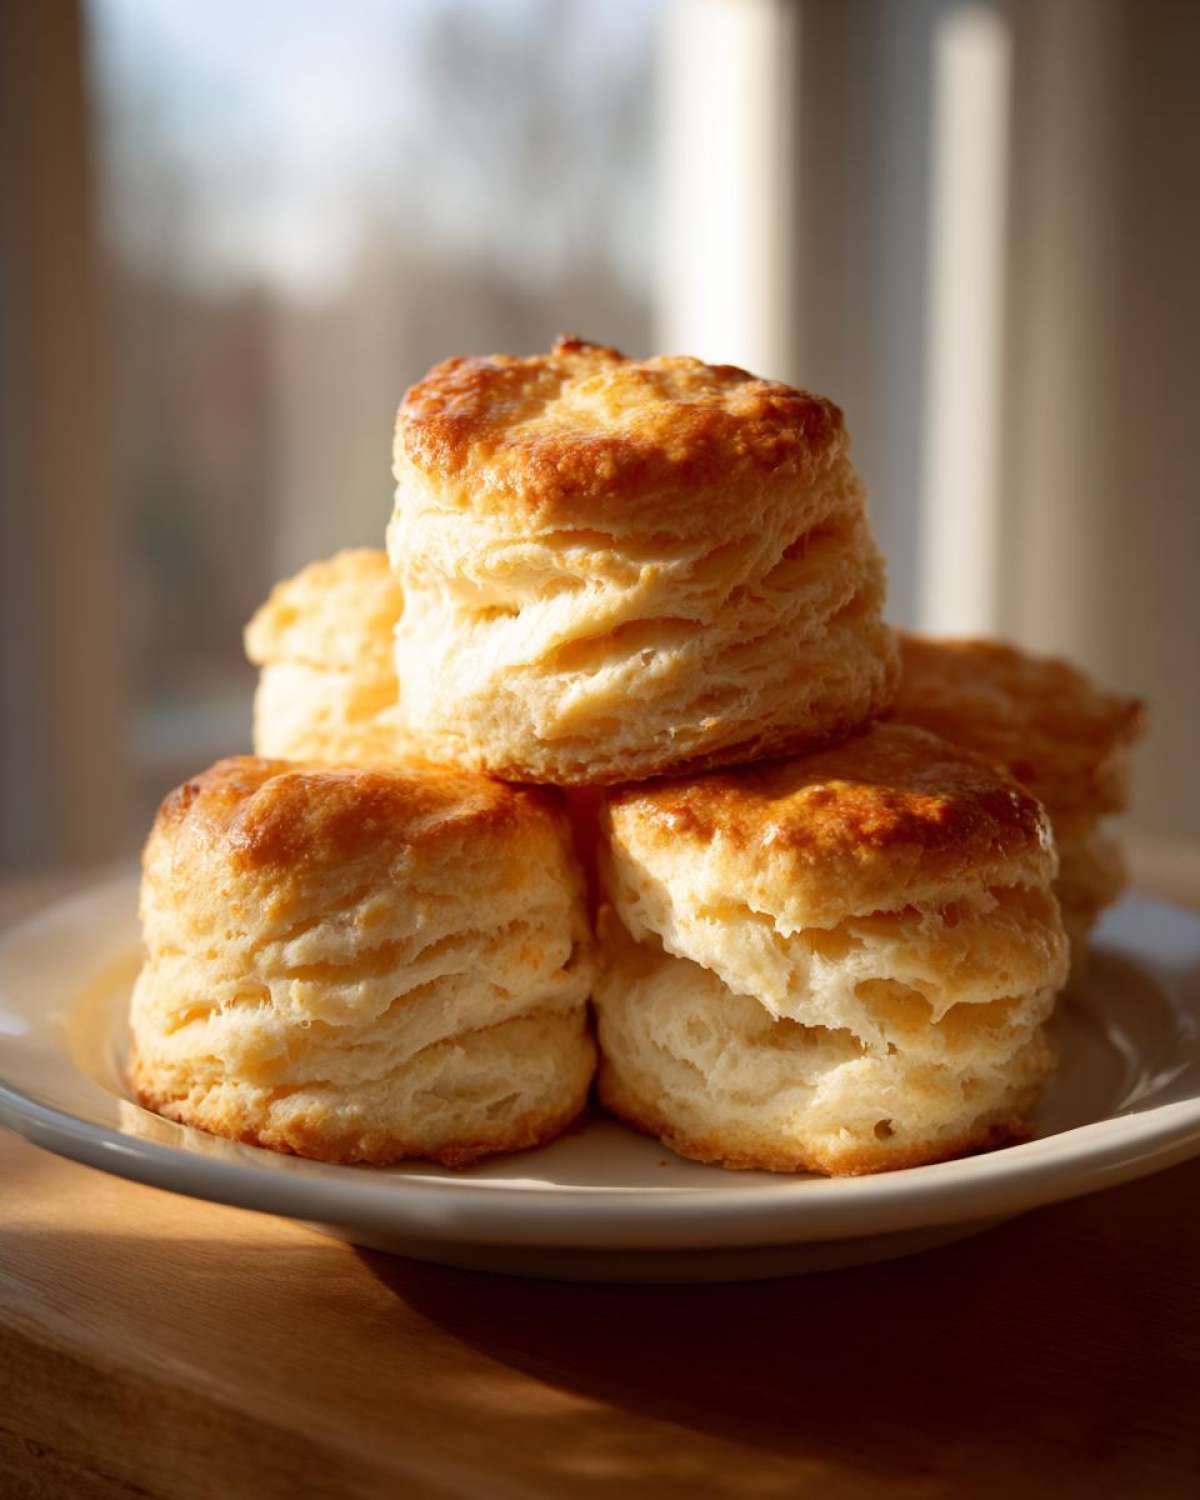
Okay, stop whatever you’re doing, because we need to talk about biscuits. I mean *real* biscuits. Not those hockey pucks you get from a can. I spent years wrestling with dough, ending up with flat, sad discs that tasted more like cardboard than heaven. But trust me, after countless attempts and lots of flour dust everywhere, I finally cracked the code for the best buttermilk biscuits you will ever eat.
This isn’t just mixing stuff in a bowl; this is about technique. We’re going completely from scratch here, focusing on keeping everything ice-cold so those layers actually separate when they hit the heat. If you want that towering height, that buttery explosion, and that melt-in-your-mouth tenderness that screams ‘Southern kitchen,’ then you’re in the right place. I’m going to walk you through every single thing that makes these buttermilk biscuits legendary.
Why You Will Bake the Best Buttermilk Biscuits
You’re going to ditch all those other recipes because this one works *every single time*. I promise you, these aren’t tricky—they just require a little patience with the cold stuff! Here’s what you get when you follow my lead:
- Maximum Flakiness: We use tiny, frozen pieces of butter which turn to steam and push those layers apart.
- Incredible Height: They stand tall! These aren’t squat little things; they rise beautifully in the oven.
- Tender Crumb: They are soft inside and never gummy, perfect for soaking up gravy.
- Real Buttery Flavor: Only the best butter makes it in here, and you can taste the difference.
Ingredients for Ultra Flaky Buttermilk Biscuits
Alright, let’s get organized! We need simplicity here, but the *quality* of the cold ingredients is everything. I’ve linked a great recipe for sweet potato biscuits if you want another variation later, but for these classic ones, stick to this list. Remember, everything has to be fridge-cold—we’re talking near-frozen butter!
- 2 cups all-purpose flour
- 1 tablespoon baking powder
- 1 teaspoon salt
- 1 teaspoon sugar
- 1/2 cup (1 stick) cold unsalted butter, cut into small cubes
- 3/4 cup cold buttermilk
Ingredient Notes and Substitutions for Perfect Buttermilk Biscuits
The beauty of buttermilk biscuits is that they use pantry staples, but chilling them is non-negotiable! Butter must be real butter—no margarine substitutes, please. Margarine melts too fast and we need chunks of cold fat encased in the flour so they steam open in the oven.
Buttermilk is the engine here; its acidity reacts with the baking powder to give us that glorious lift. If you’re staring at your fridge and realize you’re out? Don’t run to the store! Just take 3/4 cup of regular whole milk and stir in one teaspoon of white vinegar or lemon juice. Let that sit on the counter for five minutes until it curdles a tiny bit. Voila! Instant buttermilk. It works like a charm!
Essential Equipment for Making Fluffy Biscuit Recipe
Before you even think about pulling out the flour, you need your tools ready to go. A good baker (even a super messy one like me!) knows that having the right gear makes staying organized so much easier. Since we are dealing with cold ingredients, we want this process to move quickly before the butter gets warm and gooey.
I’ve gathered everything you need right here. If you’re serious about getting that towering look, these items will really help support your efforts!
- A large mixing bowl for combining the initial dry ingredients. You need space so you don’t spill flour all over the counter—trust me on this!
- A whisk or a regular fork to briefly combine the flour, salt, baking powder, and sugar.
- A pastry blender is heavenly for cutting in the butter. If you don’t have one, your fingers work just fine, but you need to be fast!
- A biscuit cutter, preferably 2.5 inches wide. Getting a clean edge is key for rise.
- A sturdy rolling pin, or just slightly flatter hands if you prefer to pat the dough out.
- Parchment paper or a silicone baking mat for the sheet pan. This helps with cleanup, which is always a win in my book.
Step-by-Step Instructions for Perfect Buttermilk Biscuits
This is where the magic happens, but we have to keep moving! First things first: get that oven heating up to 425°F right now. We want it screaming hot when the biscuits go in. While it preheats, grab your big bowl and whisk together the flour, baking powder, salt, and that little bit of sugar. Keep everything dry and airy.
Next up is the butter. Toss in those cold, cubed pieces—remember, we’re aiming for coarse crumbs and some visible pea-sized chunks. Use your pastry blender and work quickly until you hit that texture. If you’re using your fingers, try not to rub the butter too much; just use your fingertips to squish it into the flour until you see those small pieces remaining. That cold fat is your secret weapon!
Now, pour that super cold buttermilk in all at once. Mix it with a fork just until everything looks shaggy. Stop mixing the second it seems to come together. Seriously, a little bit of dry flour peeking through is totally fine! Turn the mess onto your counter, which you’ve dusted lightly. Gently press it together—only four or five times max. Roll or pat it out to about three-quarters of an inch thick. Use your cutter and press straight down. Don’t twist the cutter; twisting seals the edges and you lose all that beautiful height in your buttermilk biscuits!
Place them close together on the sheet if you like soft sides, or leave space if you want crisp edges. Bake for 12 to 15 minutes until they are deeply golden brown on top. Brush with a little melted butter right as they come out. Wow, just wow!
Technique Tip: Achieving Tall and Flaky Buttermilk Biscuits
If you are desperate for extra height—and who isn’t?—you need to think about layering. Before you roll out the dough the first time, gently take the flattened dough and fold it into thirds, like you’re folding a business letter. Pat it down slightly. That one fold instantly creates three layers. After you cut your first batch of buttermilk biscuits, take the scraps, gently bring them together (don’t knead them hard!), stack them, and fold them over one more time before cutting your second round. This folding technique traps air and guarantees those incredible, flaky separation lines when they bake up!
Tips for Success When Baking Homemade Buttermilk Biscuits
I know I keep hammering this point, but I need you to really listen up about keeping things cold! This really separates the good batch from the legendary batch of your homemade buttermilk biscuits. If your butter starts getting soft while you’re cutting it into the flour, just chuck the whole bowl in the freezer for five minutes. Seriously, take the break!
The other major pitfall is overworking the dough. Once that buttermilk hits the flour, gluten starts developing fast. Overmixing gives you tough, chewy biscuits instead of that tender texture we’re aiming for. Remember how I said to stop mixing when it looks shaggy? That means stopping when you can still see a little dry flour. That brief, gentle handling right before cutting them out is the key to fluffy layers.
The oven temperature has to be spot on, too. A hot oven (425°F!) provides the necessary shock to make the cold butter instantly vaporize into steam, pushing those layers upward before the dough even has a chance to set. Follow these temperature and mixing rules, and you’ll have golden brown perfection every time.
Serving Suggestions for Your Buttery Biscuit Recipe
The work is done, the air smells incredible, and your oven has just produced the most beautiful, golden-brown rounds of comfort food imaginable. Now what? Well, you can’t just stare at them! These buttery treats are incredibly versatile, but they truly shine when paired with the right companions. Don’t let these gorgeous buttermilk biscuits sit around plain for too long!
Of course, the absolute classic pairing is a big bowl of rich sausage gravy. There is just nothing better than splitting one of these layers open and spooning hot, creamy gravy right into the middle. It’s pure Southern magic, and I’ve got some tips on making amazing gravy over at my post about homemade gravy pairings. You definitely need to check that out when you have a minute!
But hey, biscuits aren’t just for dinner or breakfast gravy! If you’re eating them later in the day, try slicing them warm and slathering them with:
- Good quality strawberry jam—the kind with big chunks of fruit in it.
- A thick layer of local honey, maybe even mixed with a little softened butter to make a quick honey-butter spread.
- Simple apple butter when the weather starts getting crisp.
- A smear of cream cheese and chives if you want something savory but quick.
Honestly, they are so flavorful and tender all on their own that you don’t need much ornamentation, but when you do decide to dress them up, go for bold flavors that can stand up to that buttery richness. Serving them hot off the pan is the best way to enjoy the fruits of your labor!
Storage and Reheating Instructions for Tender Buttermilk Biscuits
I always hope they disappear the second they come out of the oven, but let’s be real—sometimes we have leftovers! Don’t let day-old biscuits get hard and sad. These buttermilk biscuits are best eaten the day they are made, but if you need to save them, you have to store them correctly. If you plan on eating them the next day, leave them right there on the counter in an airtight container. Don’t put them in the fridge! Cold air is the enemy of soft texture and will dry them out fast.
If you made a huge batch and need them specifically for later in the week, you can freeze them. Let them cool completely first, then wrap each biscuit tightly in plastic wrap, and then place that bundle into a heavy-duty freezer bag. They should be great for about two months this way.
Reheating Your Leftover Buttermilk Biscuits
Now for the best part: bringing them back to life! The microwave is fast, but it honestly steams the outside and makes them a little chewy—we don’t want that for our tender treats. The oven is your absolute best friend for reheating.
Set your oven to about 350°F (175°C). If they were already baked, you only need about 5 to 8 minutes. If they were fully frozen, they might take 15 minutes, but test them gently after 10. This gentle heat warms the inside without sacrificing that beautiful crust you worked so hard on.
If you just have one or two and you’re in a hurry, you can use an air fryer if you have one! Set it to 325°F for about 3 minutes. That hot, circulating air crisps up the outside just perfectly. Either way, make sure they are piping hot before you slice them open for butter or gravy!
Frequently Asked Questions About Buttermilk Biscuits
I get so many questions after people try making these! Baking is fun, but it can be frustrating when things don’t turn out perfectly right away. Honestly, once you know the ‘why’ behind the ‘how,’ everything clicks. Here are a few things readers ask me most often about getting perfect buttermilk biscuits.
Why are my biscuits tough instead of tender?
This is almost always caused by overworking the dough. Remember how I stressed stopping when the mixture was still shaggy? If you knead it like you would bread dough, or if you mix it in the bowl too long after the buttermilk goes in, you develop too much gluten. Gluten is great for chewy bread, but terrible for soft, tender cakes and biscuits! Keep your hands light, handle that dough as little as possible, and you’ll get that buttery melt-in-your-mouth texture every time.
Can I make these if I don’t have buttermilk?
Yes, you absolutely can! I covered the simple substitution above, but it’s such a common question, I want to repeat it clearly here. If you need to make these homemade buttermilk biscuits without the real stuff, just measure out 3/4 cup of regular whole milk and stir in one teaspoon of white vinegar or fresh lemon juice. Let it sit on the counter for five minutes. It will look slightly curdled—that’s exactly what you want! The acidity is key for the reaction with the baking powder.
What if my biscuits won’t rise and they end up flat?
Flat biscuits mean one of three things went wrong—and usually it’s the temperature! First, check your baking powder. If it’s old, it won’t create gas bubbles needed for lift. Second, was your butter warm? If the butter melts before it hits the oven, you lose the steam needed for layering. Third, did you twist the cutter? Twisting seals the sides, preventing them from rising vertically. Make sure your oven is fully preheated and everything is icy cold for maximum rise!
How long can I freeze biscuit dough?
You can definitely freeze the dough segments if you want quick morning biscuits later! After you cut out your rounds and before you place them on the baking sheet, put the individual biscuits on a plate or small tray and pop them in the freezer until solid. Once frozen solid, transfer them to an airtight freezer bag or container. They should keep beautifully for up to three months. When you want to bake them, just put them straight from the freezer onto the sheet pan and add about 5 to 8 extra minutes to the baking time. That’s a great trick for having quick breakfast bread recipes ready anytime!
Troubleshooting Common Buttermilk Biscuits Issues
When you’re aiming for tall and flaky biscuits, sometimes the process feels like a tightrope walk. Don’t let setbacks ruin your day! Understanding these issues helps you nail the next batch.
Why do my biscuits stick to the pan even when I use flour?
If you’re struggling with sticking, especially on a newer pan, the issue might be that the butter you used to grease the pan melted too quickly, or you didn’t use enough flour to coat the pan evenly. The best way to prevent sticking in my experience is using parchment paper, as I mentioned in the main steps. A second trick, especially if you are using a metal cutter, is to lightly dip the very edge of the cutter into extra flour right before you cut each biscuit. This tiny extra dusting prevents the bottom edge from sticking to the pan during the bake.
My tops are golden, but the centers taste raw. What gives?
This is a classic sign that your oven temperature is actually higher than what the dial says, or you didn’t let the oven preheat long enough. If the outside cooks too fast, the middle doesn’t have time to catch up. For these buttermilk biscuits, preheat for at least 20 minutes—don’t trust the little ding! Also, make sure you are placing your pan on the middle rack. If the rack is too low, the bottom cooks too fast, and if it’s too high, the tops burn before the inside sets.
Don’t get discouraged if your first batch isn’t picture-perfect. My first few batches looked like flat tires, I swear! Just remember: keep it cold, don’t twist the cutter, and handle the dough gently. Happy baking!
Estimated Nutritional Information for Buttermilk Biscuits
Now, I know for some of you, the nutrition facts matter, and I totally get it! We love that these are comfort food, but we also like to know what we’re dealing with. Keep in mind that since this is a from-scratch recipe, these numbers are just a wonderful estimate based on the ingredients list I provided earlier. If you use a different brand of flour or a different type of butter, things might shift just a little bit.
This information breaks down the macros for one single biscuit, assuming you got the recipe yield of 8 perfect rounds. They pack a little punch, but wow, are they worth it when you are savoring that buttery, flaky goodness!
- Serving Size: 1 biscuit
- Calories: 280
- Fat: 15g
- Saturated Fat: 9g (That’s the butter doing its thing!)
- Carbohydrates: 32g
- Protein: 5g
- Sugar: 2g
- Sodium: 450mg
They aren’t exactly a diet food, but they are pure happiness! If you want to cut back slightly on the sodium, you can always use just a pinch less salt in the dry mix, but honestly, I wouldn’t mess with the flavor too much. Enjoy them warm with your coffee!
Print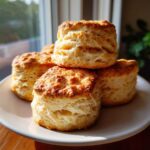
Ultra Flaky and Tender Southern Buttermilk Biscuits
- Total Time: 30 min
- Yield: 8 biscuits
- Diet: Vegetarian
Description
Make tall, flaky, and tender buttermilk biscuits from scratch using simple techniques for a classic Southern breakfast bread.
Ingredients
- 2 cups all-purpose flour
- 1 tablespoon baking powder
- 1 teaspoon salt
- 1 teaspoon sugar
- 1/2 cup (1 stick) cold unsalted butter, cut into small cubes
- 3/4 cup cold buttermilk
Instructions
- Preheat your oven to 425°F (220°C). Line a baking sheet with parchment paper or lightly grease it.
- In a large bowl, whisk together the flour, baking powder, salt, and sugar.
- Add the cold butter cubes to the flour mixture. Use a pastry blender or your fingertips to cut the butter into the flour until the mixture resembles coarse crumbs with some pea-sized pieces of butter remaining.
- Pour in the cold buttermilk all at once. Use a fork to mix until just combined. Do not overmix; the dough will look shaggy.
- Turn the dough out onto a lightly floured surface. Gently knead the dough 4 to 5 times until it just comes together.
- Pat or roll the dough out to about 3/4-inch thickness.
- Use a biscuit cutter (about 2.5 inches) to cut out the biscuits. Press the cutter straight down without twisting to keep the layers separate. Rework the scraps once gently.
- Place the cut biscuits close together on the prepared baking sheet for softer sides, or further apart for crispier sides.
- Bake for 12 to 15 minutes, or until the tops are golden brown.
- Remove from the oven and brush the tops immediately with melted butter, if desired. Serve warm.
Notes
- Keep all ingredients, especially the butter and buttermilk, very cold for the flakiest results.
- Do not twist the biscuit cutter; press straight down to maintain the layers you create.
- For extra height, fold the dough over itself a couple of times before cutting.
- Prep Time: 15 min
- Cook Time: 15 min
- Category: Breakfast
- Method: Baking
- Cuisine: American
Nutrition
- Serving Size: 1 biscuit
- Calories: 280
- Sugar: 2
- Sodium: 450
- Fat: 15
- Saturated Fat: 9
- Unsaturated Fat: 6
- Trans Fat: 0
- Carbohydrates: 32
- Fiber: 1
- Protein: 5
- Cholesterol: 35

Comments are closed.