

I swear, planning a party—especially a baby shower or gender reveal—is half stress and half pure joy! You want everything to look perfect, right? You want those gorgeous photos for the memory book, but you also need food that isn’t completely heavy or boring. Trust me, I’ve been there, staring at endless Pinterest boards.
Forget those sad, haphazard fruit bowls. We are aiming higher! My absolute favorite way to anchor a party table is with something that screams effort but takes surprisingly little time: the stunning, flower-themed fruit display. We’re talking about creating the perfect Baby Bloom Fruit Platter that doubles as edible art. It instantly elevates the whole room, and honestly, it’s one of the easiest showstoppers you’ll ever prepare. Let’s make your table bloom!
Why This Baby Bloom Fruit Platter is Your Celebration Essential
When you’re hosting a big event like a shower or a gender reveal, you need showstoppers that don’t take all day. This beautiful arrangement fills that need perfectly! It brings softness and elegance to the table without needing complicated baking skills. It’s truly a winner, which is why I use it for every springtime celebration now.
- It’s incredibly healthy, giving guests a light alternative to heavy appetizers.
- The floral arrangement *makes* the table; it’s instant decor!
- Prep is fast—you just need a few good cutters, and you’re ready to go.
Perfect for Pastel Themes and Photo Opportunities
This particular arrangement is designed to mimic soft, blossoming flowers. We stick to pale greens, soft pinks, yellows, and creamy whites with the melon and pineapple. It fits absolutely perfectly with those gentle pastel schemes everyone loves for baby events. You won’t need a filter on your phone, trust me; the natural colors pop beautifully under any light for those crucial keepsake photos!
Gathering Supplies for Your Baby Bloom Fruit Platter
Okay, before you even touch a piece of fruit, you need the right tools. Don’t try to force shapes with just a regular knife, or you’ll get frustrated fast! Pulling off these **Baby Bloom Fruit Platter** designs is all about having a few specific gadgets ready. They make the preparation feel less like work and more like playing with dough.
Essential Tools for a Themed Fruit Arrangement
You’ll want a large, round serving platter—about 14 inches is great because it gives you room to build outwards like a flower garden. Then, grab your small cookie cutters. Seriously, the flower-shaped ones are key for that blooming effect. Also, make sure you have a melon baller and a sharp paring knife handy for those **Creative fruit shaping techniques**.
Selecting the Best Fruits for Your Baby Bloom Fruit Platter
The star of the show here are the colors! To truly achieve that soft, airy look perfect for a **Baby Bloom Fruit Platter**, you need fruits that hold their shape well once cut, since we’re trying to mimic petals gently opening up. I stuck to a specific list when planning this one, leaning heavily on melons and bright berries for contrast.
The preparation is simple, provided the fruit is perfectly ripe. Too soft, and your melon flowers will collapse. Too firm, and your cutters won’t work!
Fruit Choices for a Pastel Fruit Platter for Baby
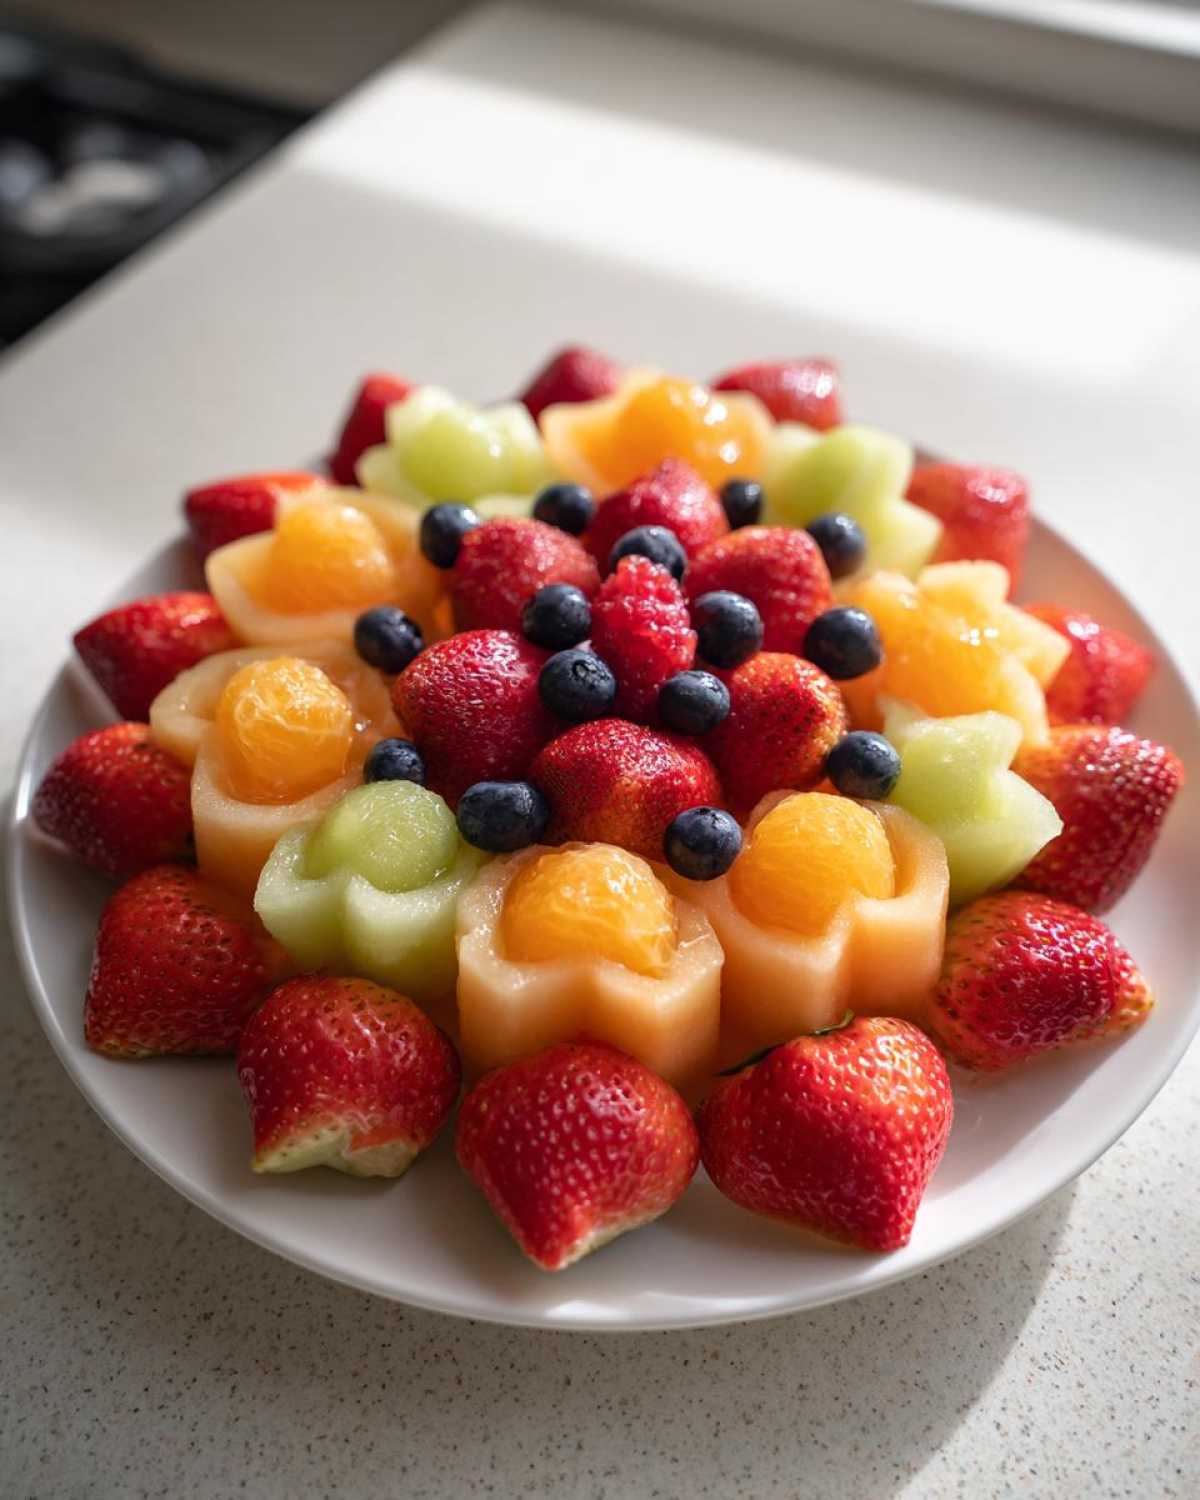
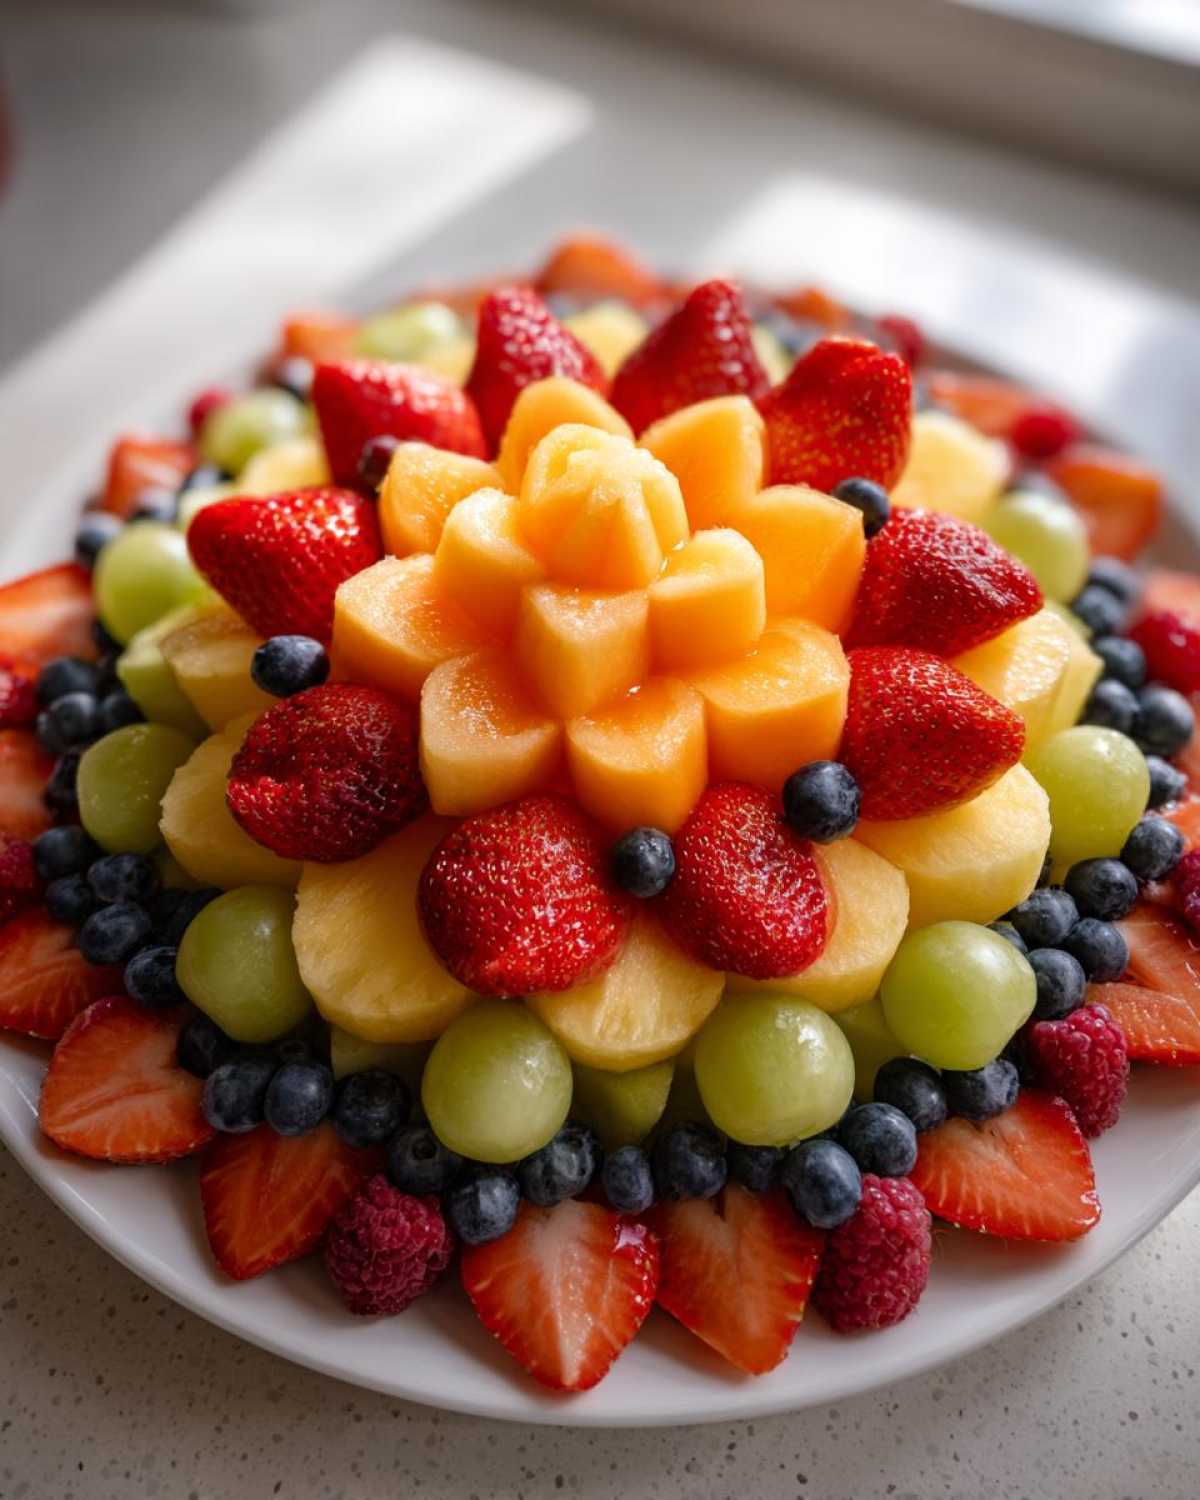
For the big, gorgeous ‘blooms,’ we rely on the melons. You’ll need creamy cantaloupe and smooth honeydew. The trick is using a small melon baller or, even better, a tiny flower-shaped cookie cutter on both of these. They form the main structure of your display.
Pineapple is my structural hero! It’s firm enough to handle cutting into clean flower shapes that act like the base layer of the blooms. Then we bring in the softer colors: bright, halved strawberries look like rich pink petals, and blueberries and raspberries act as the deep, moody centers or little speckled accents scattered around the edges. You want a good mix so it’s not boring!
Optional Dip and Edible Flower Fruit Display Notes
While this display is amazing all on its own, a little dip in the middle makes it feel extra special and adds a creamy texture contrast. I usually offer a bowl of plain Greek yogurt mixed with just a tiny bit of vanilla extract, or a quick cream cheese dip. If you’re going for ultra-fancy, this is where you bring in those **Edible flower fruit display** touches.
Use a few violas or pansies sparingly. You just tuck them gently onto the melon pieces. They look absolutely stunning, but they are strictly for looks, so make sure everyone knows not to eat them unless you’re positive they are food-safe!
Step-by-Step Guide to Building the Baby Bloom Fruit Platter
Okay, now for the fun part—putting it all together! You’ve got your beautiful, shaped fruit ready to go. Remember, layering is your best friend here. We are building this **Baby Bloom Fruit Platter** from the center outward, making sure every piece supports the flowers we’re creating. Don’t rush this; take your time arranging it like you’re placing jewels on velvet!
Preparation: Washing and Creative Fruit Shaping Techniques
Before you start laying things down, all your washing and shaping needs to be totally done. Strawberries are halved, grapes are cut in half—this just makes them look tidier on the final board. For the melons and pineapple, make sure those flower shapes are crisp. If you’re looking for other fun techniques for sweet treats, check out this guide on making fruit pizza sugar cookies for inspiration on presentation!
Assembling Your Blooming Fruit Centerpiece
First things first: if you’re using that little dip bowl, place it right in the dead center of your serving board now. That’s our anchor! Next, take those beautifully shaped pineapple flowers and arrange them close to the dip bowl. These are the strongest base flowers for your **Blooming fruit centerpiece**.
Now, build outward! Place your cantaloupe and honeydew pieces around the pineapple. You want them slightly overlapping, forming concentric rings that look like flowers just beginning to open. Then, use the halved strawberries to fill in the gaps between those melon rings, making sure the bright red sides face up. Finish by scattering the blueberries and raspberries into any empty spaces. They fill out the picture and give the eye somewhere dark to rest. Don’t overcrowd it, but don’t leave huge blank patches either!
Tips for Success: Perfecting Your Baby Bloom Fruit Platter
Listen, even the prettiest food can fall flat if you don’t manage your timeline right. A stunning **Baby Bloom Fruit Platter** deserves to look its absolute best when people arrive. My biggest piece of advice? Don’t try to do every single cut two hours early. Melons start to weep moisture if they sit too long, and we certainly don’t want that.
If you have to prep ahead, cut your melons and pineapple the night before, tuck them into separate airtight containers, and keep them chilled. That way, the morning of the party, you’re just assembling and scattering the berries, which takes practically no time at all. This keeps the platter looking fresh and vibrant for hours.
Themed Variations for Gender Reveals or Birthdays
This arrangement is so versatile, which I love! If you’re planning a gender reveal, forget randomness—you need drama! You can totally divide your platter in half. Use only the pink and red fruits—strawberries, raspberries—on one side, and load up the blueberries and maybe even use lime slices for a vibrant green on the other side. It makes for a fantastic reveal moment when you cut the first slice!
If you’re making a **Baby’s first birthday fruit platter**, you might skip the savory dip and instead bring in a little sweetness. Also, for tiny hands, make sure all your cuts are extra soft and small. Instead of big flower shapes, go for tiny melon balls, or use the smallest star cutter you have. Toddlers love things they can easily pick up and pop!
Serving Suggestions for Your Celebration Fruit Grazing Table
Even the most gorgeous fruit platter needs some friends nearby on the table, right? While the **Baby Bloom Fruit Platter** is definitely the star, you don’t want guests filling up on just fruit! If you’re setting up a larger **Celebration fruit grazing table**, you need a few savory things to balance out all that natural sugar.
Think about adding some crunch and salt. Small bowls of candied nuts—maybe pecans or walnuts—look beautiful scattered around the board’s edges. I also love having a sharp, white cheese, like cubed Gruyère or sharp white cheddar, next to the platter. The creamy richness is a perfect counterpoint to that sweet melon.
If you need something slightly more substantial that still feels light and appropriate for a shower, consider these **Easy baby shower appetizers**: little cucumber tea sandwiches with dill cream cheese, or maybe some petite ham and cheese croissants. But if you still want something creamy and sweet adjacent, you absolutely must serve this platter with a fantastic dip. If the one listed in the main recipe isn’t enough, check out this amazing recipe for a creamy fruit dip that everyone always asks me for!
Storage and Keeping the Baby Bloom Fruit Platter Fresh
Look, if you’re anything like me, you probably panic about leftovers the second you put the centerpiece out! You want this **Baby Bloom Fruit Platter** to look amazing when people arrive, but you also want to know it will taste great the next day when the host gets to snack on the leftovers.
The key thing to remember is that the melons and pineapple are the stars, but they also break down the fastest. If you have leftovers, you absolutely need to separate them immediately. Resist the urge to store the whole thing in one big, soggy container!
First, gently scrape off any fruit that was touching the dip bowl—that part is usually done for the night. Take the pineapple flower shapes and any remaining melon balls and put them into a container with a paper towel underneath. The paper towel soaks up that extra moisture so they don’t get slimy.
Berries are a bit more forgiving, but always store them unwashed if you didn’t use them all. If you cut anything else after display, always store it tightly wrapped! This effort is worth it because even day-two fruit tastes better when it’s not sitting in a puddle of its own juices. Planning ahead keeps your **Baby Bloom Fruit Platter** tasting fresh!
Frequently Asked Questions About Themed Fruit Displays
I know you’re probably running around trying to put the finishing touches on everything else, so I wanted to pull together the quick answers to the questions I always get asked when I bring a **themed fruit arrangement** like this one to a party. These are the little things that make the difference between a good platter and a great one!
What fruits pair well with the bloom theme?
Oh, the bloom theme is all about soft textures and colors! You want things that look delicate. Beyond the melons we used, think about thinly sliced kiwi—those bright green rings look exactly like the center of a giant flower. Sweet star fruit is another amazing choice; when you slice it, it’s a natural five-pointed star, which feels very intentional and pretty. Stick mainly to fruits with lighter colors; deep purple plums or dark red cherries can sometimes overwhelm that soft, airy look we’re going for.
Can I make this fruit platter the day before a baby shower?
This is a major hosting question! Yes and no, honey. You can absolutely do all the hard shaping work the day before. Cut those cantaloupe flowers and pineapple shapes, put them in sealed containers in the fridge, and they’ll be fine. But please, do not assemble the entire **pretty fruit presentation** the day before.
Melons get weepy, and the berries start to bleed color almost instantly once they touch. For the best result, assemble everything onto your board about two hours before guests arrive. That gives you time for any last-minute arranging and keeps that fresh, vibrant look you worked so hard for.
How do I keep the melon shapes from drying out?
This happened to me once when I was distracted talking to a guest! The edges of the cut melon started looking sort of dull and dry. Since this is a **colorful fruit arrangement inspiration**, we need it looking moist! The simplest trick, honestly, is a very, very light spritz of lemon or lime juice right after cutting, or just before arranging. You can’t taste it at all, but the acidity helps lock in that moisture and keeps those beautiful edges looking sharp for the party.
Sharing Your Beautiful Baby Bloom Fruit Platter Creations
Whew! You did it! You’ve transformed simple fruit into an elegant, edible centerpiece worthy of any celebration. Now that your **Baby Bloom Fruit Platter** is finished and looking absolutely perfect, I really want to hear all about it!
Seriously, don’t be shy! Tell me how the shower went or what the reaction was at the gender reveal when you set this beauty down on the table. Did anyone try to eat one of the edible flowers? Did you stick with strawberries and grapes, or did you invent a totally new combination?
Leave a comment down below! I love seeing your creations and hearing your stories. If you snap a picture of your finished **Baby Bloom Fruit Platter**—and you totally should, because they look amazing—tag me on social media! Seeing your beautiful work is what keeps me excited about sharing these recipes. Happy hosting, everyone!
Print
Elegant Baby Bloom Fruit Platter: A Centerpiece for Showers and Celebrations
- Total Time: 25 min
- Yield: 8 servings
- Diet: Vegetarian
Description
Create a beautiful, flower-themed fruit platter perfect for baby showers, gender reveals, or first birthdays using soft colors and simple shaping techniques.
Ingredients
- 1 cup strawberries, halved
- 1 cup green grapes, halved
- 1 cup cantaloupe, cut into small balls or flower shapes
- 1 cup honeydew melon, cut into small balls or flower shapes
- 1 cup pineapple, cut into flower shapes
- 1 cup blueberries
- 1/2 cup raspberries
- 1/4 cup edible flowers (optional, for garnish)
- 1 small bowl of plain Greek yogurt or cream cheese dip (optional)
Instructions
- Wash and prepare all fruit. Halve the strawberries and grapes. Use a small melon baller or flower-shaped cookie cutter for the cantaloupe and honeydew. Cut pineapple into flower shapes using a small cutter.
- Select a large, round platter or board for your base.
- Start by placing the dip bowl (if using) in the center of the platter.
- Arrange the largest fruits first, such as the pineapple flowers, around the dip bowl to form the base of your ‘blooms’.
- Create rings or clusters using the cantaloupe and honeydew shapes, positioning them to look like opening flowers.
- Fill in the spaces between the larger shapes with the halved strawberries, positioning the cut side down to show the red color.
- Use the green grapes to create borders or add green accents between the ‘blooms’.
- Scatter the blueberries and raspberries in small clusters throughout the platter to add dark color contrast and fill gaps.
- If you are using edible flowers, gently place a few small blossoms on top of the melon or pineapple shapes for an extra floral touch.
- Serve immediately or cover lightly and chill until ready to present.
Notes
- For a gender reveal, use only pink/red fruits (strawberries, raspberries) for one side and blue/purple fruits (blueberries, grapes) for the other side.
- If you do not have cookie cutters, simply slice the melons thinly and use a small paring knife to cut simple petal shapes.
- To keep the platter fresh longer, cut melons just before assembly and keep them chilled.
- Prep Time: 25 min
- Cook Time: 0 min
- Category: Appetizer
- Method: Arrangement
- Cuisine: American
Nutrition
- Serving Size: 1/8 platter
- Calories: 95
- Sugar: 18g
- Sodium: 5mg
- Fat: 0g
- Saturated Fat: 0g
- Unsaturated Fat: 0g
- Trans Fat: 0g
- Carbohydrates: 24g
- Fiber: 3g
- Protein: 1g
- Cholesterol: 0mg

Comments are closed.